Medication-info.com Search Menu

Ozempic Injection (Semaglutide): Uses, Side Effects and Dosage

Updated:
Facts
Status:
Prescription (Rx) Boxed warning
Strength:
1.34 mg/mL, 2.68 mg/mL, 0.68 mg/mL, 0.25 mg/0.5 mL, 0.5 mg/0.5 mL, 1 mg/0.5 mL
Other brand names:
Active ingredient:

Patient information: uses, side effects, how to take - Ozempic Injection

What is the most important information I should know about OZEMPIC?

OZEMPIC may cause serious side effects, including:

  • Possible thyroid tumors, including cancer. Tell your healthcare provider if you get a lump or swelling in your neck, hoarseness, trouble swallowing, or shortness of breath. These may be symptoms of thyroid cancer. In studies with rodents, OZEMPIC and medicines that work like OZEMPIC caused thyroid tumors, including thyroid cancer. It is not known if OZEMPIC will cause thyroid tumors or a type of thyroid cancer called medullary thyroid carcinoma (MTC) in people.
  • Do not use OZEMPIC if you or any of your family have ever had a type of thyroid cancer called medullary thyroid carcinoma (MTC), or if you have an endocrine system condition called Multiple Endocrine Neoplasia syndrome type 2 (MEN 2).

What is OZEMPIC?

OZEMPIC is an injectable prescription medicine used:

  • along with diet and exercise to improve blood sugar (glucose) in adults with type 2 diabetes mellitus.
  • to reduce the risk of major cardiovascular events such as heart attack, stroke or death in adults with type 2 diabetes mellitus with known heart disease.
  • to reduce the risk of kidney disease worsening, kidney failure (end-stage kidney disease), and death due to cardiovascular disease in adults with type 2 diabetes mellitus and chronic kidney disease.

It is not known if OZEMPIC is safe and effective for use in children.

Do not use OZEMPIC if:

  • you or any of your family have ever had a type of thyroid cancer called medullary thyroid carcinoma (MTC) or if you have an endocrine system condition called Multiple Endocrine Neoplasia syndrome type 2 (MEN 2).
  • you have had a serious allergic reaction to semaglutide or any of the ingredients in OZEMPIC. See the end of this Medication Guide for a complete list of ingredients in OZEMPIC. See “What are the possible side effects of OZEMPIC?” for symptoms of a serious allergic reaction.

Before using OZEMPIC, tell your healthcare provider if you have any other medical conditions, including if you:

  • have or have had problems with your pancreas.
  • have a history of diabetic retinopathy.
  • have severe problems with your stomach, such as slowed emptying of your stomach (gastroparesis) or problems with digesting food.
  • are scheduled to have surgery or other procedures that use anesthesia or deep sleepiness (deep sedation).
  • are pregnant or plan to become pregnant. It is not known if OZEMPIC will harm your unborn baby. You should stop using OZEMPIC at least 2 months before you plan to become pregnant. Talk to your healthcare provider about the best way to control your blood sugar if you plan to become pregnant or while you are pregnant.

  • are breastfeeding or plan to breastfeed. It is not known if OZEMPIC passes into your breast milk. You should talk with your healthcare provider about the best way to feed your baby while using OZEMPIC.
  • Tell your healthcare provider about all the medicines you take, including prescription and over-the-counter medicines, vitamins, and herbal supplements. OZEMPIC may affect the way some medicines work and some medicines may affect the way OZEMPIC works.

  • Before using OZEMPIC, talk to your healthcare provider about low blood sugar and how to manage it. Tell your healthcare provider if you are taking other medicines to treat diabetes, including insulin or sulfonylureas.

Know the medicines you take. Keep a list of them to show your healthcare provider and pharmacist when you get a new medicine.

How should I use OZEMPIC?

  • Read the Instructions for Use that comes with OZEMPIC.
  • Use OZEMPIC exactly as your healthcare provider tells you to.
  • Your healthcare provider should show you how to use OZEMPIC before you use it for the first time.
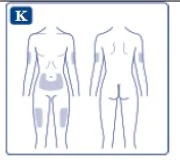
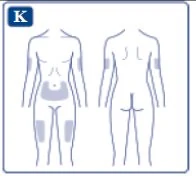
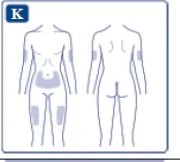
  • OZEMPIC is injected under the skin (subcutaneously) of your stomach (abdomen), thigh, or upper arm. Do not inject OZEMPIC into a muscle (intramuscularly) or vein (intravenously).
  • Use OZEMPIC 1 time each week, on the same day each week, at any time of the day.
  • You may change the day of the week you use OZEMPIC as long as your last dose was given 2 or more days before.
  • If you miss a dose of OZEMPIC, take the missed dose as soon as possible within 5 days after the missed dose. If more than 5 days have passed, skip the missed dose and take your next dose on the regularly scheduled day.
  • OZEMPIC may be taken with or without food.

  • Do not mix insulin and OZEMPIC together in the same injection.
  • You may give an injection of OZEMPIC and insulin in the same body area (such as your stomach area), but not right next to each other.
  • Change (rotate) your injection site with each injection. Do not use the same site for each injection.
  • Do not share your OZEMPIC pen with other people, even if the needle has been changed. You may give other people a serious infection, or get a serious infection from them.
  • If you take too much OZEMPIC, call your healthcare provider or Poison Help line at 1-800-222-1222 or go to the nearest hospital emergency room right away.

What are the possible side effects of OZEMPIC?

OZEMPIC may cause serious side effects, including:

  • See “What is the most important information I should know about OZEMPIC?”
  • inflammation of your pancreas (pancreatitis). Stop using OZEMPIC and call your healthcare provider right away if you have severe pain in your stomach area (abdomen) that will not go away, with or without vomiting. You may feel the pain from your abdomen to your back.
  • changes in vision. Tell your healthcare provider if you have changes in vision during treatment with OZEMPIC.
  • low blood sugar (hypoglycemia). Your risk for getting low blood sugar may be higher if you use OZEMPIC with another medicine that can cause low blood sugar, such as a sulfonylurea or insulin. Signs and symptoms of low blood sugar may include:
  • dizziness or light-headedness
  • blurred vision
  • anxiety, irritability, or mood changes
  • sweating
  • slurred speech
  • hunger
  • confusion or drowsiness
  • shakiness
  • weakness
  • headache
  • fast heartbeat
  • feeling jittery
  • Dehydration leading to kidney problems. Diarrhea, nausea, and vomiting may cause a loss of fluids (dehydration) which may cause kidney problems. It is important for you to drink fluids to help reduce your chance of dehydration. Tell your healthcare provider right away if you have nausea, vomiting, or diarrhea that does not go away.
  • Severe stomach problems. Stomach problems, sometimes severe, have been reported in people who use OZEMPIC. Tell your healthcare provider if you have stomach problems that are severe or will not go away.
  • serious allergic reactions. Stop using OZEMPIC and get medical help right away, if you have any symptoms of a serious allergic reaction including:

    • swelling of your face, lips, tongue or throat
    • problems breathing or swallowing
    • severe rash or itching
    • fainting or feeling dizzy
    • very rapid heartbeat
  • gallbladder problems. Gallbladder problems have happened in some people who take OZEMPIC. Tell your healthcare provider right away if you get symptoms of gallbladder problems which may include:
  • pain in your upper stomach (abdomen)
  • yellowing of skin or eyes (jaundice)
  • fever
  • clay-colored stools
  • food or liquid getting into the lungs during surgery or other procedures that use anesthesia or deep sleepiness (deep sedation). OZEMPIC may increase the chance of food getting into your lungs during surgery or other procedures. Tell all your healthcare providers that you are taking OZEMPIC before you are scheduled to have surgery or other procedures.

The most common side effects of OZEMPIC may include nausea, vomiting, diarrhea, stomach (abdominal) pain, and constipation.

Talk to your healthcare provider about any side effect that bothers you or does not go away. These are not all the possible side effects of OZEMPIC.

Call your doctor for medical advice about side effects. You may report side effects to FDA at 1‑800‑FDA‑1088.

General information about the safe and effective use of OZEMPIC.

Medicines are sometimes prescribed for purposes other than those listed in a Medication Guide. Do not use OZEMPIC for a condition for which it was not prescribed. Do not give OZEMPIC to other people, even if they have the same symptoms that you have. It may harm them.

You can ask your pharmacist or healthcare provider for information about OZEMPIC that is written for health professionals.

What are the ingredients in OZEMPIC?

Active Ingredient: semaglutide

Inactive Ingredients: disodium phosphate dihydrate, propylene glycol, phenol and water for injection. Hydrochloric acid or sodium hydroxide may be added to adjust pH.

Manufactured by: Novo Nordisk A/S, DK-2880 Bagsvaerd, Denmark

OZEMPIC® is a registered trademark of Novo Nordisk A/S.

PATENT Information: http://novonordisk-us.com/products/product-patents.html

© 2025 Novo Nordisk

For more information, go to OZEMPIC.com or call 1-888-693-6742.

  1. This Medication Guide has been approved by the U.S. Food and Drug Administration. Revised: 01/2025

Instructions for Use - 0.25 mg or 0.5 mg doses, 2 mg/3 mL pen

INSTRUCTIONS FOR USE

OZEMPIC® [oh-ZEM-pick]

(semaglutide)

injection, for subcutaneous use

0.25 mg or 0.5 mg doses

(pen delivers doses in 0.25 mg or 0.5 mg increments only)

  • Read these instructions carefully before using your OZEMPIC® pen.
  • Do not use your pen without proper training from your healthcare provider. Make sure that you know how to give yourself an injection with the pen before you start your treatment.
  • Do not share your OZEMPIC pen with other people, even if the needle has been changed. You may give other people a serious infection, or get a serious infection from them.
  • If you are blind or have poor eyesight and cannot read the dose counter on the pen, do not use this pen without help. Get help from a person with good eyesight who is trained to use the OZEMPIC pen.
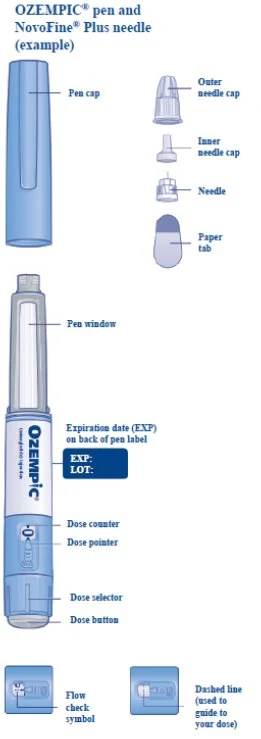
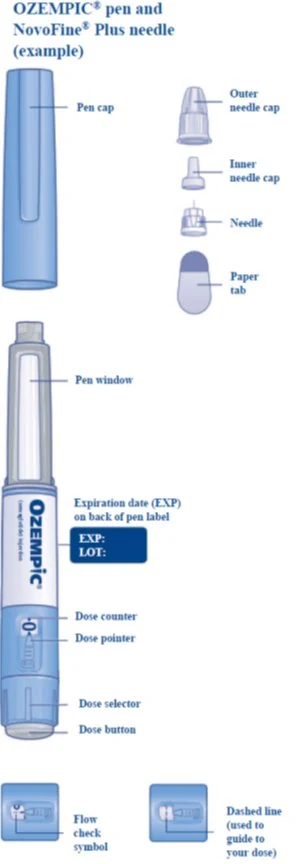
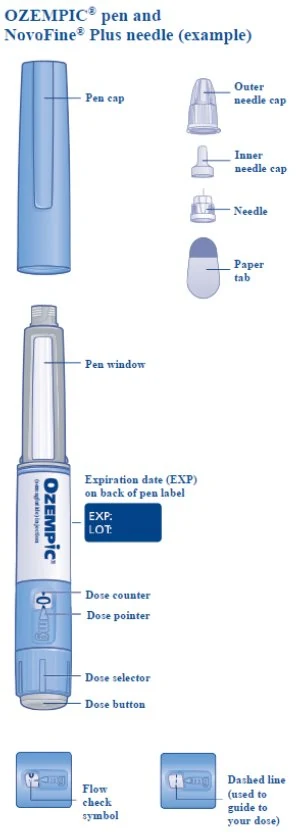
  • Start by checking your pen to make sure that it contains OZEMPIC, then look at the pictures below to get to know the different parts of your pen and needle.
  • Your pen is a prefilled, single-patient-use, dial-a-dose pen. It contains 2 mg of semaglutide, and you can select doses of 0.25 mg or 0.5 mg. Each prefilled pen contains 4 doses of 0.25 mg and 2 doses of 0.5 mg or contains 4 doses of 0.5 mg.
  • NovoFine® Plus 32G 4 mm disposable needles are included with your OZEMPIC pen.
  • Always use a new needle for each injection.
  • If you need additional needles, NovoFine® Plus, NovoFine® or other compatible disposable needles with a length up to 8 mm can be used. For needle compatibility information, talk to your healthcare professional.

Supplies you will need to give your OZEMPIC injection:

  • OZEMPIC pen
  • a new NovoFine Plus, NovoFine, or other compatible needle
  • 1 alcohol swab
  • 1 gauze pad or cotton ball
  • 1 sharps disposal container for throwing away used OZEMPIC pens and needles. See “Disposing of used OZEMPIC pens and needles” at the end of these instructions.

Step 1.

Prepare your pen with a new needle

  • Wash your hands with soap and water.
  • Check the name and colored label of your pen, to make sure that it contains OZEMPIC.
  • This is especially important if you take more than 1 type of medicine.
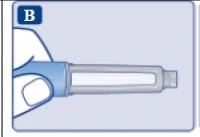
  • Pull off the pen cap.
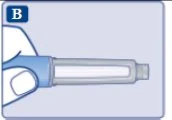
  • Check that the OZEMPIC medicine in your pen is clear and colorless.
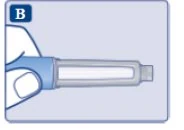
  • Look through the pen window. If OZEMPIC looks cloudy or contains particles, do not use the pen.
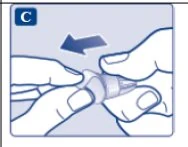
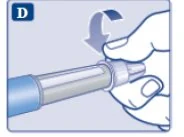
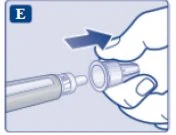
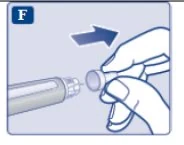
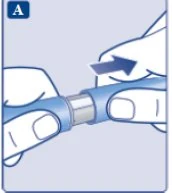
  • Take a new needle, and tear off the paper tab. Do not attach a new needle to your pen until you are ready to give your injection.
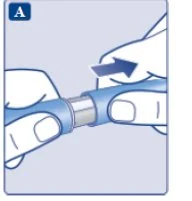
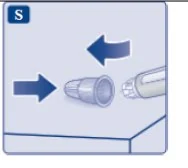
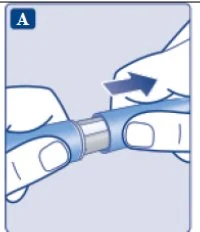
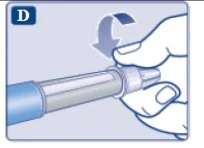
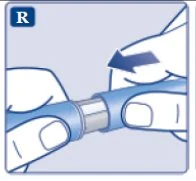
  • Push the needle straight onto the pen. Turn until it is on tight.
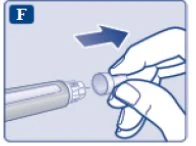
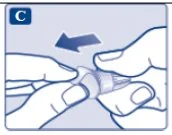
  • The needle is covered by 2 caps. You must remove both caps. If you forget to remove both caps, you will not inject any medicine.
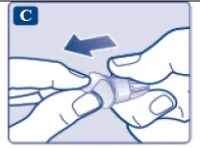
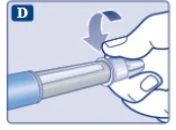
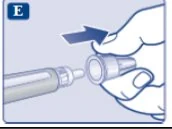
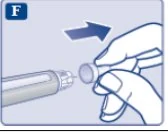
  • Pull off the outer needle cap. Do not throw it away.
  • Pull off the inner needle cap and throw it away.
  • A drop of OZEMPIC may appear at the needle tip. This is normal, but you must still check the OZEMPIC flow if you use a new pen for the first time.

Always use a new needle for each injection. This will reduce the risk of contamination, infection, leakage of OZEMPIC, and blocked needles leading to the wrong dose.

Do not reuse or share your needles with other people. You may give other people a serious infection, or get a serious infection from them.

Never use a bent or damaged needle.

Step 2.

First Time Use for Each New Pen: Check the OZEMPIC flow

  • Check the OZEMPIC flow before the first injection with each new pen only.
  • If your OZEMPIC pen is already in use, go to Step 3 “Select your dose”.
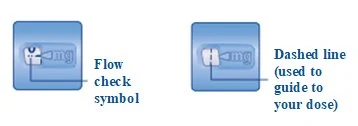
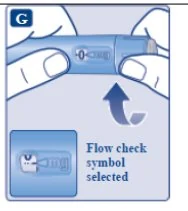
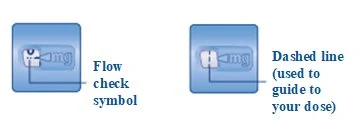
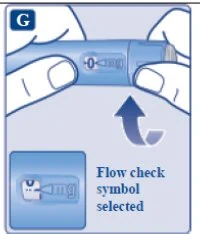
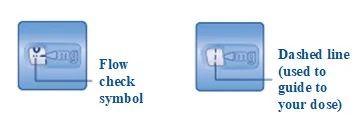
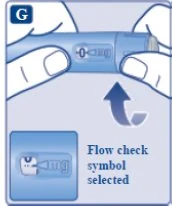
  • Turn the dose selector until the dose counter shows the flow check symbol ( ).
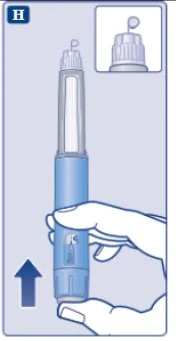
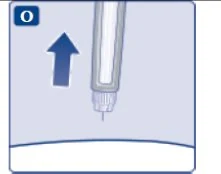
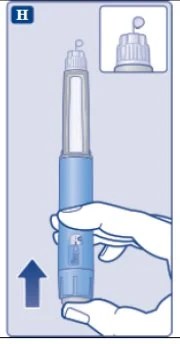
  • Hold the pen with the needle pointing up.
  • Press and hold in the dose button until the dose counter shows 0. The 0 must line up with the dose pointer.
  • A drop of OZEMPIC will appear at the needle tip.
  • If no drop appears, repeat Step 2 above as shown in Figure G and Figure H up to 6 times. If there is still no drop, change the needle and repeat Step 2 as shown in Figure G and Figure H 1 more time.
  • Do not use the pen if a drop of OZEMPIC still does not appear.
  • Contact Novo Nordisk at 1-888-693-6742.

Always make sure that a drop appears at the needle tip before you use a new pen for the first time. This makes sure that OZEMPIC flows.

If no drop appears, you will not inject any OZEMPIC, even though the dose counter may move. This may mean that there is a blocked or damaged needle.

A small drop may remain at the needle tip, but it will not be injected.

Only check the OZEMPIC flow before your first injection with each new pen.

Step 3.

Select your dose

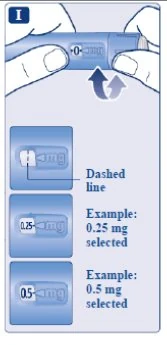
  • Turn the dose selector until the dose counter stops and shows your dose (0.25 mg or 0.5 mg).
  • The dashed line in the dose counter will guide
  • you to your dose.
  • Make sure you know the dose of OZEMPIC you should use. If you select the wrong dose, you can turn the dose selector forward or backwards to the correct dose.

Always use the dose counter and the dose pointer to see how many mg you select.

You will hear a “click” every time you turn the dose selector. Do not set the dose by counting the number of clicks you hear.

Only doses of 0.25 mg or 0.5 mg can be selected with the dose selector. The selected dose must line up exactly with the dose pointer to make sure that you get a correct dose.

The dose selector changes the dose. Only the dose counter and dose pointer will show how many mg you select for each dose.

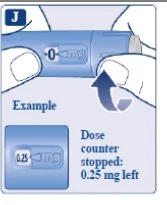
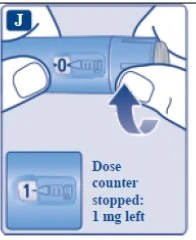
You can select 0.25 mg or 0.5 mg for each dose. When your pen contains less than 0.5 or 0.25 mg, the dose counter stops before 0.5 mg or 0.25 mg is shown.

The dose selector clicks differently when turned forward or backward. Do not count the pen clicks.

How much OZEMPIC is left?
  • To see how much OZEMPIC is left in your pen, use the dose counter:
  • Turn the dose selector until the dose counter stops.
  • If it shows 0.5, at least 0.5 mg is left in your pen. If the dose counter stops before 0.5 mg, there is not enough OZEMPIC left for a full dose of 0.5 mg.
  • If it shows 0.25, at least 0.25 mg is left in your pen. If the dose counter stops before 0.25 mg, there is not enough OZEMPIC left for a full dose of 0.25 mg.
  • If there is not enough OZEMPIC left in your pen for a full dose, do not use it. Use a new OZEMPIC pen.

Step 4.

Inject your dose

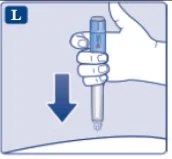
  • Choose your injection site and wipe the skin with an alcohol swab. Let the injection site dry before you inject your dose (See Figure K).
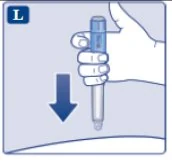
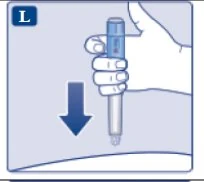
  • Insert the needle into your skin as your healthcare provider has shown you.
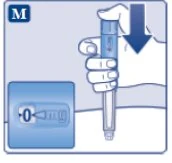
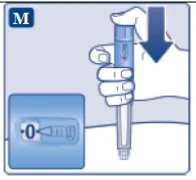
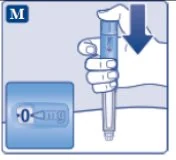
  • Make sure you can see the dose counter. Do not cover it with your fingers. This could stop the injection.
  • Press and hold down the dose button until the dose counter shows 0.
  • The 0 must line up with the dose pointer. You may then hear or feel a click.
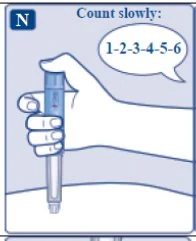
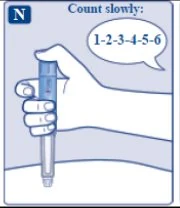
  • Continue pressing the dose button while keeping the needle in your skin.
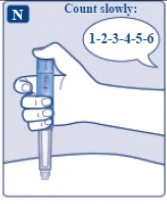
  • Count 6 seconds while keeping the dose button pressed.
  • If the needle is removed earlier, you may see a stream of OZEMPIC coming from the needle tip. If this happens, the full dose will not be delivered.
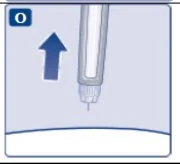
  • Remove the needle from your skin. You can then release the dose button.
  • If blood appears at the injection site, press lightly with a gauze pad or cotton ball. Do not rub the area.

Always watch the dose counter to make sure you have injected your complete dose. Hold the dose button down until the dose counter shows 0.

How to identify a blocked or damaged needle?

  • If 0 does not appear in the dose counter after continuously pressing the dose button, you may have used a blocked or damaged needle.
  • If this happens you have not received any OZEMPIC even though the dose counter has moved from the original dose that you have set.

How to handle a blocked needle?

Change the needle as described in Step 5, and repeat all steps starting with Step 1: “Prepare your pen with a new needle”.

Never touch the dose counter when you inject. This can stop the injection.

You may see a drop of OZEMPIC at the needle tip after injecting. This is normal and does not affect your dose.

Step 5.

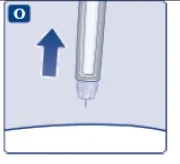
After your injection

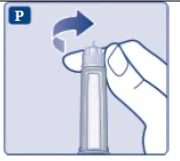
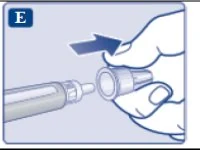
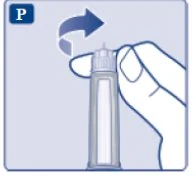
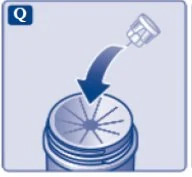
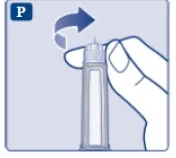
  • Carefully remove the needle from the pen. Do not put the needle caps back on the needle to avoid needle sticks.
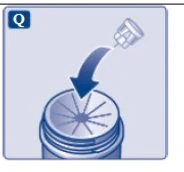
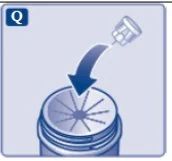
  • Place the needle in a sharps disposal container right away to reduce the risk of needle sticks. See “Disposing of used OZEMPIC pens and needles” below for more information about how to dispose of used pens and needles the right way.
  • Put the pen cap on your pen after each use to protect OZEMPIC from light.
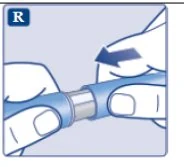
  • If you do not have a sharps disposal container, follow a 1-handed needle recapping method. Carefully slip the needle into the outer needle cap. Dispose of the needle in a sharps disposal container as soon as possible.

Never try to put the inner needle cap back on the needle. You may stick yourself with the needle.

Always remove the needle from your pen.

This will reduce the risk of contamination, infection, leakage of OZEMPIC, and blocked needles leading to the wrong dose. If the needle is blocked, you will not inject any OZEMPIC.

Always dispose of the needle after each injection.

Disposing of used OZEMPIC pens and needles:

  • Put your used OZEMPIC pen and needle in a FDA-cleared sharps disposal container right away after use.
  • If you do not have a FDA-cleared sharps disposal container, you may use a household container that is:

    • made of a heavy-duty plastic
    • can be closed with a tight-fitting, puncture-resistant lid, without sharps being able to come out
    • upright and stable during use
    • leak-resistant
    • properly labeled to warn of hazardous waste inside the container
  • When your sharps disposal container is almost full, you will need to follow your community guidelines for the right way to dispose of your sharps disposal container. There may be state or local laws about how you should throw away used needles and syringes. For more information about the safe sharps disposal, and for specific information about sharps disposal in the state that you live in, go to the FDA’s website at: http://www.fda.gov/safesharpsdisposal
  • Do not dispose of your used sharps disposal container in your household trash unless your community guidelines permit this. Do not recycle your used sharps disposal container.
  • Safely dispose of OZEMPIC that is out of date or no longer needed.
Important
  • Caregivers must be very careful when handling used needles to prevent accidental needle stick injuries and prevent passing (transmission) of infection.
  • Never use a syringe to withdraw OZEMPIC from your pen.
  • Always carry an extra pen and new needles with you, in case of loss or damage.
  • Always keep your pen and needles out of reach of others, especially children.
  • Always keep your pen with you. Do not leave it in a car or other place where it can get too hot or too cold.
Caring for your pen
  • Do not drop your pen or knock it against hard surfaces. If you drop it or suspect a problem, attach a new needle and check the OZEMPIC flow before you inject.
  • Do not try to repair your pen or pull it apart.
  • Do not expose your pen to dust, dirt or liquid.
  • Do not wash, soak, or lubricate your pen. If necessary, clean it with mild detergent on a moistened cloth.

How should I store my OZEMPIC pen?

  • Store your new, unused OZEMPIC pens in the refrigerator between 36°F to 46°F (2°C to 8°C).
  • Store your pen in use for 56 days at room temperature between 59ºF to 86ºF (15ºC to 30ºC) or in a refrigerator between 36°F to 46°F (2°C to 8°C).
  • The OZEMPIC pen you are using should be disposed of (thrown away) after 56 days, even if it still has OZEMPIC left in it. Write the disposal date on your calendar.
  • Do not freeze OZEMPIC. Do not use OZEMPIC if it has been frozen.
  • Unused OZEMPIC pens may be used until the expiration date (“EXP”) printed on the label, if kept in the refrigerator.
  • When stored in the refrigerator, do not store OZEMPIC pens directly next to the cooling element.
  • Keep OZEMPIC away from heat and out of the light.
  • Keep the pen cap on when not in use.
  • Keep OZEMPIC and all medicines out of the reach of children.

For more information go to www.OZEMPIC.com

Marketed by:

Novo Nordisk, Inc.

Plainsboro, NJ

08536

For information about OZEMPIC contact:

Novo Nordisk Inc.

800 Scudders Mill Road

Plainsboro, NJ 08536

1-888-693-6742

OZEMPIC® and NovoFine® are registered trademarks of Novo Nordisk A/S.

Patent Information: https://novonordisk-us.com/products/product-patents.html

© 2026 Novo Nordisk

This Instructions for Use has been approved by the U.S. Food and Drug Administration.

Revised: June/2026

Instructions for Use – 1 mg dose, 3 mL pen

INSTRUCTIONS FOR USE

OZEMPIC® [oh-ZEM-pick]

(semaglutide)

injection, for subcutaneous use

1 mg dose

(pen delivers doses in 1 mg increments only)

  • Read these instructions carefully before using your OZEMPIC® pen.
  • Do not use your pen without proper training from your healthcare provider. Make sure that you know how to give yourself an injection with the pen before you start your treatment.
  • Do not share your OZEMPIC pen with other people, even if the needle has been changed. You may give other people a serious infection, or get a serious infection from them.
  • If you are blind or have poor eyesight and cannot read the dose counter on the pen, do not use this pen without help. Get help from a person with good eyesight who is trained to use the OZEMPIC pen.
  • Start by checking your pen to make sure that it contains OZEMPIC, then look at the pictures below to get to know the different parts of your pen and needle.
  • Your pen is a prefilled, single-patient-use, dial-a-dose pen. It contains 4 mg of semaglutide, and you can only select doses of 1 mg. Each prefilled pen contains 4 doses of 1 mg.
  • NovoFine® Plus 32G 4 mm disposable needles are included with your OZEMPIC pen.
  • Always use a new needle for each injection.
  • If you need additional needles, NovoFine® Plus, NovoFine® or other compatible disposable needles with a length up to 8 mm can be used. For needle compatibility information, talk to your healthcare professional.

Supplies you will need to give your OZEMPIC injection:

  • OZEMPIC pen 1 mg dose
  • a new NovoFine Plus, NovoFine, or other compatible needle
  • 1 alcohol swab
  • 1 gauze pad or cotton ball
  • 1 sharps disposal container for throwing away used OZEMPIC pens and needles.
  • See “Disposing of used OZEMPIC pens and needles” at the end of these instructions.

Step 1.

Prepare your pen with a new needle

  • Wash your hands with soap and water.
  • Check the name and colored label of your pen, to make sure that it contains OZEMPIC.
  • This is especially important if you take more than 1 type of medicine.
  • Pull off the pen cap.
  • Check that the OZEMPIC medicine in your pen is clear and colorless.
  • Look through the pen window. If OZEMPIC looks cloudy or contains particles, do not use the pen.
  • Take a new needle, and tear off the paper tab.
  • Do not attach a new needle to your pen until you are ready to give your injection.
  • Push the needle straight onto the pen. Turn until it is on tight.
  • The needle is covered by 2 caps. You must remove both caps. If you forget to remove both caps, you will not inject any medicine.
  • Pull off the outer needle cap. Do not throw it away.
  • Pull off the inner needle cap and throw it away.
  • A drop of OZEMPIC may appear at the needle tip. This is normal, but you must still check the OZEMPIC flow if you use a new pen for the first time.
  1. Always use a new needle for each injection. This will reduce the risk of contamination, infection, leakage of OZEMPIC, and blocked needles leading to the wrong dose.

Do not reuse or share your needles with other people. You may give other people a serious infection, or get a serious infection from them.

Never use a bent or damaged needle.

Step 2.

First Time Use for Each New Pen: Check the OZEMPIC flow

  • Check the OZEMPIC flow before the first injection with each new pen only.
  • If your OZEMPIC pen is already in use, go to Step 3 “Select your dose”.
  • Turn the dose selector until the dose counter shows the flow check symbol ( ).
  • Hold the pen with the needle pointing up.
  • Press and hold in the dose button until the dose counter shows 0. The 0 must line up with the dose pointer.
  • A drop of OZEMPIC will appear at the needle tip.
  • If no drop appears, repeat Step 2 above as shown in Figure G and Figure H up to 6 times. If there is still no drop, change the needle and repeat Step 2 as shown in Figure G and Figure H 1 more time.
  • Do not use the pen if a drop of OZEMPIC still does not appear.
  • Contact Novo Nordisk at 1-888-693-6742.
  1. Always make sure that a drop appears at the needle tip before you use a new pen for the first time. This makes sure that OZEMPIC flows.

If no drop appears, you will not inject any OZEMPIC, even though the dose counter may move. This may mean that there is a blocked or damaged needle.

A small drop may remain at the needle tip, but it will not be injected.

Only check the OZEMPIC flow before your first injection with each new pen.

Step 3.

Select your dose

  • Turn the dose selector until the dose counter stops and shows your 1 mg dose.
  • The dashed line in the dose counter will guide you to 1 mg.

Always use the dose counter and the dose pointer to see that 1 mg has been selected.

You will hear a “click” every time you turn the dose selector. Do not set the dose by counting the number of clicks you hear.

Only doses of 1 mg can be selected with the dose selector. 1 mg must line up exactly with the dose pointer to make sure that you get a correct dose.

The dose selector changes the dose. Only the dose counter and dose pointer will show that 1 mg has been selected.

You can only select 1 mg for each dose. When your pen contains less than 1 mg, the dose counter stops before 1 mg is shown.

The dose selector clicks differently when turned forward or backward. Do not count the pen clicks.

How much OZEMPIC is left?
  • To see how much OZEMPIC is left in your pen, use the dose counter:
  • Turn the dose selector until the dose counter stops.
  • If it shows 1, at least 1 mg is left in your pen. If the dose counter stops before 1 mg, there is not enough OZEMPIC left for a full dose of 1 mg.
  • If there is not enough OZEMPIC left in your pen for a full dose, do not use it. Use a new OZEMPIC pen.

Step 4.

Inject your dose

  • Choose your injection site and wipe the skin with an alcohol swab. Let the injection site dry before you inject your dose (See Figure K).
  • Insert the needle into your skin as your healthcare provider has shown you.
  • Make sure you can see the dose counter. Do not cover it with your fingers. This could stop the injection.
  • Press and hold down the dose button until the dose counter shows 0.
  • The 0 must line up with the dose pointer. You may then hear or feel a click.
  • Continue pressing the dose button while keeping the needle in your skin.
  • Count 6 seconds while keeping the dose button pressed.
  • If the needle is removed earlier, you may see a stream of OZEMPIC coming from the needle tip. If this happens, the full dose will not be delivered.
  • Remove the needle from your skin. You can then release the dose button.
  • If blood appears at the injection site, press lightly with a gauze pad or cotton ball. Do not rub the area.

Always watch the dose counter to make sure you have injected your complete dose. Hold the dose button down until the dose counter shows 0.

How to identify a blocked or damaged needle?

  • If 0 does not appear in the dose counter after continuously pressing the dose button, you may have used a blocked or damaged needle.
  • If this happens you have not received any OZEMPIC even though the dose counter has moved from the original dose that you have set.

How to handle a blocked needle?

Change the needle as described in Step 5, and repeat all steps starting with Step 1: “Prepare your pen with a new needle”.

Never touch the dose counter when you inject. This can stop the injection.

You may see a drop of OZEMPIC at the needle tip after injecting. This is normal and does not affect your dose.

Step 5.

After your injection

  • Carefully remove the needle from the pen. Do not put the needle caps back on the needle to avoid needle sticks.
  • Place the needle in a sharps disposal container right away to reduce the risk of needle sticks. See “Disposing of used OZEMPIC pens and needles” below for more information about how to dispose of used pens and needles the right way.
  • Put the pen cap on your pen after each use to protect OZEMPIC from light.
  • If you do not have a sharps disposal container, follow a 1-handed needle recapping method. Carefully slip the needle into the outer needle cap. Dispose of the needle in a sharps disposal container as soon as possible.

Never try to put the inner needle cap back on the needle. You may stick yourself with the needle.

Always remove the needle from your pen.

This will reduce the risk of contamination, infection, leakage of OZEMPIC, and blocked needles leading to the wrong dose. If the needle is blocked, you will not inject any OZEMPIC.

Always dispose of the needle after each injection.

Disposing of used OZEMPIC pens and needles:

  • Put your used OZEMPIC pen and needle in a FDA-cleared sharps disposal container right away after use.
  • If you do not have a FDA-cleared sharps disposal container, you may use a household container that is:

    • made of a heavy-duty plastic
    • can be closed with a tight-fitting, puncture-resistant lid, without sharps being able to come out
    • upright and stable during use
    • leak-resistant
    • properly labeled to warn of hazardous waste inside the container
  • When your sharps disposal container is almost full, you will need to follow your community guidelines for the right way to dispose of your sharps disposal container. There may be state or local laws about how you should throw away used needles and syringes. For more information about the safe sharps disposal, and for specific information about sharps disposal in the state that you live in, go to the FDA’s website at: http://www.fda.gov/safesharpsdisposal
  • Do not dispose of your used sharps disposal container in your household trash unless your community guidelines permit this. Do not recycle your used sharps disposal container.
  • Safely dispose of OZEMPIC that is out of date or no longer needed.
Important
  • Caregivers must be very careful when handling used needles to prevent accidental needle stick injuries and prevent passing (transmission) of infection.
  • Never use a syringe to withdraw OZEMPIC from your pen.
  • Always carry an extra pen and new needles with you, in case of loss or damage.
  • Always keep your pen and needles out of reach of others, especially children.
  • Always keep your pen with you. Do not leave it in a car or other place where it can get too hot or too cold.
Caring for your pen
  • Do not drop your pen or knock it against hard surfaces. If you drop it or suspect a problem, attach a new needle and check the OZEMPIC flow before you inject.
  • Do not try to repair your pen or pull it apart.
  • Do not expose your pen to dust, dirt or liquid.
  • Do not wash, soak, or lubricate your pen. If necessary, clean it with mild detergent on a moistened cloth.

How should I store my OZEMPIC pen?

  • Store your new, unused OZEMPIC pens in the refrigerator between 36°F to 46°F (2°C to 8°C).
  • Store your pen in use for 56 days at room temperature between 59ºF to 86ºF (15ºC to 30ºC) or in a refrigerator between 36°F to 46°F (2°C to 8°C).
  • The OZEMPIC pen you are using should be disposed of (thrown away) after 56 days, even if it still has OZEMPIC left in it. Write the disposal date on your calendar.
  • Do not freeze OZEMPIC. Do not use OZEMPIC if it has been frozen.
  • Unused OZEMPIC pens may be used until the expiration date (“EXP”) printed on the label, if kept in the refrigerator.
  • When stored in the refrigerator, do not store OZEMPIC pens directly next to the cooling element.
  • Keep OZEMPIC away from heat and out of the light.
  • Keep the pen cap on when not in use.
  • Keep OZEMPIC and all medicines out of the reach of children.

For more information go to www.OZEMPIC.com

Marketed by:

Novo Nordisk, Inc.

Plainsboro, NJ

08536

For information about OZEMPIC contact:

Novo Nordisk Inc.

800 Scudders Mill Road

Plainsboro, NJ 08536

1-888-693-6742

OZEMPIC® and NovoFine® are registered trademarks of Novo Nordisk A/S.

Patent Information: https://novonordisk-us.com/products/product-patents.html

© 2026 Novo Nordisk

This Instructions for Use has been approved by the U.S. Food and Drug Administration.

Revised: June/2026

Instructions for Use – 2 mg dose, 3 mL pen

INSTRUCTIONS FOR USE

OZEMPIC® [oh-ZEM-pick]

(semaglutide)

injection, for subcutaneous use

2 mg dose

(pen delivers doses in 2 mg increments only)

  • Read these instructions carefully before using your OZEMPIC® pen.
  • Do not use your pen without proper training from your healthcare provider. Make sure that you know how to give yourself an injection with the pen before you start your treatment.
  • Do not share your OZEMPIC pen with other people, even if the needle has been changed. You may give other people a serious infection, or get a serious infection from them.
  • If you are blind or have poor eyesight and cannot read the dose counter on the pen, do not use this pen without help. Get help from a person with good eyesight who is trained to use the OZEMPIC pen.
  • Start by checking your pen to make sure that it contains OZEMPIC, then look at the pictures below to get to know the different parts of your pen and needle.
  • Your pen is a prefilled, single-patient-use, dial-a-dose pen. It contains 8 mg of semaglutide, and you can only select doses of 2 mg. Each prefilled pen contains 4 doses of 2 mg.
  • NovoFine® Plus 32G 4 mm disposable needles are included with your OZEMPIC pen.
  • Always use a new needle for each injection.
  • If you need additional needles, NovoFine® Plus, NovoFine® or other compatible disposable needles with a length up to 8 mm can be used. For needle compatibility information, talk to your healthcare professional.

Supplies you will need to give your OZEMPIC injection:

  • OZEMPIC pen 2 mg dose
  • a new NovoFine Plus, NovoFine, or other compatible needle
  • 1 alcohol swab
  • 1 gauze pad or cotton ball
  • 1 sharps disposal container for throwing away used OZEMPIC pens and needles.
  • See “Disposing of used OZEMPIC pens and needles” at the end of these instructions.

Step 1.

Prepare your pen with a new needle

  • Wash your hands with soap and water.
  • Check the name and colored label of your pen, to make sure that it contains OZEMPIC.
  • This is especially important if you take more than 1 type of medicine.
  • Pull off the pen cap.
  • Check that the OZEMPIC medicine in your pen is clear and colorless.
  • Look through the pen window. If OZEMPIC looks cloudy or contains particles, do not use the pen.
  • Take a new needle, and tear off the paper tab.
  • Do not attach a new needle to your pen until you are ready to give your injection.
  • Push the needle straight onto the pen. Turn until it is on tight.
  • The needle is covered by 2 caps. You must remove both caps. If you forget to remove both caps, you will not inject any medicine.
  • Pull off the outer needle cap. Do not throw it away.
  • Pull off the inner needle cap and throw it away.
  • A drop of OZEMPIC may appear at the needle tip. This is normal, but you must still check the OZEMPIC flow if you use a new pen for the first time.

Always use a new needle for each injection. This will reduce the risk of contamination, infection, leakage of OZEMPIC, and blocked needles leading to the wrong dose.
Do not reuse or share your needles with other people. You may give other people a serious infection, or get a serious infection from them.

Never use a bent or damaged needle.

Step 2.

First Time Use for Each New Pen: Check the OZEMPIC flow

  • Check the OZEMPIC flow before the first injection with each new pen only.
  • If your OZEMPIC pen is already in use, go to Step 3 “Select your dose”.
  • Turn the dose selector until the dose counter shows the flow check symbol ( ).
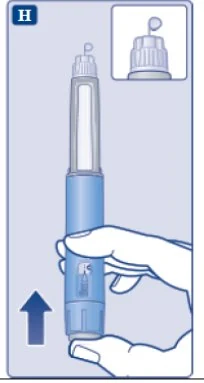
  • Hold the pen with the needle pointing up.
  • Press and hold in the dose button until the dose counter shows 0. The 0 must line up with the dose pointer.
  • A drop of OZEMPIC will appear at the needle tip.
  • If no drop appears, repeat Step 2 above as shown in Figure G and Figure H up to 6 times. If there is still no drop, change the needle and repeat Step 2 as shown in Figure G and Figure H 1 more time.
  • Do not use the pen if a drop of OZEMPIC still does not appear.
  • Contact Novo Nordisk at 1-888-693-6742.

Always make sure that a drop appears at the needle tip before you use a new pen for the first time. This makes sure that OZEMPIC flows.
If no drop appears, you will not inject any OZEMPIC, even though the dose counter may move. This may mean that there is a blocked or damaged needle.

A small drop may remain at the needle tip, but it will not be injected.

Only check the OZEMPIC flow before your first injection with each new pen.

Step 3.

Select your dose

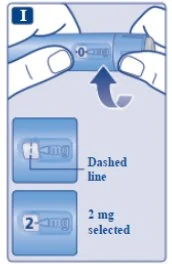
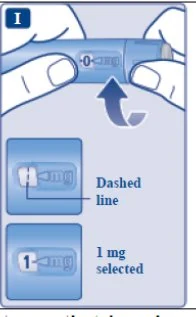
  • Turn the dose selector until the dose counter stops and shows your 2 mg dose.

The dashed line in the dose counter will guide you to 2 mg.

Always use the dose counter and the dose pointer to see that 2 mg has been selected.

You will hear a “click” every time you turn the dose selector. Do not set the dose by counting the number of clicks you hear.

Only doses of 2 mg can be selected with the dose selector. 2 mg must line up exactly with the dose pointer to make sure that you get a correct dose.

The dose selector changes the dose. Only the dose counter and dose pointer will show that 2 mg has been selected.

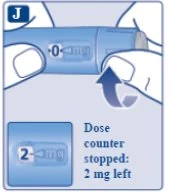
You can only select 2 mg for each dose. When your pen contains less than 2 mg, the dose counter stops before 2 mg is shown.

The dose selector clicks differently when turned forward or backward. Do not count the pen clicks.

How much OZEMPIC is left?
  • To see how much OZEMPIC is left in your pen, use the dose counter:
  • Turn the dose selector until the dose counter stops.
  • If it shows 2, at least 2 mg is left in your pen. If the dose counter stops before 2 mg, there is not enough OZEMPIC left for a full dose of 2 mg.
  • If there is not enough OZEMPIC left in your pen for a full dose, do not use it. Use a new OZEMPIC pen.

Step 4.

Inject your dose

  • Choose your injection site and wipe the skin with an alcohol swab. Let the injection site dry before you inject your dose (See Figure K).
  • Insert the needle into your skin as your healthcare provider has shown you.
  • Make sure you can see the dose counter. Do not cover it with your fingers. This could stop the injection.
  • Press and hold down the dose button until the dose counter shows 0.
  • The 0 must line up with the dose pointer. You may then hear or feel a click.
  • Continue pressing the dose button while keeping the needle in your skin.
  • Count 6 seconds while keeping the dose button pressed.
  • If the needle is removed earlier, you may see a stream of OZEMPIC coming from the needle tip. If this happens, the full dose will not be delivered.
  • Remove the needle from your skin. You can then release the dose button.
  • If blood appears at the injection site, press lightly with a gauze pad or cotton ball. Do not rub the area.

Always watch the dose counter to make sure you have injected your complete dose. Hold the dose button down until the dose counter shows 0.
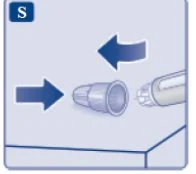
How to identify a blocked or damaged needle?

  • If 0 does not appear in the dose counter after continuously pressing the dose button, you may have used a blocked or damaged needle.
  • If this happens you have not received any OZEMPIC even though the dose counter has moved from the original dose that you have set.

How to handle a blocked needle?

Change the needle as described in Step 5, and repeat all steps starting with Step 1: “Prepare your pen with a new needle”.

Never touch the dose counter when you inject. This can stop the injection.

You may see a drop of OZEMPIC at the needle tip after injecting. This is normal and does not affect your dose.

Step 5.

After your injection

  • Carefully remove the needle from the pen. Do not put the needle caps back on the needle to avoid needle sticks.
  • Place the needle in a sharps disposal container right away to reduce the risk of needle sticks. See “Disposing of used OZEMPIC pens and needles” below for more information about how to dispose of used pens and needles the right way.
  • Put the pen cap on your pen after each use to protect OZEMPIC from light.
  • If you do not have a sharps disposal container, follow a 1-handed needle recapping method. Carefully slip the needle into the outer needle cap. Dispose of the needle in a sharps disposal container as soon as possible.

Never try to put the inner needle cap back on the needle. You may stick yourself with the needle.

Always remove the needle from your pen.

This will reduce the risk of contamination, infection, leakage of OZEMPIC, and blocked needles leading to the wrong dose. If the needle is blocked, you will not inject any OZEMPIC.

Always dispose of the needle after each injection.

Disposing of used OZEMPIC pens and needles:

  • Put your used OZEMPIC pen and needle in a FDA-cleared sharps disposal container right away after use.
  • If you do not have a FDA-cleared sharps disposal container, you may use a household container that is:

    • made of a heavy-duty plastic
    • can be closed with a tight-fitting, puncture-resistant lid, without sharps being able to come out
    • upright and stable during use
    • leak-resistant
    • properly labeled to warn of hazardous waste inside the container
  • When your sharps disposal container is almost full, you will need to follow your community guidelines for the right way to dispose of your sharps disposal container. There may be state or local laws about how you should throw away used needles and syringes. For more information about the safe sharps disposal, and for specific information about sharps disposal in the state that you live in, go to the FDA’s website at: http://www.fda.gov/safesharpsdisposal
  • Do not dispose of your used sharps disposal container in your household trash unless your community guidelines permit this. Do not recycle your used sharps disposal container.
  • Safely dispose of OZEMPIC that is out of date or no longer needed.
Important
  • Caregivers must be very careful when handling used needles to prevent accidental needle stick injuries and prevent passing (transmission) of infection.
  • Never use a syringe to withdraw OZEMPIC from your pen.
  • Always carry an extra pen and new needles with you, in case of loss or damage.
  • Always keep your pen and needles out of reach of others, especially children.
  • Always keep your pen with you. Do not leave it in a car or other place where it can get too hot or too cold.
Caring for your pen
  • Do not drop your pen or knock it against hard surfaces. If you drop it or suspect a problem, attach a new needle and check the OZEMPIC flow before you inject.
  • Do not try to repair your pen or pull it apart.
  • Do not expose your pen to dust, dirt or liquid.
  • Do not wash, soak, or lubricate your pen. If necessary, clean it with mild detergent on a moistened cloth.

How should I store my OZEMPIC pen?

  • Store your new, unused OZEMPIC pens in the refrigerator between 36°F to 46°F (2°C to 8°C).
  • Store your pen in use for 56 days at room temperature between 59ºF to 86ºF (15ºC to 30ºC) or in a refrigerator between 36°F to 46°F (2°C to 8°C).
  • The OZEMPIC pen you are using should be disposed of (thrown away) after 56 days, even if it still has OZEMPIC left in it. Write the disposal date on your calendar.
  • Do not freeze OZEMPIC. Do not use OZEMPIC if it has been frozen.
  • Unused OZEMPIC pens may be used until the expiration date (“EXP”) printed on the label, if kept in the refrigerator.
  • When stored in the refrigerator, do not store OZEMPIC pens directly next to the cooling element.
  • Keep OZEMPIC away from heat and out of the light.
  • Keep the pen cap on when not in use.
  • Keep OZEMPIC and all medicines out of the reach of children.

For more information go to www.OZEMPIC.com

Marketed by:

Novo Nordisk, Inc.

Plainsboro, NJ

08536

For information about OZEMPIC contact:

Novo Nordisk Inc.

800 Scudders Mill Road

Plainsboro, NJ 08536

1-888-693-6742

OZEMPIC® and NovoFine® are registered trademarks of Novo Nordisk A/S.

Patent Information: https://novonordisk-us.com/products/product-patents.html

© 2026 Novo Nordisk

This Instructions for Use has been approved by the U.S. Food and Drug Administration.

Revised: June/2026

Instructions for Use – 0.25 mg, 0.5 mg, 1 mg single-dose prefilled syringe

OZEMPIC® [oh-ZEM-pick]

(semaglutide)

Injection, subcutaneous only

0.25 mg, 0.5 mg, 1 mg

single-dose prefilled syringe

Before using your prefilled syringe always read these instructions carefully.

This leaflet instructs how to perform an injection under the skin (subcutaneous).

The prefilled syringe might be different than any other device you have used previously.

Before you use your prefilled syringe, talk to your healthcare provider about how to inject your prefilled syringe correctly.

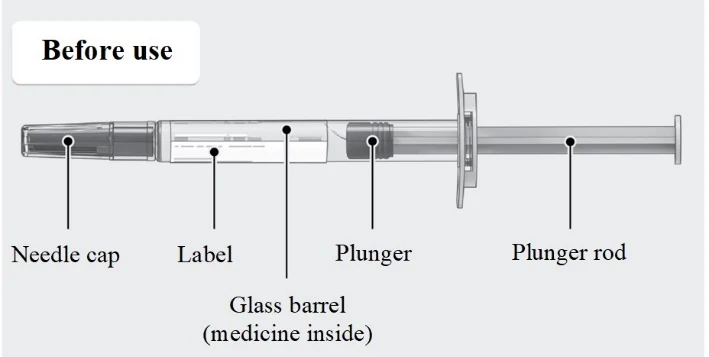
Get to Know Your Prefilled Syringe

You should check the label on the carton and prefilled syringe to ensure it contains the correct medicine. Please make sure you have the correct dose prescribed by your healthcare provider.

Important Information You Need to Know Before Injecting with your Prefilled Syringe

    • Use the prefilled syringe exactly the way your healthcare provider tells you to.
      • The prefilled syringe contains 1 complete dose. It is for one-time use only.
      1. •Do not use the prefilled syringe if the carton is damaged or if the tamper-evident is broken.
      2. •Do not warm the prefilled syringe using any heat sources such as hot water or a microwave.
      3. •Do not use the prefilled syringes if the expiration date on the label or carton has expired.
  1. •Do not use the prefilled syringe if it has been frozen or thawed.

People who are blind or have vision problems should not use the prefilled syringe without help from a person who knows how to use the prefilled syringe.

Gather the Following Materials Before Your Injection

    • 1 OZEMPIC prefilled syringe.
    • Alcohol wipe.
    • Cotton ball or gauze.
    • Sharps disposal container for used prefilled syringes.

Not Included in Your Carton

Frequently Asked Questions

Do I inject the full volume of the prefilled syringe?

Yes, the prefilled syringe is for one-time (single) use and contains one complete dose.

What if the prefilled syringe is damaged?

Do not use a dropped, damaged or broken prefilled syringe. Take a new prefilled syringe for your injection.

What if the needle is broken?

Do not use a needle that appears to be bent, dropped, damaged or broken. Take a new prefilled syringe for your injection.

If you have any questions about OZEMPIC, go to OZEMPIC.com or call Novo Nordisk Inc.at 1-888-OZEMPIC.

Prepare Your Prefilled Syringe
    1. 1. Take One Prefilled Syringe
    • Wash and dry your hands.
    • Open the carton.
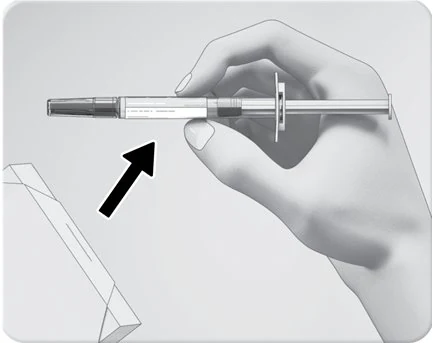
    • Gently take out one prefilled syringe by holding the glass barrel.
    • Check the syringe label. Confirm you have the dose prescribed by your healthcare provider.

Do not hold or touch the prefilled syringe by the plunger rod or needle cap.

Keep the needle cap on, until you are ready to inject.

    1. 2. Inspect your Prefilled Syringe
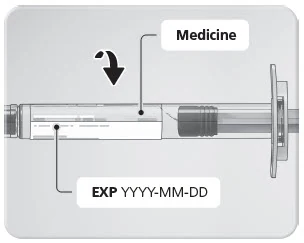
    • Check the expiration date (EXP) on the label has not passed.
  1. •Check that the medicine in the prefilled syringe is clear and colorless. If the medicine looks cloudy or contains particles, do not use the prefilled syringe.

It is normal to see air bubbles, they do not affect your dose. Do not try to remove bubbles.

Do not use the prefilled syringe if it appears to have been used, dropped, damaged or broken.

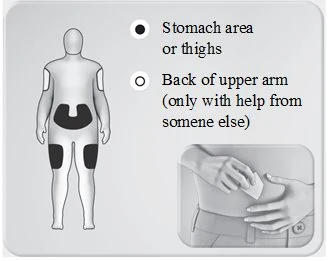
    1. 3. Choose Your Injection Site
  1. •

    Inject into the skin of:

    • Stomach area (abdomen) at least 2 inches from the belly button.
    • Thighs.
  2. o Back of upper arm (only with help from someone else)

Clean the injection site with an alcohol wipe and allow to dry. Your healthcare provider can help you choose the injection site that is best for you.

Avoid using the exact same spot as the last time between injections.

Inject Your Dose
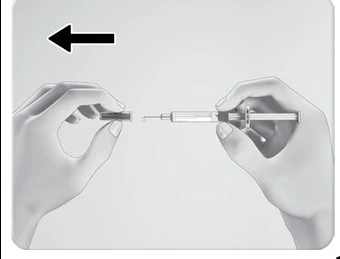
    1. 4. Pull Off the Needle Cap
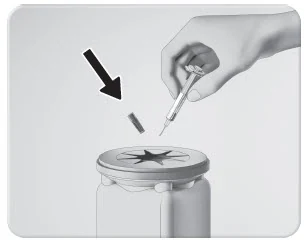
  1. • Pull the needle cap straight off and throw it in a sharps disposal container.

You might see drops of medicine from the needle tip. This is normal and does not affect your dose. Continue with your injection right away.

Do not put the needle cap back on, to avoid

needle stick injuries.

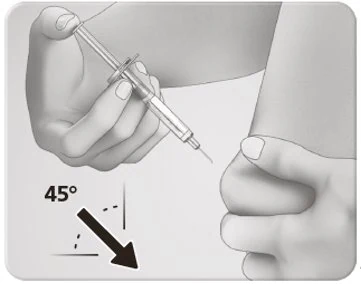
    1. 5. Insert Your Prefilled Syringe
    • Pinch and hold a fold of skin at the injection site between your thumb and fingers. Hold the pinch throughout the injection.
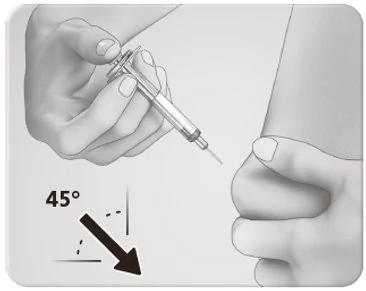
    • Fully insert the needle into the pinched skin at a 45-degree angle.

This is to inject under the skin (subcutaneous) and not the muscle.

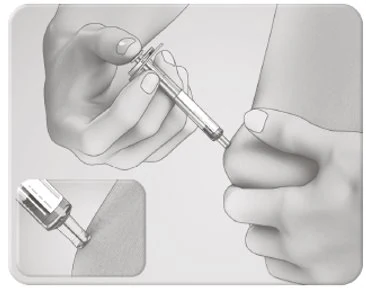
    1. 6. Inject Your Dose
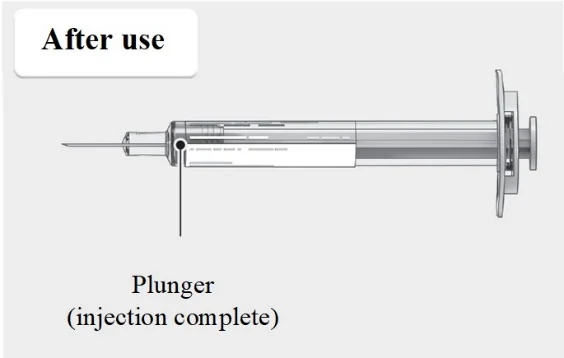
    • Keep a 45-degree angle. With a constant pressure, gently push the plunger rod all the way down, until the plunger stops.

When the plunger is at the bottom and the prefilled syringe is empty, your dose is complete.

    1. 7. Remove Your Syringe
  1. • Pull out the empty syringe at a 45-degree angle. Your injection is complete.

If blood appears at the injection site, lightly press with a cotton ball or gauze over it, without rubbing.

Do not put the needle cap back on the syringe.

After Injection
    1. 8. Dispose of (Throw Away) Your Used Syringe
  1. • Put the used syringe in an FDA-cleared sharp disposal container right away after use.
  2. • If you do not have an FDA-cleared sharps
  3. disposal container, you may use a household container that is:
  4. ⸰ made of a heavy-duty plastic,
  5. ⸰ can be closed with a tight-fitting, puncture-resistant lid, without sharps being able to come out,
  6. ⸰ upright and stable during use,
  7. ⸰ leak-resistant, and,
  8. ⸰ properly labeled to warn of hazardous waste inside the container.
  9. • When your sharps disposal container is almost full, you will need to follow your community guidelines for the right way to dispose of your sharps disposal container. There may be state or local laws about how you should throw away used needles and syringes. For more information about safe sharps disposal, and for specific information about sharps disposal in the state that you live in, go to the FDA’s website at: http://www.fda.gov/safesharpsdisposal
  10. • Do not dispose of your used sharps disposal container in your household trash unless your community guidelines permit this. Do not recycle your used sharps disposal container.

Safely dispose of your syringe that is out of date or no longer needed

Keep your syringe and all medicines out of the reach of children.

How Should I Store My OZEMPIC Prefilled Syringe?

  • Store the unused OZEMPIC prefilled syringes in the refrigerator between 36°F to 46°F (2°C to 8°C).
  • If needed, the prefilled syringes can be stored out of the refrigerator between 46°F to 86°F (8°C to 30°C) for up to 28 days. Record the date your prefilled syringe was removed from the refrigerator and dispose of it, if not used within 28 days.
  • Do not freeze.
  • Always keep the prefilled syringes in the original carton to protect from light.

Keep the prefilled syringe and all medicines out of the reach of children.

Marketed by:

Novo Nordisk Inc.

Plainsboro, NJ 08536

For information about OZEMPIC,

contact:

Novo Nordisk Inc.

800 Scudders Mill Road

Plainsboro, NJ 08536

1-888-OZEMPIC

OZEMPIC® is a registered trademark of Novo Nordisk A/S.

Patent Information:

http://www.novonordisk-us.com/products/product-patents.html

©2026 Novo Nordisk

  1. The Instructions for Use has been approved by the U.S Food and Drug Administration. Approved: 05/2026

About this document

Source: FDA drug labeling via NLM DailyMed · Application number: NDA 209637 · View the label on DailyMed

Revision date stated in the text: June 2026

Found a mistake? Write to us via the contact page.

The information on this site does not replace the advice of a doctor or pharmacist.

Drug information for Ozempic Injection

Rx or OTC
Prescription (Rx)?
  • This drug is available only with a prescription from a licensed healthcare provider.
  • Rx
Boxed warning Yes – this drug has a boxed warning (also called a black box warning), the strongest warning of the FDA.
Drug class GLP-1 Receptor Agonist
Active ingredient Semaglutide
Dosage form Injection, solution
Route Subcutaneous
Marketing status not in the current FDA NDC Directory
Company (applicant) NOVO
FDA approval NDA 209637New Drug Application (NDA) Approved December 5, 2017
Reference listed drug This is the reference listed drug (RLD) that generics are compared with.
Manufacturers 1 labelers list this drug on DailyMed
Packages (NDC)
Package
1.34 mg/mL – 1.5 ml in 1 syringe, plastic / 2 in 1 carton NDC 0169-4136-11
1.34 mg/mL – 1.5 ml in 1 syringe, plastic / 1 in 1 carton NDC 0169-4132-90
1.34 mg/mL – 1.5 ml in 1 syringe, plastic / 1 in 1 carton NDC 0169-4132-11
1.34 mg/mL – 3 ml in 1 syringe, plastic / 1 in 1 carton NDC 0169-4130-01
2.68 mg/mL – 3 ml in 1 syringe, plastic / 1 in 1 carton NDC 0169-4772-11
2.68 mg/mL – 3 ml in 1 syringe, plastic / 1 in 1 carton NDC 0169-4772-90
0.68 mg/mL – 3 ml in 1 syringe, plastic / 1 in 1 carton NDC 0169-4181-03
0.68 mg/mL – 3 ml in 1 syringe, plastic / 1 in 1 carton NDC 0169-4181-90
0.25 mg/0.5 mL – 0.5 ml in 1 syringe, glass / 4 in 1 carton NDC 0169-1302-01
0.25 mg/0.5 mL – 0.5 ml in 1 syringe, glass / 4 in 1 carton NDC 0169-1302-90
0.5 mg/0.5 mL – 0.5 ml in 1 syringe, glass / 4 in 1 carton NDC 0169-1305-01
1 mg/0.5 mL – 0.5 ml in 1 syringe, glass / 4 in 1 carton NDC 0169-1310-01

Source: FDA drug labeling via NLM DailyMed, data as of October 31, 2026. FDA data (DailyMed, Orange Book, Drug Shortages, enforcement reports). Not a substitute for the advice of a doctor or pharmacist.