


Patient information: uses, side effects, how to take - Andembry
What is ANDEMBRY?
ANDEMBRY is a prescription medicine used to prevent attacks of Hereditary Angioedema (HAE) in children 12 years of age and older.
It is not known if ANDEMBRY is safe and effective in children under 12 years of age.
Before you use ANDEMBRY, tell your healthcare provider about all of your medical conditions, including if you:
- are pregnant or planning to become pregnant. It is not known if ANDEMBRY can harm your unborn baby.
are breastfeeding or plan to breastfeed. It is not known if ANDEMBRY passes into your breastmilk. Talk to your healthcare provider about the best way to feed your baby while using ANDEMBRY.
Tell your healthcare provider about all the medicines you take, including prescription medicines, over-the-counter medicines, vitamins and herbal supplements.
How should I use ANDEMBRY?
- See the detailed Instructions for Use that comes with this Patient Information leaflet about the right way to prepare and inject ANDEMBRY.
- Use ANDEMBRY exactly as your healthcare provider tells you to use it.
- ANDEMBRY is given as an injection under your skin (subcutaneous) by you or a caregiver.
- Your healthcare provider should show you or your caregiver how to prepare and inject your dose of ANDEMBRY before you inject yourself for the first time.
- Do not try to inject ANDEMBRY unless you have been trained by your healthcare provider.
What are the possible side effects of ANDEMBRY?
The most common side effects of ANDEMBRY include:
- redness, itchiness, and bruising (injection site reactions)
- stomach (abdominal) pain
- runny or stuffy nose, sneezing, watery eyes (nasopharyngitis)
Tell your healthcare provider if you have any side effect that bothers you or that does not go away. These are not all the possible side effects of ANDEMBRY. For more information, ask your healthcare provider or pharmacist.
Call your doctor for medical advice about side effects. You may report side effects to FDA at 1-800-FDA-1088.
General information about the safe and effective use of ANDEMBRY
Medicines are sometimes prescribed for purposes other than those listed in a Patient Information leaflet. Do not use ANDEMBRY for a condition for which it is not prescribed. Do not give ANDEMBRY to other people, even if they have the same symptoms that you have. It may harm them. You can ask your pharmacist or healthcare provider for information about ANDEMBRY that is written for healthcare professionals.
What are the ingredients in ANDEMBRY?
Active ingredient: garadacimab-gxii
Inactive ingredients: arginine monohydrochloride, histidine, polysorbate 80, proline, water for injection.
Manufactured for:
CSL Behring GmbH
Emil-von-Behring-Strasse 76,
35041 Marburg, Germany
US License No. 1765
Manufactured by:
CSL Behring LLC
King of Prussia, PA 19406
US License No. 1767
Distributed by:
CSL Behring LLC
Kankakee, IL 60901
For Patent information: www.cslbehring.com/products/patents
For more information, visit www.ANDEMBRY.com or call 1-866-915-6158.
INSTRUCTIONS FOR USE
ANDEMBRY (an-DEM-bree)
(garadacimab-gxii)
injection, for subcutaneous use
Prefilled Autoinjector
Important: This autoinjector works differently than other injection devices. Read the Instructions for Use carefully before using it, and each time you get a new autoinjector. There may be new information. This information does not take the place of talking to your healthcare provider about your medical condition or treatment. Children should inject ANDEMBRY under the supervision of an adult. Make sure you have been trained by your healthcare provider before you use this autoinjector for the first time. |
Parts of the Autoinjector (see Figure A):
Continue to the next sections to prepare and perform the injection.
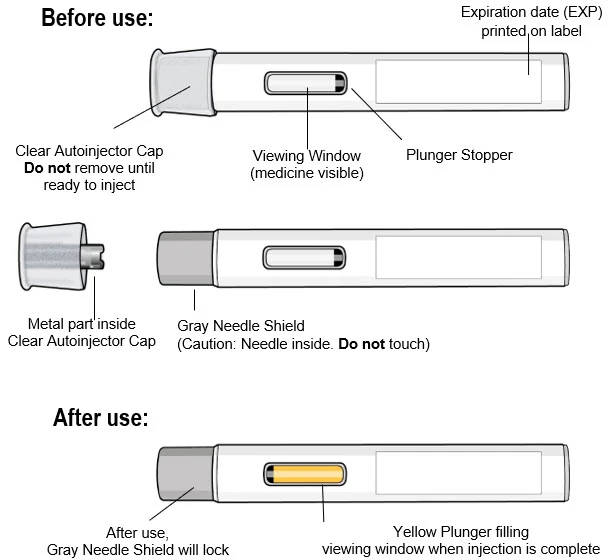 |
| Figure A |
Read the Following Safety Information:
- Keep the autoinjector in its original carton box until use, to protect it from light.
- Do not remove the clear autoinjector cap until you are ready to inject.
- Do not put the clear autoinjector cap back on the autoinjector after it has been removed because this could start the injection and cause injury.
- The autoinjector contains 1 dose and is for one time use only. Do not try to reuse the same autoinjector.
- Do not use the autoinjector if the expiration date has passed.
- The autoinjector is for subcutaneous (under the skin) injection only.
- Do not use the autoinjector if it has dropped, looks damaged, has cracks, or is leaking medicine. Throw away the autoinjector as described in Step 11 and use a new one.
- Do not inject through clothing.
- Do not touch or try to remove the gray needle shield at any time.
- Keep ANDEMBRY and all medicines out of reach of children.
Contact your healthcare provider if you have any questions.
How Should I Store ANDEMBRY?
- Store ANDEMBRY autoinjector in a refrigerator, between 36°F to 46°F (2°C to 8°C) in its original carton box until use, to protect it from light.
- Do not shake
- Do not freeze. If the autoinjector has been frozen, do not use the autoinjector even if it is thawed.
- The refrigerated autoinjector may be used until the expiration date (EXP) printed on the label.
- Take the autoinjector out of the refrigerator 30 minutes before use, allowing it to reach room temperature.
- Do not put the autoinjector back in the refrigerator after it has reached room temperature.
Supplies needed for your Autoinjector Injection (see Figure B):
Included in the carton box:
- 1 Single-dose autoinjector
Required supplies but not included in the carton box:
- 1 Alcohol pad
- 1 Cotton ball or gauze pad
- 1 FDA-cleared sharps container or puncture-resistant container for disposal (see Step 11. Disposing of the Autoinjector )
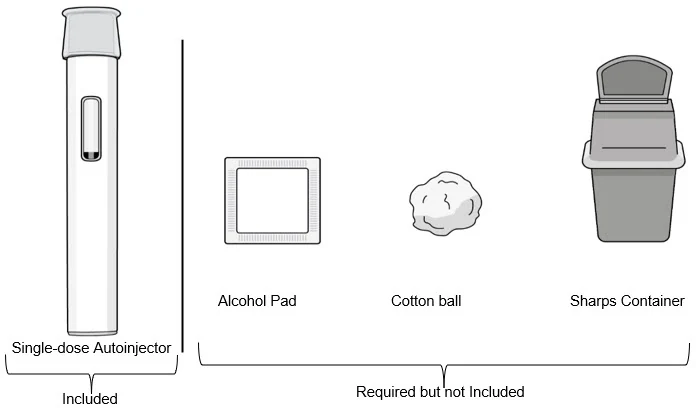 |
| Figure B |
Preparing for an Injection
Do not remove the clear autoinjector cap until immediately before the injection.
Step 1. Let the Autoinjector Reach Room Temperature
- Remove the autoinjector from the carton box and place it laying down on a clean flat surface.
- Wait 30 minutes for the medicine to reach room temperature after taking it out of the refrigerator (see Figure C ).
- Injecting the medicine cold could be uncomfortable.
- Do not try to speed up the warming process in any way. For example, do not warm it in a microwave, in hot water, or leave it in direct sunlight.
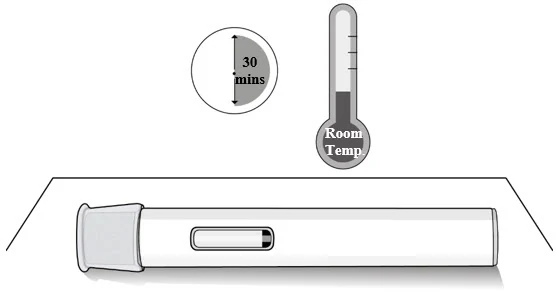 |
| Figure C |
Step 2. Check the Expiration Date
- Check the expiration date on the autoinjector label (see Figure D ).
- Do not use the autoinjector if the expiration date has passed.
- If the expiration date has passed, then safely dispose of the autoinjector and get a new one (see Step 11. Disposing of the Autoinjector ).
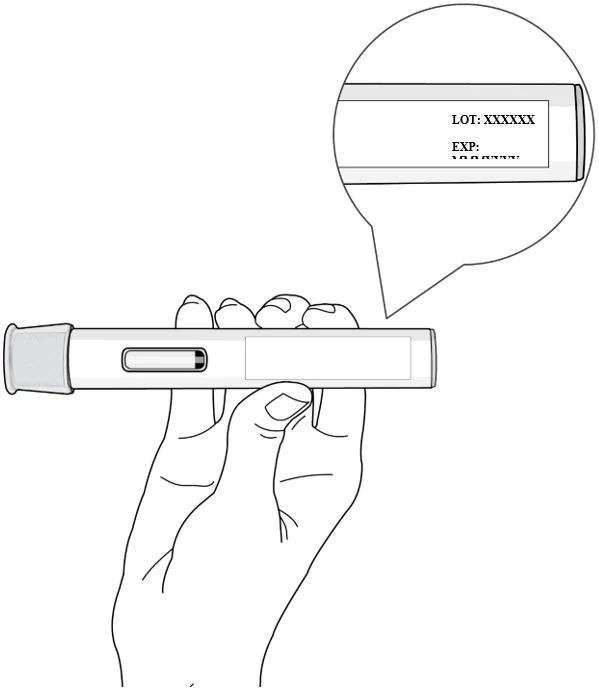 |
| Figure D |
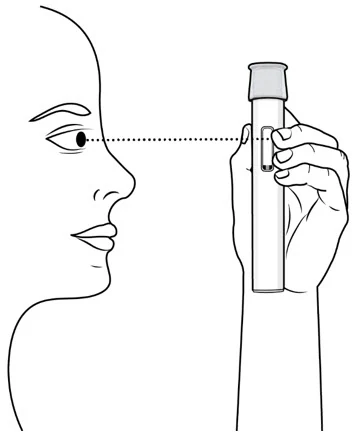
Step 3. Inspect the autoinjector and the medicine
- Check the autoinjector for damage.
- Check the medicine through the viewing window of the autoinjector (see Figure E ).
- It is normal to see air bubbles, do not try to remove the air bubbles.
- The medicine should be brownish-yellow to yellow and may appear slightly opalescent to clear.
Do not use the autoinjector, safely dispose and get a new one (see Step 11. Disposing of the Autoinjector ) if:
- The medicine is discolored or contains particles
- The autoinjector looks damaged or has cracks
- The autoinjector is leaking
- The autoinjector has been dropped on a hard surface, even if it does not look damaged
 |
| Figure E |
Choose and Prepare an Injection Site
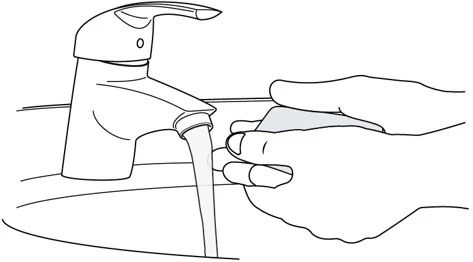
Step 4. Clean your Hands
- Wash your hands well with soap and water or use hand sanitizer (see Figure F ).
 |
| Figure F |
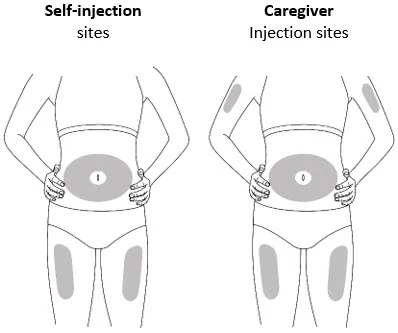
Step 5. Select the Injection Site
- Inject into the thigh or belly (abdomen) area, but stay 1 inch (2 cm) away from the belly button (navel) (see Figure G )
- If somebody else (caregiver) gives you the injection, they can also use the upper arm. Do not try to inject into the upper arm yourself.
- Change (rotate) your injection site with each injection. Do not inject in the same place multiple times if the skin is damaged.
- Do not inject into the belly button, moles, scars or bruises, or into areas where the skin is tender, red, hard, or injured.
 |
| Figure G |
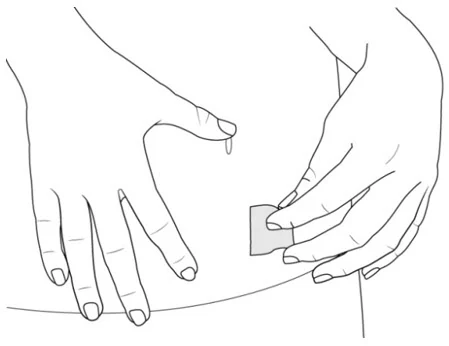
Step 6. Prepare the Injection Site
- Clean the injection site with an alcohol pad (see Figure H ).
- Let your skin dry on its own.
- Do not touch this area again before injecting.
- Do not fan or blow on the skin area that you cleaned.
 |
| Figure H |
Injecting the Medicine with the Autoinjector
Complete the Injection without stopping. Read all steps first before beginning.
Do not remove the Clear Cap until you are ready to inject.
Step 7. Remove Clear Autoinjector Cap and Dispose of the Cap
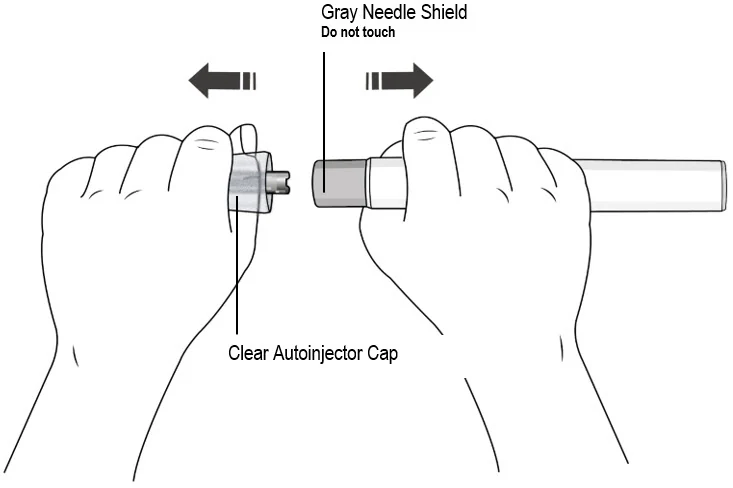
- Hold the autoinjector with one hand and pull the Clear Autoinjector Cap straight off with the other hand.
- Do not twist the Clear Cap, (see Figure I ). If you cannot remove the Clear Cap, ask a caregiver for help or contact your healthcare provider.
- The Clear Cap has a metal part inside, this is normal.
- Do not put the Clear Cap back on after it has been removed, because this could start the injection and cause injury.
- Dispose of the Clear Cap in an FDA-cleared sharps container.
Important:
- Do not touch the gray needle shield of the autoinjector to avoid injury.
- Do not put the autoinjector down after removing the Clear Cap.
 |
| Figure I |
Step 8. Pinch the Skin and place the autoinjector on the injection site
Immediately after removing the clear autoinjector cap, complete the following steps without stopping:
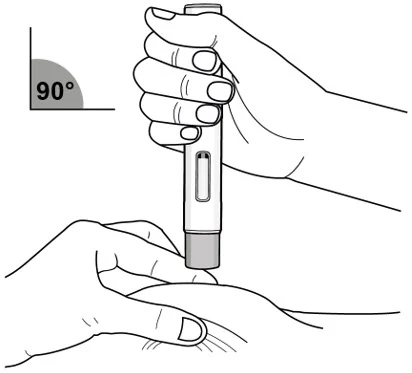
- Gently pinch the area of cleaned skin around the injection site and hold the area firmly until the injection is complete (see Figure J ).
- Place the autoinjector at a 90° angle on the cleaned injection site (see Figure J ).
- Make sure you can see the viewing window.
 |
| Figure J |
| Step 9. Inject Medicine (see Figure K ) | |
 | You Must Read all of Step 9 before injecting. The injection may take up to 15 seconds. To ensure you receive a full dose you must keep the autoinjector firmly pressed against your pinched skin until:
|
| Figure K | ||
| Press the gray needle shield down firmly against the pinched skin to start the injection and keep pressing down until all the steps below are complete. | ||
| Press down to start | Keep Pressing Down | Keep Pressing down for 5 more seconds …1…2…3…4…5 |
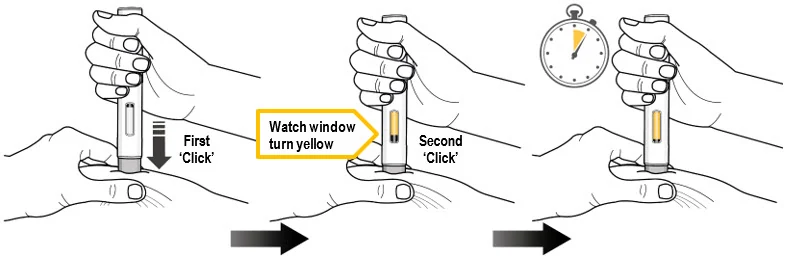 | ||
Press down to start the injection and listen for a First 'Click'.
| Keep pressing the autoinjector down and watch the viewing window.
| Keep pressing the autoinjector down for 5 more seconds to make sure you get the full dose. Make sure the yellow plunger completely fills the window and has stopped moving before you remove the autoinjector. |
| Keep pressing the autoinjector down. | Keep pressing the autoinjector down. | |
- Do not remove the autoinjector until the yellow plunger has stopped moving and completely filled the viewing window, and 5 seconds has passed after the Second "Click."
- Do not remove, tilt, or rotate the autoinjector during the injection.
Step 10. Release the Pinch and Remove the Autoinjector
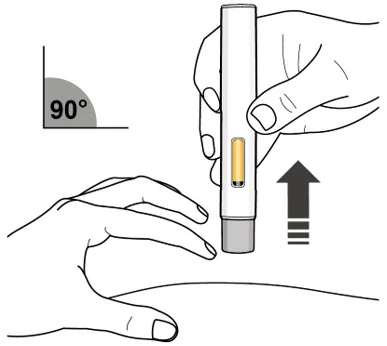
- Release the pinch and remove the autoinjector at a 90° angle from the skin (see Figure L ).
- As the autoinjector is lifted from the skin, the gray needle shield returns to the original (before use) position, and will lock into place, covering the needle.
 |
| Figure L |
Important: If you think that you have not received the full dose, contact your healthcare provider right away.
- If there is a little bleeding at the injection site, you can press a cotton ball or gauze over the injection site.
- Do not rub the injection site.
- If needed, you may cover the injection site with a small adhesive bandage.
Disposal
Step 11. Disposing of the autoinjector
- Do not try to reuse the autoinjector.
- After injecting your dose, put the autoinjector into an FDA-cleared sharps container or closed puncture-resistant container (see Figure M ).
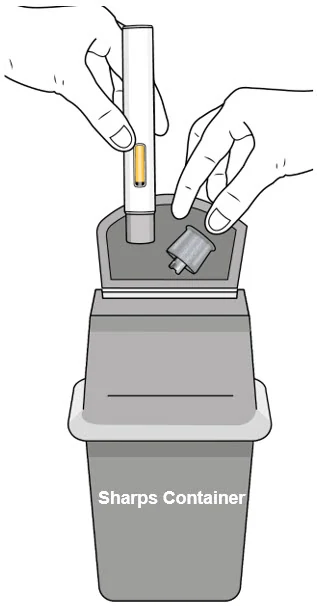 |
| Figure M |
If you do not have an FDA-cleared sharps container, you may use a household container that is:
- Made of heavy-duty plastic
- Can be closed with a tight-fitting, puncture-resistant lid, without sharps being able to come out
- Upright stable during use
- Leak-resistant
- Properly labeled to warn of hazardous waste inside the container
- When your sharps container is almost full, you will need to follow your local guidelines for the right way to dispose of your sharps container. There may be state or local laws about how you should throw away used needles and syringes. For more information, go to the FDA's website at: http://www.fda.gov/safesharpsdisposal.
- Do not dispose of your used sharps container in your household trash unless your local guidelines permit this.
- Do not recycle your used sharps container.
Step 12. Keep Track of Your Treatment
- If required by your healthcare provider, record your injection in a diary to help keep track of your medicine.