Patient information: uses, side effects, how to take - Skytrofa
Important Information 
Important information about your SKYTROFA Auto-Injector:
Do not use the SKYTROFA Auto-Injector for the first time until you receive training from a healthcare provider. Follow this Instructions for Use for the auto-injector to avoid getting an injury, infection, or incorrect dose.
The auto-injector can only be used with SKYTROFA Cartridges and needles that are prescribed by your healthcare provider. Cartridges and needles come together in the same packaging. Follow the instructions that come with SKYTROFA Cartridges. If refrigerated, take the cartridge out of the refrigerator and leave at room temperature for 15 minutes before use.
Do not use your auto-injector with other medicines or needles than provided in the SKYTROFA Cartridge pack.
 | Your weekly dose may require that you use 2 cartridges. |
 | When this warning symbol is seen, safety instructions must be followed. Otherwise, serious safety hazardous situations and injuries may occur. |
 | Do not share your auto-injector with other people, even if the needle has been changed. You may give other people a serious infection or get a serious infection from them. |
 | Keep out of the reach of children. This product contains small parts that may present a choking hazard to small children. The cable can present a strangulation hazard. |
 | Do not use any charger or charging cables other than those included with your auto-injector. Read more on page 65. |
 | Do not use or place the auto-injector closer than 12 inches (30 cm) to microwave ovens or electronic equipment with antennas such as Wi-Fi transceivers. The auto-injector might not work the right way. |
 | When this precaution symbol is seen, safety instructions must be followed. Otherwise, safety hazardous situations and injuries and potential damage to the auto-injector or other property may occur. |
 | Do not reuse needles. |
 | Do not use a cartridge if it has been dropped or you think it may be damaged. |
 | Do not point the auto-injector at yourself or other people, except when you are ready to inject, to avoid needle stick injury. |
 | If your auto-injector turns off automatically, press and release the green button to turn it on again and read page 60 to proceed. |
 | If the auto-injector packaging has been damaged or unintentionally opened before first using it, please call Ascendis Pharma Customer Support. For contact information back cover. |
Before You Begin
The SKYTROFA Auto-Injector
Your healthcare provider will inform you that the SKYTROFA Auto-Injector, which comes in a separate package, is required for injecting the prescribed the SKYTROFA medicine.
The SKYTROFA Auto-Injector is exclusively for use with SKYTROFA Cartridge (medicine).
The SKYTROFA Auto-Injector automates part of the procedure for injecting SKYTROFA medicine.
The SKYTROFA Cartridge
The medicine SKYTROFA comes in a one-time use cartridge "SKYTROFA Cartridge". The cartridge has 2 chambers, 1 filled with powder and 1 filled with water. The auto-injector automatically mixes the powder and the water during mixing steps, making it ready for injection. Each SKYTROFA Cartridge pack contains 4 cartridges packed in individual blisters.
The Needle
The single-use needle comes with SKYTROFA Cartridges and is used for screwing on the cartridge to inject the medicine. Each SKYTROFA Cartridge pack contains 6 needles including 2 spare needles.
Contact your healthcare provider if you need more SKYTROFA consumables.
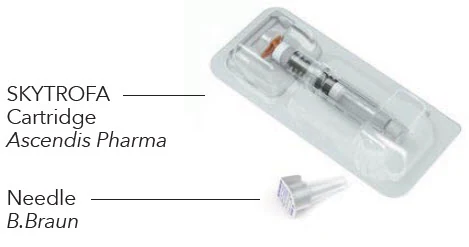
Figure A
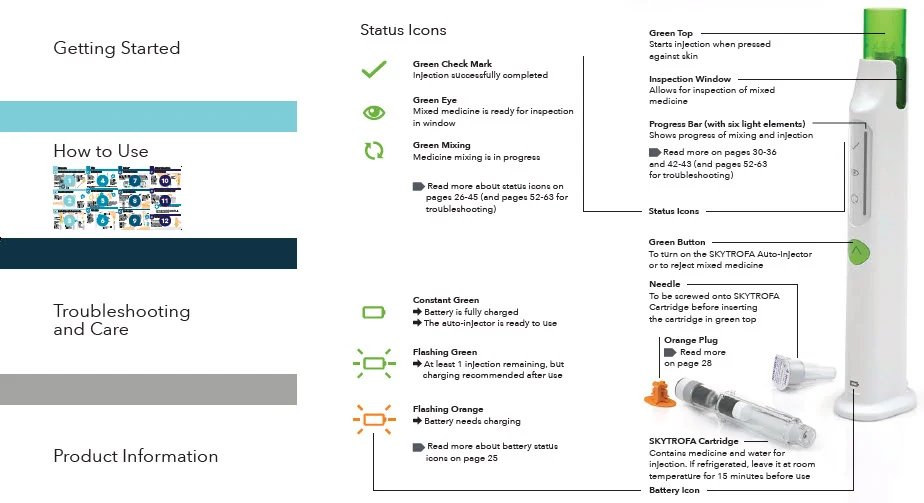
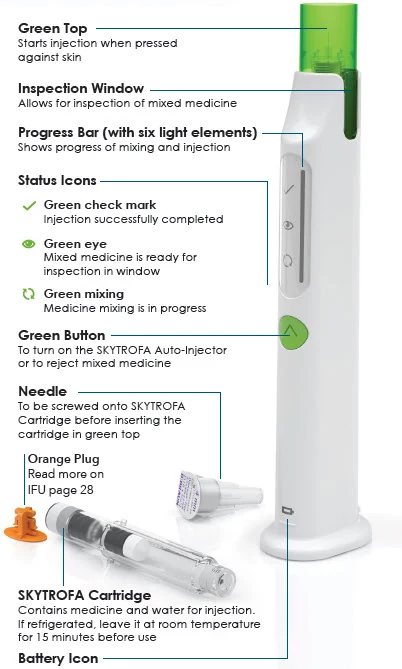
Product Overview
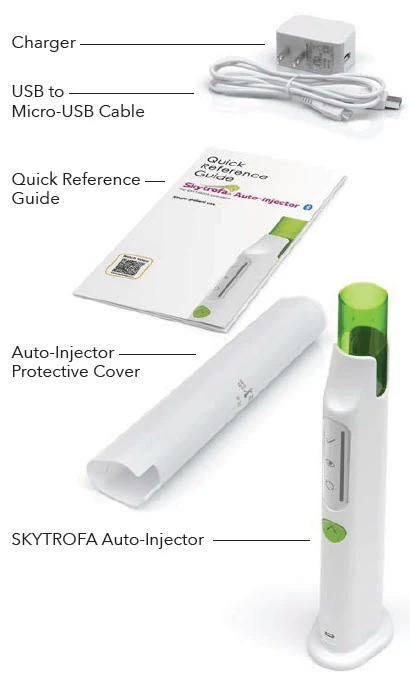
Figure B
Setting Up
Remove the SKYTROFA Auto-Injector from the package.
- Use the auto-injector at room temperature between 59°F to 86°F (15°C to 30°C).
Connect the USB (large end of the cable) to the charger (only use the provided charger). Plug the charger into a power outlet. Connect the Micro-USB (small end of the cable) to the back of the auto-injector. For protection, charge the auto-injector with the protective cover on (see Figure C).
For more information on charging
 page 65.
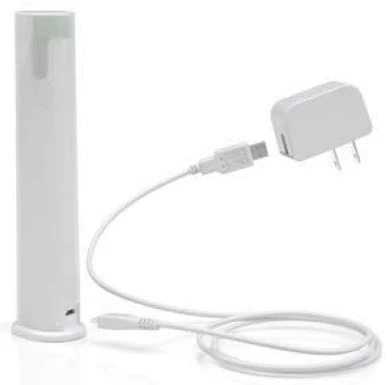
Figure C
Fully charge the auto-injector before using it for the first time. This will take 2 hours and 30 minutes. When the battery icon located at the base of the auto-injector (see Figure D) is flashing orange or green, it is charging. When it shows constant green, the auto-injector is fully charged and is ready to use after the charging cable is unplugged.
- When fully charged, the battery should last for at least 3 injections.
- When traveling, bring regional adaptors for the auto-injector charger to connect to the local power outlet.
The auto-injector cannot be used when connected to the charger.
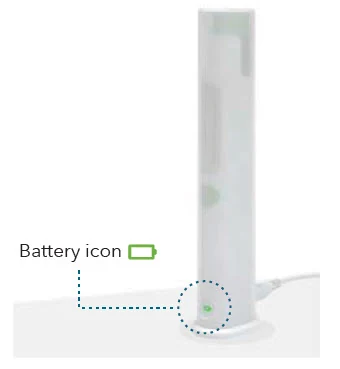 Figure D
- Find a quiet place where you can perform your injection.
Gather your supplies and place them on a flat, hard, clean surface.
Supplies needed for an injection:
From SKYTROFA Auto-Injector packaging
(see Figure B):
- 1 SKYTROFA Auto-Injector
From SKYTROFA Cartridge pack
(see Figure E):
- 1 SKYTROFA Cartridge
- 1 Omnican fine 0.25 mm × 4 mm (31G × 5/32") B. Braun needle
Other supplies (not included)
(see Figure E):
- 1 Alcohol Wipe
- 1 Sharps Container
 If your weekly dose requires 2 cartridges, you will need the following additional supplies:
- 1 SKYTROFA Cartridge
- 1 Omnican fine 0.25 mm × 4 mm (31G × 5/32") B. Braun needle
- 1 Alcohol Wipe
Supplies Needed for Each Injection
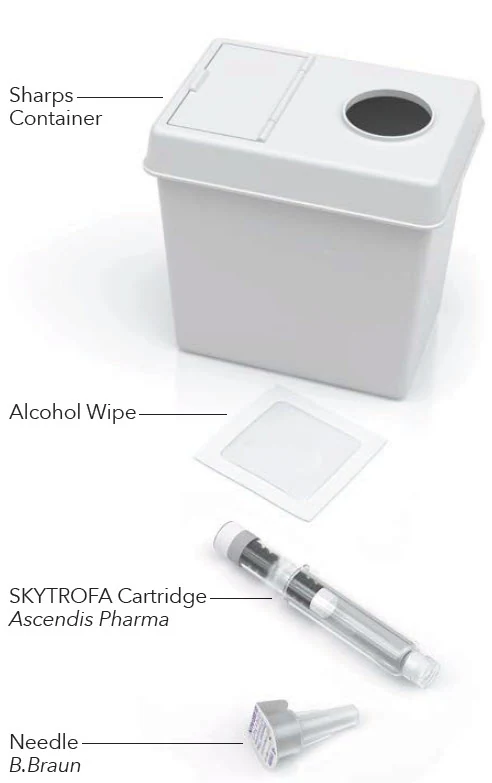
Figure E
  Does Your Weekly Dose Require 2 Cartridges? |
Your healthcare provider may prescribe a dose that requires use of the medicine in 2 cartridges. If you have been prescribed a dose that requires 2 cartridges:
|
| Figure F |
How to Use
| Step-by-Step Guide | Page |
|---|---|
| Prepare | 20 |
| Mix | 30 |
| Inject | 38 |
| After Injection | 44 |
 | |
Prepare
1 Check and assemble cartridge and needle
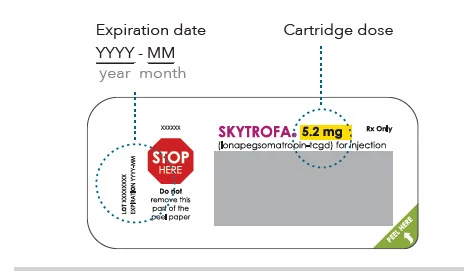
Figure G
| 1.1 | Check the expiration date and cartridge dose on the cartridge packaging (see Figure G). |
 | Do not use if the dose is not as prescribed. |
| Remove the SKYTROFA Cartridge from the packaging according to the instructions on its lid. | |
| If refrigerated, take the cartridge out of the refrigerator and leave at room temperature for 15 minutes before use. | |
Do not use if the expiration date has passed on the cartridge.
| |
| 1.2 | Check the expiration date on the needle. Peel off the paper from the needle by hand (see Figure H). |
 Be careful with the exposed needle to avoid needle stick injury and infection. | |
| |
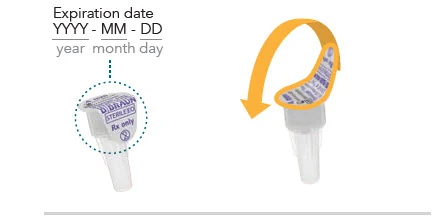 Figure H | |
| 1.3 | Screw the needle straight on the cartridge by turning clockwise until there is a tight fit (see Figure I and J). |
 | Do not remove the plastic needle cover. You will need it to insert the cartridge into the SKYTROFA Auto-Injector. Check the needle is screwed tight on the cartridge. |
 | Do not use the needle if it has touched anything other than the injection site. |
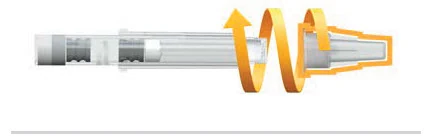 Figure I | |
| Check the needle is screwed tight on the cartridge (see Figure J). | |
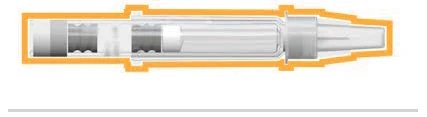 Figure J | |
| 2 Turn on the auto-injector | |
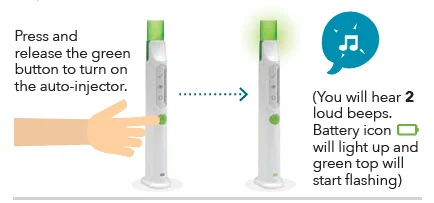 Figure K | |
| 2.1 | Disconnect the auto-injector from the charger when charged.
|
| 2.2 | Find a quiet place where you can give your injection. Use the auto-injector at room temperature between 59°F to 86°F (15°C to 30°C). |
| 2.3 | Remove the protective cover. Place the auto-injector upright on a flat surface. |
| 2.4 | Press and release the green button to turn on the auto-injector (see Figure K).
|
| 2.5 | Check the battery icon on the base of the auto-injector to see if it is charged. The battery icon  is green when the auto-injector is ready to use: |
 | Constant Green Battery is fully charged. The auto-injector is ready to use. |
 | Flashing Green At least 1 injection remaining, but charging is recommended after use. |
 | Flashing Orange Battery needs charging. |
If no icons light up  page 56. | |
If you see flashing icons (other than the battery) pages 58–59. | |
 back cover.
 Do not use the needle if:
 Do not use a bent needle.
 and the 3 icons above the green button will light up. Then all of the icons will turn off, except the battery icon.
| 3 Insert cartridge with attached needle | |
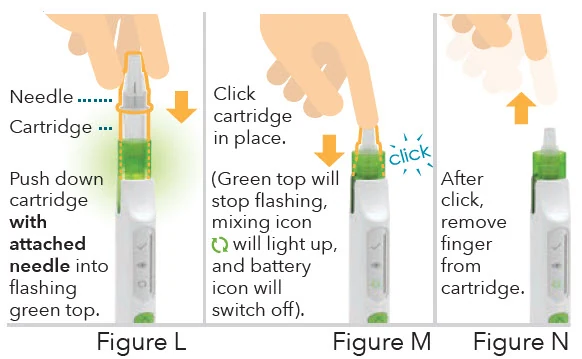 | |
| 3.1 | Insert the cartridge. |
 | Insert the cartridge into the flashing green top by pushing straight down with the needle cover still on (see Figure L). |
| 3.2 | Click the cartridge into place. |
 | Make sure the cartridge is pushed all the way down until you hear a click (see Figure M).
|
 | Do not insert the cartridge without attaching the needle fully. If you did not attach the needle, push the cartridge to release it and continue with Step 1.2 (page 21). |
 | Do not attempt to insert the charging cable in the auto-injector if a cartridge has been inserted. |
| 3.3 | After the click, remove your finger from the cartridge (see Figure N).
|
 | If your auto-injector turns off automatically, press and release the green button to turn it on again, then read Situation A  page 61. |
 | If you see a flashing orange mixing icon If you cannot insert the cartridge, check if an orange plug is still attached to the cartridge. If an orange plug is still attached to the cartridge, remove it by pulling it straight off (see Figure O). The orange plug only protects the cartridge during transportation. |
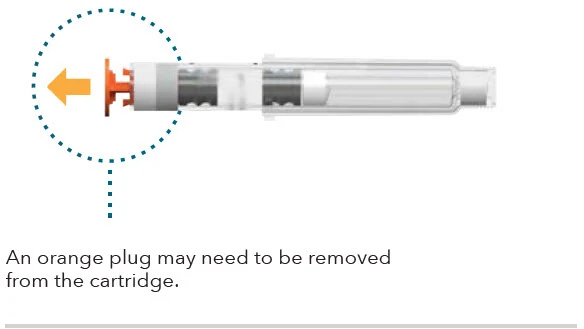 Figure O | |
Do not use the auto-injector if you cannot insert the cartridge. Please call Ascendis Pharma Customer Support. For contact information back cover. | |
 will light up, and the battery icon
 will switch off.
 page 58.
Mix
| 4 Wait while mixing | |
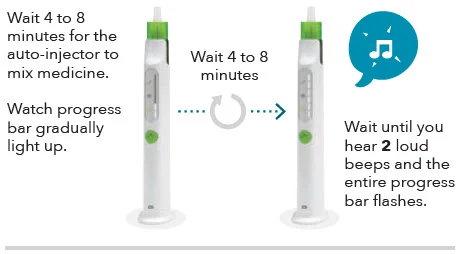 Figure P | |
| 4.1 | Wait 4 to 8 minutes for the auto-injector to mix your medicine. The progress bar will gradually light up, and you will hear steady ticking during mixing (see Figure P).
|
 | If you see a slowly flashing green mixing icon and the progress bar is frozen page 54. |
 | If you see a flashing orange mixing icon page 58. |
| 4.2 | The auto-injector has finished the automatic part of the mixing when you hear 2 loud beeps and the entire progress bar flashes. |
| 4.3 | Continue with Step 5 (page 32) immediately after automatic mixing is completed. If you wait for more than 2 hours before completing the steps for mixing the medicine by hand (Step 5), the auto-injector will automatically cancel the procedure. If this happens, the cartridge will be released and cannot be used. To remove the cartridge, see Step 10 (page 44). If you still need to inject after the auto-injector has canceled the procedure, go back to Step 1 and use a new cartridge (page 20). |
 | If your auto-injector turns off automatically, press and release the green button to turn it on again, then read Situation B page 61. |
| 5 Turn the auto-injector up and down | |
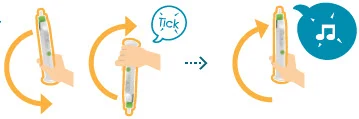
| Turn the auto-injector up and down, listening for a tick sound each up and down cycle to make sure the turns are correct. | 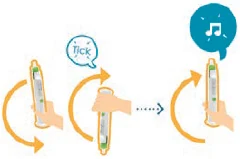 |
| Turn up and down correctly 5 to 10 times until you hear 2 loud beeps and the whole progress bar, except the top element, lights up. | |
| Do not press the green button. | |
| Figure Q | |
| 5.1 | Turn the auto-injector up and down to mix the medicine by hand. You will hear a 'tick' sound each time you turn the auto-injector up and down correctly. To mix the medicine correctly:
The progress bar, except the top element, will light up as you turn the auto-injector up and down correctly. Do not press the green button. Pressing and holding the green button for 8 seconds will cancel mixing, and you cannot reuse the cartridge. After 5 to 10 correct turns, you will hear 2 loud beeps and the progress bar, except the top element, will light up. |
 | If your auto-injector turns off automatically, press and release the green button to turn it on again. Read Situation B or C to find the corresponding lit-up icons page 61 and 62. |
 | If you see a flashing orange mixing icon page 58. |
| 5.2 | Continue with Step 6 (page 36) immediately after you finish mixing by hand. If you wait more than 2 hours before performing Step 6 to Step 9 (pages 36–43), the auto-injector will automatically cancel the procedure. If this happens, the cartridge will be released and cannot be used. To remove the cartridge, see Step 10 (page 44).
|
| 6 Finish mixing | |
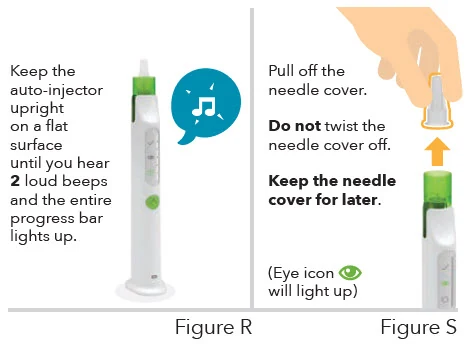 | |
| 6.1 | Keep the auto-injector upright for automatic air removal (see Figure R). Wait until you hear 2 loud beeps and the entire progress bar lights up. |
| If you see a slowly flashing green mixing icon and the progress bar is frozen page 54. |
| If you see a flashing orange mixing icon page 58. |
| 6.2 | Pull off the needle cover (see Figure S). The green eye icon Do not twist the needle cover off. If you have trouble removing the needle cover, gently pull up the green top. |
 | Keep the needle cover for later use. It is needed to safely remove the cartridge after injection. |
 | If your auto-injector turns off automatically, press and release the green button to turn it on again. Read Situation D or E to find the corresponding lit-up icons page 62 and 63. |
| Inject | |
| 7 Check mixed medicine | |
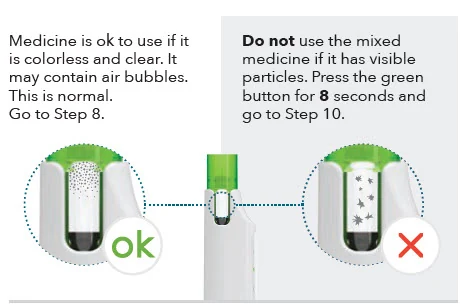 Figure T | |
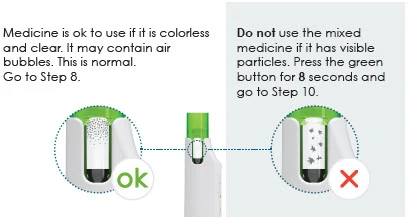
| 7.1 | Check the mixed medicine in the inspection window on the side of the auto-injector (see Figure T). The medicine should look colorless and clear. It may contain air bubbles. This is normal. |
| Be careful with the exposed needle to avoid needle stick injury and infection. Do not inject the medicine if there are visible particles (medicine is not dissolved) or the mixed medicine is discolored. If you see visible particles or the medicine is discolored:
|
| If you see a flashing orange mixing icon page 58. |
| 8 Prepare for injection | |
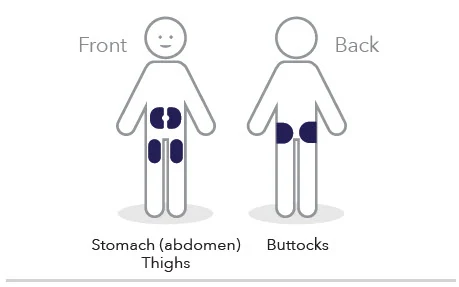 Figure U | |
| 8.1 | Choose an injection site. |
 | There are only 3 areas of your body you can inject into (see Figure U):
Change the injection site for every injection. |
| 8.2 | Make sure your hands are clean using soap and water or hand sanitizer (see Figure V). |
 Figure V | |
| 8.3 | Clean the injection site with an alcohol wipe (see Figure W). |
| Do not inject in an injection site that has not been cleaned. |
| Do not touch the cleaned area before injecting. |
| Do not fan or blow on the cleaned area. |
| Inject directly into skin. Do not inject through clothes. |
 Figure W | |
| 9 Inject medicine | |
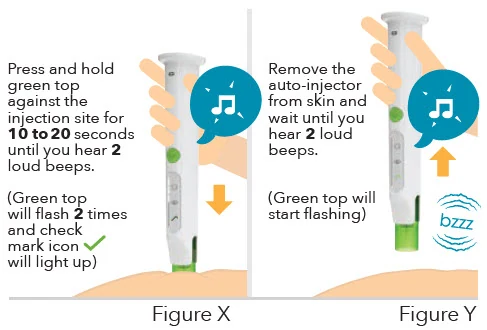 | |
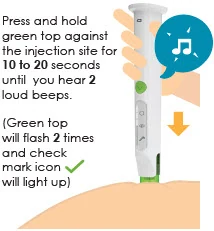
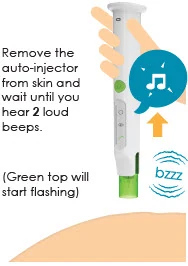
| 9.1 | Press and hold the green top against the skin of the injection site to inject (see Figure X). Hold for 10 to 20 seconds until you hear 2 loud beeps and the green top flashes 2 times. The green check mark icon
|
| Do not remove the auto-injector from the injection site until the injection is finished to ensure you get your full cartridge dose. The injection is finished when you hear 2 loud beeps and the green top flashes 2 times. The green check mark |
| 9.2 | Remove the auto-injector from the skin after the injection is finished (see Figure Y).
|
 | If you see a slowly flashing green check mark icon and the progress bar is frozen page 55. |
 | If you see a flashing orange check mark icon page 58. |
| After Injection | |
| 10 Remove cartridge | |
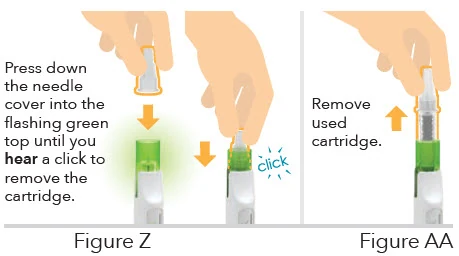 | |
| Be careful when handling needles to reduce the risk of needlestick injury and infection. |
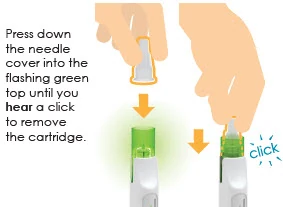
| 10.1 | Press down the needle cover into the flashing green top until you hear a click to remove the cartridge (see Figure Z).
Do not twist the cartridge. |
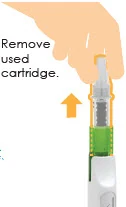
| 10.2 | Remove the used cartridge by pulling straight up (see Figure AA). |
| Do not remove the cartridge without using the needle cover.
|
| Do not use the auto-injector if you cannot remove the cartridge as instructed. Please call Ascendis Pharma Customer Support. For contact information back cover. |
| 11 Check cartridge and throw away | |
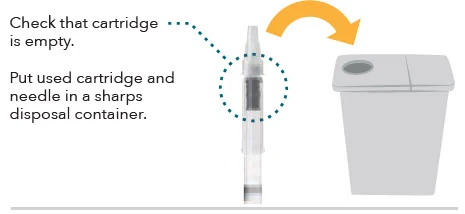 Figure AB | |
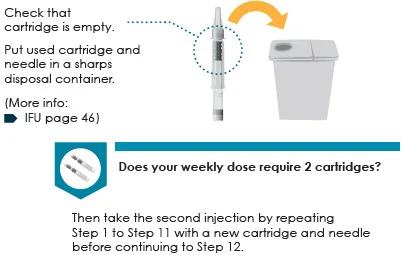
| 11.1 | Check that the cartridge is empty of medicine (see Figure AB). |
| Do not use the auto-injector if there is medicine left in the cartridge after injection. Please call Ascendis Pharma Customer Support. For contact information back cover. |
| 11.2 | Put your used cartridge and needle in an FDA-cleared sharps disposal container right away after use (see Figure AB). |
| Do not throw away (dispose of) opened or used needles and cartridges in your household trash. Do not recycle your used sharps disposal container. If you do not have an FDA-cleared sharps disposal container, you may use a household container that is:
When your sharps disposal container is almost full, you will need to follow your community guidelines for the right way to dispose of your sharps disposal container. There may be state or local laws about how to throw away used needles and syringes. For more information about safe sharps disposal, go to the FDA's website at: http://www.fda.gov/safesharpsdisposal. |
| Healthcare providers, relatives, and other caregivers should follow this Instructions for Use for removal and throwing away (disposal) of needles to prevent needlestick injury and infection. |
 | Does Your Weekly Dose Require 2 Cartridges? Then take the second injection by repeating Step 1 to Step 11 (pages 20–47) with a new cartridge and needle before continuing to Step 12. |
| 12 Store the auto-injector | |
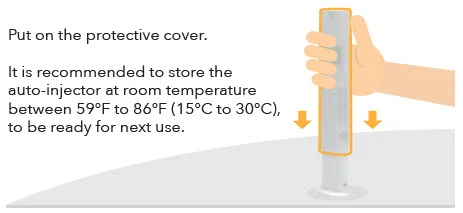 Figure AC | |
| 12.1 | Make sure that the auto-injector is clean. If it is dirty or if medicine has been spilled onto it, clean with a damp cloth and wait until dry. Do not place the auto-injector under water. For more information on cleaning |
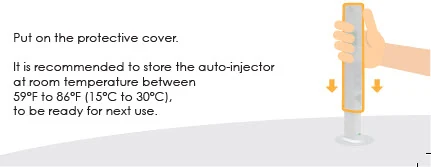
| 12.2 | Put the protective cover on the auto-injector by sliding it straight down (see Figure AC). |
| 12.3 | Charge the auto-injector if the battery icon has been flashing before or after the injection. For more information about how to charge the auto-injector page 65. |
| 12.4 | It is recommended to store the auto-injector at room temperature between 59°F to 86°F (15°C to 30°C), in between uses. Store with the protective cover on until the next injection. For more information about how to store the auto-injector page 66. |
| 12.5 | Write down the date of every weekly dose taken under Keep Track of Your Injections
|
 will light up. Removing the needle cover will allow you to check the mixed medicine in the inspection window (Step 7 on page 38).
 will light up.
 will light up.
Troubleshooting and Care
| Page | |
|---|---|
| Troubleshooting | 52 |
| Cleaning and Maintenance | 64 |
| Charging and Charging Cable | 65 |
| Storing | 66 |
Troubleshooting
- What do you see?
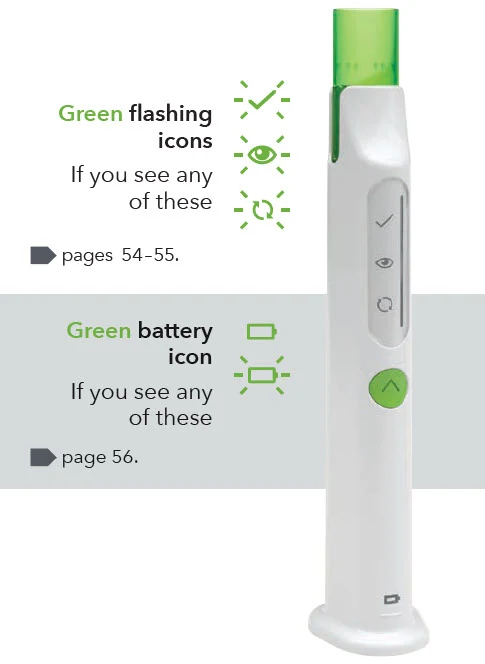
   | Orange flashing icons If you see any of these |
 | Orange battery icon If you see this |
If the auto-injector turns off automatically, press and release the green button: If the auto-injector is not responding with no icons lighting up If any progress bar elements or icons light up |
  | You see slowly flashing green mixing icon and the progress bar is frozen. |
 | You hear a repeating notification sound. |
| Mixing paused (Step 4 on page 30 or Step 6 on page 36). If the SKYTROFA Auto-Injector is not in an upright position, mixing or air removal will pause (see Figure AD). | |
| Do this: Place the auto-injector in an upright position and the mixing or air removal will continue. | |
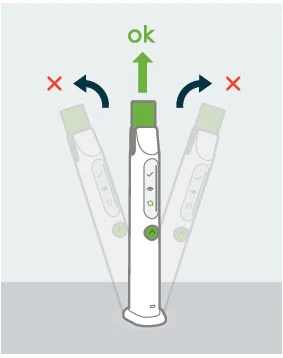 Figure AD | |
 | You see a slowly flashing green check mark icon and the progress bar is frozen. |
 | You hear a repeating notification sound. |
| Injection paused (Step 9 on page 42). If the green top is removed from the skin before completing the injection, the auto-injector will pause the injection (see Figure AE). | |
| Do this: Press the green top against skin and the injection will start again. If the injection is not completed within 15 minutes, the auto-injector automatically cancels the injection. | |
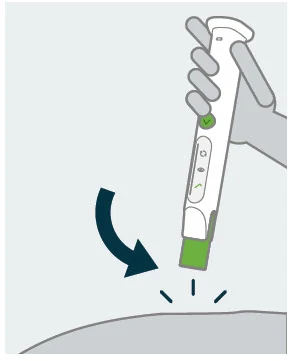 Figure AE | |
 | You see a flashing green battery icon. |
| Charging recommended. There is enough battery for at least 1 injection. | |
| Do this: Charge the auto-injector after the next injection. | |
 | You see a constant green battery icon. |
| Battery is fully charged. The auto-injector is ready to use (the battery icon turns off while the auto-injector is in use). | |
| Do this: If you are charging the auto-injector, disconnect it from the charger. | |
| You see no icons lighting up at all. | |
| Either the auto-injector has turned off (the auto-injector will turn off if it is not active for 6 minutes without a cartridge loaded or for 3 minutes with a cartridge loaded) or the battery needs charging. | |
Do this: Press the green button to turn it on again.
| |
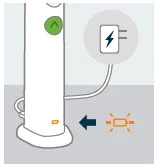
 | You see a flashing orange battery icon. You hear a notification sound. |
| The battery needs charging. | |
| Do this: Charge the auto-injector. | |
| Insert the charging cable into the auto-injector at rear lower side and connect to a power outlet (see Figure AF). When the auto-injector has charged for 15 minutes and the battery icon flashes green, the auto-injector is ready to use for at least 1 injection after the charging cable is unplugged. When the battery icon shows constant green, the auto-injector is fully charged and lasts for at least 3 injections. | |
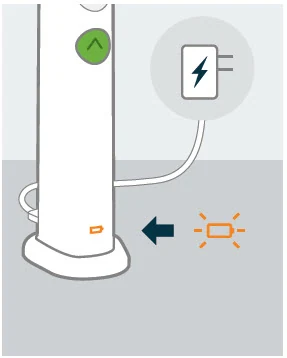 Figure AF | |
 | You see a flashing orange mixing icon. |
 | You hear an error sound. |
| Either you have inserted a used cartridge, or you have canceled the mixing, or the auto-injector has canceled the injection, or the cartridge is damaged. The auto-injector cancels the injection 2 hours after automatic mixing (Step 4, page 30) or 2 hours after manual mixing (Step 5, page 32) is completed. | |
Do this: Remove the cartridge and wait for the device to turn off. Start again with a new, unused cartridge and make sure to screw on the needle straight and tightly. Read more | |
 | You see a flashing orange check mark icon. |
 | You hear an error sound. |
| Either an injection error has happened (the needle is not screwed on tightly, or it is bent or blocked), or you have canceled the injection, or the auto-injector has canceled an injection that was not completed within 15 minutes. | |
Do this: Remove the cartridge and wait for the auto-injector to turn off. Start again with a new, unused cartridge and make sure to screw on the needle straight and tightly. Read more | |
  | You see 3 flashing icons alternating between green and orange. |
  | |
  | You hear a repeating error sound. |
| The auto-injector is near its expiration. The first time you see this, either there are 5 injections left or the auto-injector expires in 1 month. | |
| Do this: Press and release the green button to proceed. The green top will start flashing. The auto-injector can be used as usual for the remaining injections. When there are no more injections left or the expiration date has passed, the auto-injector cannot be used. Please contact a healthcare provider or Ascendis Pharma Customer Support to receive a new auto-injector. For Ascendis Pharma contact information back cover. | |
  | You see 3 flashing orange icons. |
| You hear an error sound. |
| Either the auto-injector has expired (the maximum number of injections has been reached or the lifetime of 5 years has passed) or a critical error has occurred. | |
| Do this: Try to turn the auto-injector on (press and release the green button). If you still see 3 flashing orange icons, the auto-injector needs to be replaced. For disposal information page 73. Please contact a healthcare provider or Ascendis Pharma Customer Support to receive a new auto-injector. For Ascendis Pharma contact information back cover. | |
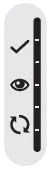 | If you see no icons lighting up at all. Either the auto-injector needs charging or it has timed out and turned off automatically. |
 | Do this: Press and release the green button to turn the auto-injector on again. |
 |
|
| Do this: Read more page 57. | |
 |
|
| Do this: Read the next pages and find the way your device lights up and blinks. | |
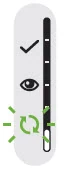 | Situation A You see a flashing green mixing icon and a progress bar with the bottom first element lit up. You hear a repeating notification sound. The auto-injector has not completed the automatic medicine mixing. Do this: Keep the auto-injector standing upright on a flat surface. Go to |
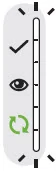 | Situation B You see a constant green mixing icon and a flashing progress bar. The auto-injector has not completed the manual mixing of the medicine. Do this: Continue to turn the auto-injector up and down to mix the medicine by hand. Go to |
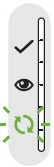 | Situation C You see a flashing green mixing icon and a constant progress bar lit up. You hear a repeating notification sound. The auto-injector has not automatically removed the air. Do this: Keep the auto-injector standing upright on a flat surface. Go to |
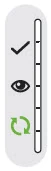 | Situation D You see a constant green mixing icon and a constant progress bar lit up. You have not pulled off the needle cover within 3 minutes of completing automatic air removal. Do this: Continue to pull off the needle cover. Go to |
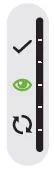 | Situation E You see a constant green eye icon. You have not started to inject within 3 minutes of pulling off the needle cover. Do this: Continue to prepare and do the injection. Go to |
| Cleaning and Maintenance | |
Cleaning the SKYTROFA Auto-Injector If the auto-injector is dirty or if medicine has been spilled onto it, clean with a damp cloth. Before cleaning, the cartridge must be removed. The green top needs to be cleaned on the outside and on the reachable part of the inside. If medicine is spilled inside the auto-injector, turn it upside down to let the medicine run out. | |
| Do not clean the auto-injector while charging. Keep the auto-injector dry. Do not place the auto-injector in liquid. Do not sterilize the auto-injector. |
| Maintenance of the SKYTROFA Auto-Injector | |
| Do not open, try to repair, or change the auto-injector. The battery is not replaceable. Please call Ascendis Pharma Customer Support. For contact information back cover. |
| Charging and Charging Cable | |
| Charging the SKYTROFA Auto-Injector | |
Connect the USB (large end of the cable) to the charger. Plug the charger into a power outlet. Connect the Micro-USB (small end of the cable) to the rear of the auto-injector. For protection, charge the auto-injector with the protective cover on. Read more Only charge the auto-injector when the battery icon is flashing green or orange. Read more | |
| Do not use any charger or charging cables other than those included with your auto-injector. Other chargers or cables may create problems and may interfere with device operation. |
| Do not clean the auto-injector while charging. Keep the auto-injector dry. |
| Do not insert a cartridge when the auto-injector is connected to the charger. |
| Do not attempt to insert the charging cable in the auto-injector if a cartridge has been inserted. |
| Storing | |
| Storing the SKYTROFA Auto-Injector | |
| Keep out of the reach of children. This product contains small parts that may present a choking hazard to small children. The cable can present a strangulation hazard. |
| Do not store the auto-injector closer than 12 inches (30 cm) to microwave ovens or electronic equipment with antennas such as Wi-Fi transceivers. The auto-injector may not work the right way. Remove the cartridge from the auto-injector before storing. Store with the protective cover on. It is recommended to store the auto-injector at room temperature between 59°F to 86°F (15°C to 30°C), in between uses. If the auto-injector is stored at higher or lower temperatures, you should keep it at room temperature for 30 minutes before use with a cartridge. The auto-injector can be stored between 14°F to 104°F (-10°C to 40°C) if not in use. Keep the protective cover on when traveling with the auto-injector. Keep the auto-injector away from dirt, dust, and humid or wet places. Keep the auto-injector, the charger, and the charging cable away from pets and pests. Avoid refrigerating or freezing the auto-injector in between uses. |
 | Avoid exposing the auto-injector to direct sunlight and extreme temperatures. For technical details of the conditions under which the auto-injector can be used, stored, and transported Storing the SKYTROFA Cartridge For information on the SKYTROFA Cartridge storing, see instructions on the cartridge pack and blister. |
Product Information
| Page | |
|---|---|
| Product Safety | 70 |
| Expiration | 72 |
| EMC Compliance Levels | 74 |
| Technical Specification | 77 |
| Symbols | 80 |
| Warranty and Disclaimer | 84 |
| Parts Overview | 85 |
Product Safety
Do not use the SKYTROFA Auto-Injector if the SKYTROFA Cartridge cannot be inserted or removed, or if the cartridge was not completely emptied during the last attempted injection.
| Do not use the auto-injector if you think it may be damaged. |
| Do not open, try to repair, or change the auto-injector. The battery is not replaceable. Please call Ascendis Pharma Customer Support. For contact information back cover. |
| Do not clean the auto-injector while charging. Keep the auto-injector dry. |
| Do not use or place the auto-injector closer than 12 inches (30 cm) to microwave ovens or electronic equipment with antennas such as Wi-Fi transceivers. The auto-injector might not work the right way. |
| Do not use a cartridge if it has been dropped or you think it may be damaged. |
| Do not expose the auto-injector to extreme temperatures. Keep the auto-injector away from heat and open flames. Keep it out of direct sunlight. Do not place the auto-injector in liquid. Do not wash the auto-injector in a dishwasher. |
| Expiration | |
The SKYTROFA Auto-Injector has an expiration date (5 years after the manufacturing date) or a maximum of 210 injections, whichever comes first. The expiration date is located at the bottom of the auto-injector and is indicated by year (YYYY), month (MM), and date (DD), printed as YYYY-MM-DD. When there are 5 injections or less than 1 month left, the auto-injector will indicate this when turned on. Read more The auto-injector may be used for the remaining 5 injections. After the final injection or after the expiration date, your auto-injector has to be replaced. Please contact a healthcare provider or Ascendis Pharma Customer Support to receive a new auto-injector. For contact information  The auto-injector contains electrical and electronic components, including a non-replaceable battery. Do not throw away (dispose) in household trash. When the auto-injector reaches its expiration date, maximum number of injections, or needs replacing, return it to the Ascendis Pharma Customer Support. Contact Ascendis Pharma Customer Support for instructions on how to return properly. For contact information | |
EMC Compliance Levels
The auto-injector is intended for use in the electromagnetic environment specified below. The user of the auto-injector should ensure that it is used in such an environment.
| Electromagnetic Compatibility (EMC) Compliance Levels | Basic EMC Standard |
|---|---|
EMC - RF Field radiated emission in 10 m (maximum):
Compliance levels according to CISPR11, Group1, Class B. | IEC 60601-1-2 Edition 4.1/ EN 60601-1-2:2015/ A1:2021 CISPR 11 / EN 55011 EN ISO 11608- 4:2022 |
EMC - RF Field radiated immunity - Electrical field:
1 kHz 80% AM | IEC 60601-1-2 Edition 4.1/ EN 60601-1-2:2015/ A1:2021 IEC 61000-4-3 EN ISO 11608- 4:2022 |
EMC - Power Frequency Magnetic field, Immunity:
| IEC 60601-1-2 Edition 4.1/ EN 60601-1-2:2015/ A1:2021 IEC 61000-4-3 EN ISO 11608- 4:2022 |
EMC - Fast transients and bursts:
| IEC 60601-1-2 Edition 4.1/ EN 60601-1-2:2015/ A1:2021 IEC 61000-4-4 EN ISO 11608-4:2022 |
EMC - Surge:
| EC 60601-1-2 Edition 4.1/ EN 60601-1-2:2015/ A1:2021 IEC 61000-4-5 EN ISO 11608-4:2022 |
EMC - Conducted immunity disturbance by RF fields
| IEC 60601-1-2 Edition 4.1/ EN 60601-1-2:2015/ A1:2021 IEC 61000-4-6 EN ISO 11608-4:2022 |
EMC - Conducted emission
120 V @ 60 Hz Compliance levels according to CISPR11, Group1, Class B. | IEC 60601-1-2 Edition 4.1 EN 60601-1-2:2015/ A1:2021 CISPR 11/EN 55011 EN ISO 11608-4:2022 |
EMC - Voltage dips and interruptions:
| IEC 60601-1-2 Edition 4.1/ EN 60601-1-2:2015/ A1:2021 IEC 61000-4-11 EN ISO 11608-4:2022 |
EMC - RF Field Immunity to Proximity fields from Wireless communication equipment, Immunity at 0.3 m separation:
| IEC 60601-1-2 Edition 4.1/EN 60601-1-2:2015/ A1:2021 IEC 61000-4-39 EN ISO 11608- 4:2022 |
EMC - Immunity to proximity magnetic fields (9 kHz to 13.56 MHz):
| IEC 60601-1-2 Edition 4.1/EN 60601-1-2:2015/ A1:2021 IEC 61000-4-39 EN ISO 11608- 4:2022 |
ESD immunity:
| IEC 60601-1-2 Edition 4.1/EN 60601-1-2:2015/ A1:2021 IEC 61000-4-2 EN ISO 11608- 4:2022 |
Technical Specification
| SKYTROFA Auto-Injector | |
|---|---|
| Lifetime | Expiration date page 72. |
| Serial Number (SN) | Please refer to the bottom side of your auto-injector, marked after . |
| Size | 7.09 × 1.46 × 1.06 in (180 × 37 × 27 mm). |
| Weight | 5.29 oz (150 g). |
| Display | Light-emitting diodes (LED). |
| Power source | Mains charger: 100 to 240 V AC. |
| Power supply | 1 rechargeable internal Li-ion battery. |
| Full capacity charging time | 2 hours and 30 minutes. Charging time for 1 injection: 15 minutes. |
| Full capacity | 3 weeks with 1 injection per week. |
| Electromagnetic compatibility | SKYTROFA Auto-Injector meets the requirements of IEC / EN 60601-1- 2, 4-th Edition. Using SKYTROFA Auto-Injector in the immediate vicinity of microwave appliances may result in impaired functioning. Use and store SKYTROFA Auto-Injector outside such an environment. |
| Protection against electric shock | Type BF. |
| Dose accuracy | SKYTROFA Auto-Injector meets the requirements of ISO 11608-1:2022. Minimum 90% of the volume. |
| Needle Insertion Depth | Based on needle length of 4 mm. |
| Ingress protection | IP22: IP2X: Ingress protection of solid foreign objects, ≥ 12.5mm diameter. IPX2: Ingress protection of water with harmful effects, dripping (15% tilted). Both put together called IP22. |
| Cable | USB to Micro-USB cable, 1m. |
| Bluetooth® Version | BLE v5.3 with frequency 2.4 GHz. |
| Software Bill of Materials | The off-the-shelf software components that are used in the SKYTROFA Auto-Injector can be found on: https://www.phillipsmedisize. com/sbom |
| Charger | |
|---|---|
| Model | ASSA54a-050100. |
| Input | 100-240V – 50-60Hz. |
| Output | 5.0V  1.0A. |
| Use Conditions for SKYTROFA Auto-Injector | |
|---|---|
| Operation temperature (with medicine) and recommended storage temperature in between uses | 59°F to 86°F (15°C to 30°C) (marking on device bottom). |
| Storage & Transportation temperature | 14°F to 104°F (-10°C to 40°C) (marking on device cover). |
| Charging temperature | 59°F to 86°F (15°C to 30°C). |
| Operation humidity | 15 to 90% relative humidity, non-condensing. |
| Storage & Transportation relative humidity | Up to 93% relative humidity, non-condensing. |
| Atmospheric pressure | 10.15 psi to 15.37 psi (700 hPa to 1060 hPa). |
Use Conditions for Cartridge with Medicine and Needles
The use conditions provided here are for the SKYTROFA Auto-Injector device. The use conditions for SKYTROFA Cartridges with medicine and needles may be different. To see the use conditions for cartridges with medicine and needles, please see the information provided with your medicine.
Waste
To protect natural resources and to promote material reuse, please separate packaging material from electronic, medicine, and sharp waste and recycle the material through your local recycling system.
Electronic waste: The auto-injector, including battery, must be returned to the manufacturer. Contact Ascendis Pharma Customer Support for instructions on how to return properly back cover.
Charger and USB cable must be disposed of following local regulations for disposal of electronic waste.
Symbols
These symbols are found on the SKYTROFA Auto-Injector, the packaging, and the Instructions for Use.
 | Manufacturer. |
 | Distributor. |
 | Unique serial number of SKYTROFA Auto-Injector. |
 | Model Number. |
 | Manufacturer catalogue number for identification. |
 | Manufacturer batch code for identification. |
 | Medical Device. |
 | Single patient Multiple use. |
 | Expiration date. |
 | Consult Instructions For Use. |
 | Applied parts SKYTROFA Auto-Injector is a type BF device and provides protection against electrical shock and electrical current leakage. Applied parts on the device are the green top, the housing, and the button. |
 | Warning! When this warning symbol is seen, safety instructions must be followed. Otherwise, serious safety hazardous situations and injuries may occur. |
 | Precaution! When this precaution symbol is seen, safety instructions must be followed. Otherwise, minor to moderate safety hazardous situations and injuries and potential damage to the auto-injector or other property may occur. |
| Rx only | Caution: Federal law restricts this device for sale by or on the order of a physician. |
 | Operation temperature. |
 | Storage & Transportation temperature. |
 | Keep dry. |
 | If the auto-injector packaging has been damaged or unintentionally opened before the first use, contact customer support back cover. |
 | SKYTROFA Auto-Injector contains electrical and electronic components, including a battery that cannot be replaced, and must not be disposed of using standard waste collection. |
 | SKYTROFA Auto-injector packaging is a non-corrugated fiberboard. Can be disposed of as paper. |
 | SKYTROFA Auto-Injector has been tested and found to comply with the limits for a Class B digital device, according to part 15 of the FCC Rules. |
 | Radio transmitter – Bluetooth® technology @2.4GHz using customized encrypted protocol – ClassB digital device. |
 | DC (Direct Current). |
 | Bluetooth® technology The Bluetooth® word mark and logos are registered trademarks owned by Bluetooth SIG, Inc. and any use of such marks by Ascendis Pharma is under license. Other trademarks and trade names are those of their respective owners. |
 | Pairing key. |
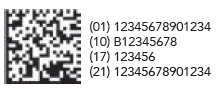 | The Unique Device Identifier (UDI) that appears on the carton is shown by a barcode and human readable format:
|
FCC Class B Notice
It is not allowed to modify the SKYTROFA Auto- Injector. Modifications may void the authority granted to the user by the FCC to operate this equipment.
This device complies with Part 15 of the FCC Rules. Operation is subject to the following two conditions:
- 1. This device may not cause harmful interference.
- 2. This device must accept any interference received, including interference that may cause undesired operation.
Note: This equipment has been tested and found to comply with the limits for a Class B digital device, pursuant to Part 15 of the FCC Rules.
These limits are designed to provide reasonable protection against harmful interference in a residential installation. This equipment generates, uses and can radiate radio frequency energy and, if not installed and used in accordance with the instructions, may cause harmful interference to radio communications. However, there is no guarantee that interference will not occur in a particular installation. If this equipment does cause harmful interference to radio or television reception, which can be determined by turning the equipment off and on, the user is encouraged to try to correct the interference by one or more of the following measures:
- Reorient or relocate the receiving antenna.
- Increase the separation between the equipment and receiver.
- Connect the equipment into an outlet on a circuit different from that to which the receiver is connected.
- Consult the dealer or an experienced radio/television technician for help.
Warranty and Disclaimer
Warranty
After the expiration date, your SKYTROFA Auto-Injector must be replaced. Please contact a healthcare provider or Ascendis Pharma Customer Support to receive a new auto-injector. For contact information back cover.
The expiration date is located at the bottom of the auto-injector and is indicated by year (YYYY), month (MM), and date (DD), printed as YYYY-MM-DD.
Disclaimer
The correct application of SKYTROFA according to the information provided with your medicine remains your responsibility.
Ascendis Pharma Endocrinology Inc. shall have no liability for incidental or consequential damages.
We reserve the right to modify technical specifications and documentation.
Patent Information
www.ascendispharma.us/products/patents
Parts Overview
Quick Reference Guide
Skytrofa® Auto-Injector 
For SKYTROFA cartridges
| Single-patient use | 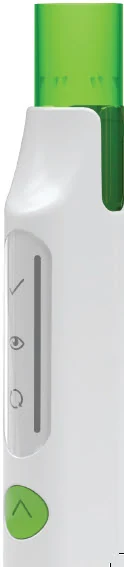 | ||
 |
This is your
Quick Reference Guide
- Read your Instructions for Use for full instructions before using this Quick Reference Guide.
- For training video, go to www.skytrofa.com
- If you are unsure about your dose, contact your healthcare provider.

| # | 02 2026-07-02 8020100530_08 |
Parts overview
 Constant green Battery is fully charged The SKYTROFA Auto-Injector is ready to use |  Flashing green At least 1 injection remaining, but charging recommended after use |  Flashing orange Battery needs charging |
Quick troubleshooting
For all troubleshooting cases and details, see Instructions for Use (IFU)
 IFU page 52
Charging required (Step 2)
IFU page 57
 | If the battery level is low: | |
 | You will see a flashing orange battery icon. | |
| Do this: Insert charging cable into the SKYTROFA Auto-Injector at rear lower side and connect to a power outlet. |
SKYTROFA Auto-Injector not upright (Step 4 and 6.1)
IFU page 54
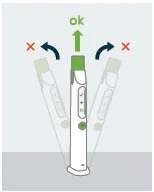 | If the SKYTROFA Auto-Injector is not in an upright position during mixing and air removal: | |
 | You will hear a repeating notification sound. Mixing icon will flash slowly and progress bar will freeze. | |
| Do this: Place the SKYTROFA Auto-Injector in an upright position and the mixing or air removal will continue. |
Skin contact lost (Step 9)
IFU page 55
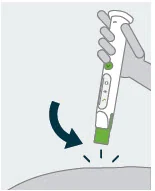 | If the green top is removed from skin before the injection is complete: | |
 | You will hear a repeating notification sound. Check mark icon will flash slowly and progress bar will freeze. | |
| Do this: Press green top against skin and the injection will continue. |
Prepare
1 Check and assemble cartridge and needle
| 1.1 | 1.2 | 1.3 | ||
Check expiration date and cartridge dose on cartridge pack. If refrigerated, allow 15 minutes to reach room temperature. 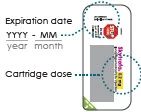 | 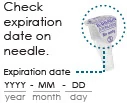 | Screw needle straight and tightly on cartridge. Do not remove needle cover. 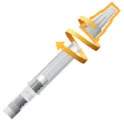 | ||
| Remove paper from needle. |  | |||
2 Turn on the auto-injector
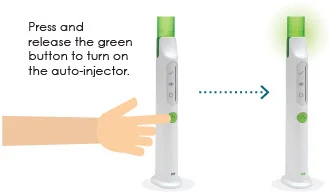 |  | |
(You will hear 2 loud beeps. Battery icon  will light up and green top will start flashing) |
3 Insert cartridge with attached needle
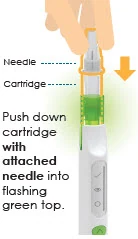 | 3.1 | 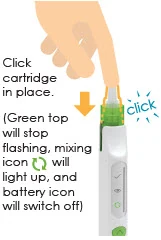 | 3.2 | 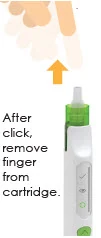 | 3.3 |
Mix
4 Wait while mixing
Wait 4 to 8 minutes for the auto-injector to mix medicine. Watch progress bar gradually light up. | 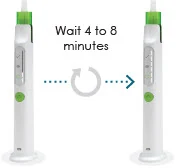 |  Wait until you hear 2 loud beeps and the entire progress bar flashes. |
If your auto-injector turns off automatically read Instructions for Use
 IFU page 60.
5 Turn the auto-injector up and down
Turn the auto-injector up and down, listening for a tick sound each up and down cycle to make sure the turns are correct. Turn up and down correctly 5 to 10 times until you hear 2 loud beeps and the whole progress bar, except the top element, lights up. Do not press the green button.
If you see a flashing orange mixing icon read IFU page 58.
6 Finish mixing
| 6.1 | 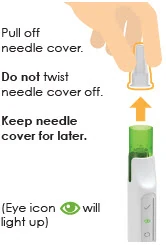 | 6.2 | ||
| Keep the auto-injector upright on a flat surface until you hear 2 loud beeps and the entire progress bar lights up. | 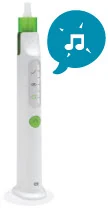 |
Inject
7 Check mixed medicine
8 Prepare for injection
| 8.1 | 8.2 | 8.3 | |
Choose an injection site: Stomach (abdomen), thighs, or buttocks. Change the injection site for every injection. 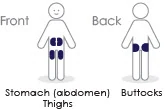 | Make sure your hands are clean using soap and water or hand sanitizer.  | Clean injection site with alcohol wipe. Do not inject through clothes.  |
9 Inject medicine
| 9.1 | 9.2 | |
 |  |
After injection
10 Remove cartridge
| 10.1 | 10.2 | |
 |  |
11 Check cartridge and throw away
12 Store the auto-injector