


Patient information: uses, side effects, how to take - Omnitrope
INSTRUCTIONS FOR USE
OMNITROPE® PEN 5
OMNITROPE (om-KNEE-trope)
(somatropin) injection, for subcutaneous use
5 mg/1.5 mL Single-Patient-Use cartridges for use with
Omnitrope Pen 5
Read this Instructions for Use before you start using Omnitrope Pen 5 and each time you get a refill. There may be new information. This information does not take the place of talking to the healthcare provider about the medical condition or the treatment.
Note:
- Omnitrope is for use under the skin only (subcutaneous).
- Do not share your Omnitrope Pen or needles with anyone else. You may give an infection to them or get an infection from them.
- The “Start use by no later than” date, printed in year, month, and day on the outer carton, shows the date after which treatment should not be started with this pen.
Omnitrope Pen 5, Single-Patient-Use cartridge containing Omnitrope, needle, alcohol swab and storage case:
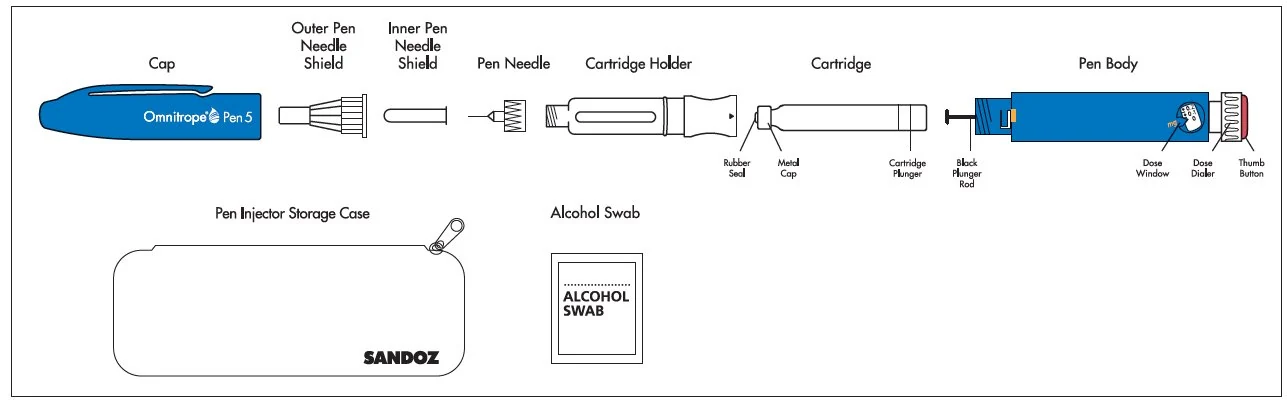
Figure A
Supplies you will need to give an Omnitrope injection. See Figure A.
- Omnitrope Pen 5
- 5 mg/1.5 mL cartridge containing Omnitrope
- 1 new BD™ Pen needle (29G x 12.7 mm or 31G x 8 mm or 31G x 5 mm). Needles are not included with the Pen.
- 1 alcohol swab
- flat surface like a table
- a sharps disposal container. See Step 6 for information on how to throw away (dispose of) used needles and cartridges.
Steps you should follow to give an Omnitrope injection:
Step 1. Placing the cartridge in the Omnitrope Pen 5
Step 2. Attaching the needle to the Omnitrope Pen 5
Step 3. Priming a new cartridge
Step 4. Selecting the correct dose of Omnitrope
Step 5. Selecting the injection site and injecting the dose of Omnitrope
Step 6. Removing and throwing away the needle and empty cartridge
Step 1. Placing the cartridge in the Omnitrope Pen 5
- Take an Omnitrope cartridge out of the refrigerator and leave at room temperature for about 30 minutes. Wash and dry your hands while you wait.
- Assemble all of the supplies needed on a flat surface. Remove the Pen and cartridge from their cartons if you are preparing the injection for the first time.
- Hold the body of the Pen with 1 hand and pull off the Pen cap with the other hand. See Figure B.
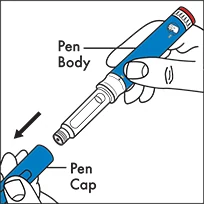
Figure B
- Hold the body of the Pen with 1 hand and unscrew the cartridge holder in a clockwise direction until the Pen and cartridge holder are completely separated. See Figure C.
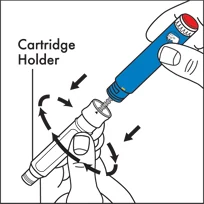
Figure C
- Hold the cartridge in 1 hand with the metal cap end pointing down. Insert the cartridge into the cartridge holder. See Figure D.
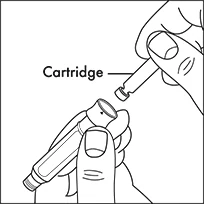
Figure D
- Lower the Pen body onto the cartridge holder so that the black rod presses against the cartridge plunger. Screw the cartridge holder onto the Pen body in a counterclockwise direction until the cartridge holder will not turn anymore. One of the blue arrows on the cartridge holder must line up with the yellow line mark on the Pen body. Do not over tighten the cartridge holder. See Figure E.
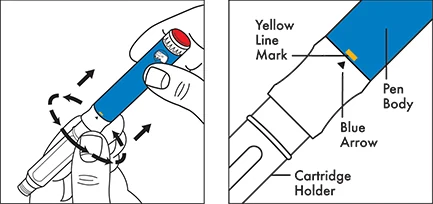
Figure E
Step 2. Attaching the needle to the Omnitrope Pen 5
- Take a new disposable needle and tear off the paper tab. Do not touch the needle or lay it on a surface. See Figure F.
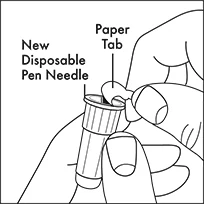
Figure F
- Holding the cartridge holder with 1 hand, firmly press the needle onto the cartridge holder end of the Pen. See Figure G. Screw the threaded part of the needle onto the cartridge holder in a counterclockwise direction until the needle will not turn anymore. See Figure H.
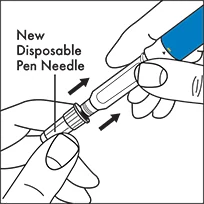
Figure G 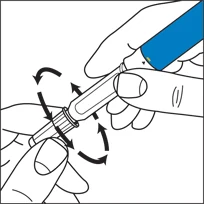
Figure H
- Gently pull off the outer needle shield and put it on a flat surface. You will use the outer needle shield later to remove the needle from the Pen after the injection is finished. See Figure I.
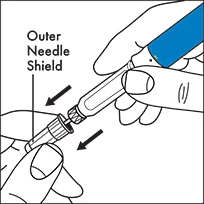
Figure I
Note: Check that the cartridge holder is attached to the Pen body before each injection. One of the blue arrows on the cartridge holder should be lined up with the yellow mark on the Pen body. After you attach the needle, you may see a few drops of medicine at the tip of the needle.
Step 3. Priming a new cartridge
- Priming is not needed for a cartridge you have used before. If the cartridge has already been primed, go to Step 4.
- Before you use a new cartridge you must first prepare it for use. Hold the Pen with the needle pointing upwards. Gently tap the cartridge holder with your finger to help air bubbles rise to the top of the cartridge. See Figure J.
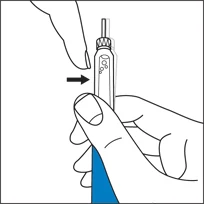
Figure J
- Hold the pen with the needle pointing up and the dose window facing you and you will see the numbers in the dose window at the bottom of the Pen body. Using the dose knob on the bottom of the Pen, slowly turn the dose knob in a clockwise direction as shown in Figure K until you hear 1 “click”. The arrow on the Pen body will then be lined up with the small line between “0” and “0.1” (0.05 mg). See Figure K.
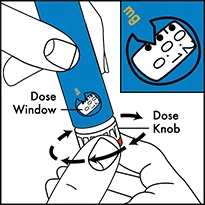
Figure K
- Remove the inner needle shield. See Figure L.
- With the needle pointing up, firmly turn the dose knob in a counterclockwise direction and back to the “0” position.
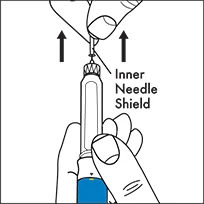
Figure L
At least 2 drops of medicine must flow out of the needle for the Pen to be properly primed. See Figure M.
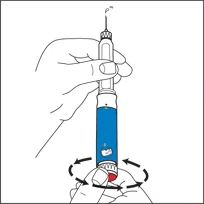
Figure M
- If at least 2 drops of medicine do not flow out, set the dose to 0.05 mg and repeat this step until at least 2 drops of medicine appear at the tip of the needle.
- When you see 2 drops of medicine flow out of the needle, the Pen is correctly primed and ready to use.
Step 4. Selecting the correct dose of Omnitrope
- Hold the pen with the needle pointing up and the dose window facing you and turn (dial) the dose knob in a clockwise direction until you see the number of mg for the prescribed dose in the middle of the dose window. The dose should be lined up with the arrow on the Pen body. You will hear 1 click for every single unit you dial. See Figure N.
Do not count the clicks to measure the correct dose of medicine.
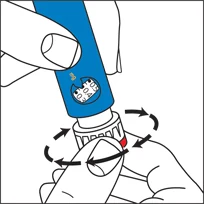
Figure N
- If you turn the dose knob past the correct dose, do not dial counterclockwise.
Instead, hold the Pen body with the needle pointing up and turn the dose knob in a clockwise direction until you see a bent arrow (  ) in the dose dialing window. See Figure O. Now continue to turn the dose knob in a clockwise direction until you hear a click and the entire Pen body is fully extended.
The injection button can now be fully pressed, resetting the dial to “0” without giving medicine. The correct dose can now be redialed.
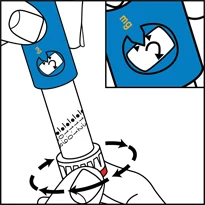
Figure O
- Check that the cartridge holder is still attached to the Pen body, with the blue arrow lined up with the yellow mark on the Pen body.
Step 5. Selecting the injection site and injecting the dose of Omnitrope
The best sites for injection are tissues with a layer of fat between skin and muscle such as the upper leg (thigh), buttocks, or stomach area (abdomen) as in the picture shown below. Do not inject near your belly button (navel) or waistline.
Change the injection site every day. See Figure P.
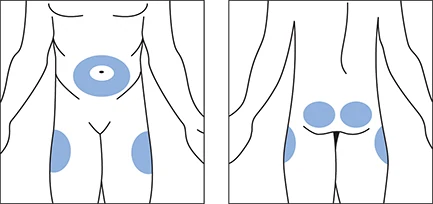
Figure P
- Select the injection site and wipe the skin with an alcohol swab as your healthcare provider showed you.
- With 1 hand, pinch a fold of loose skin at the injection site.
- With your other hand, insert the needle under the skin (at an angle of 45° to 90°) as your healthcare provider showed you. See Figure Q.
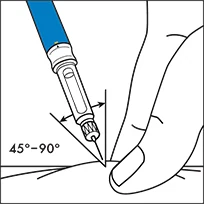
Figure Q
- After inserting the needle into the skin, push the injection button as far in as it will go and press the button firmly. A clicking sound will be heard while the dose is being injected. Continue to press firmly on the injection button for 5 seconds before you remove the needle from the skin. See Figure R.
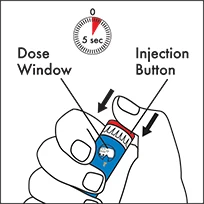
Figure R
- Stop pressing the injection button before you carefully remove the needle from the skin.
- If the injection button cannot be pushed in completely or stops during the injection, and the cartridge is empty, then the full dose has not been given. The dose indicator window will show the amount of medicine still needed. Reset the dose knob to “0” as described in Step 4. Remove the needle as described in Step 6. Replace the empty cartridge with a new cartridge as described in Step 1. Prime the new cartridge as described in Step 3. Set the dose, which you noted, and inject. This completes your dose.
Step 6. Removing and throwing away the needle and empty cartridge
- Carefully replace the outer needle shield. See Figure S.
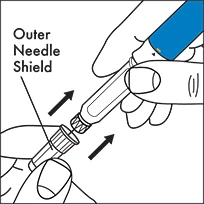
Figure S
- Hold the Pen by the cartridge holder and carefully remove the needle from the Pen by turning the needle in a clockwise direction. See Figure T. Recap the pen.
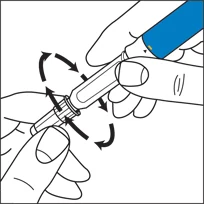
Figure T
- Put your used needles and cartridges in a FDA-cleared sharps disposal container right away after use. Do not throw away (dispose of) loose needles and cartridges in your household trash.
If you do not have a FDA-cleared sharps disposal container, you may use a household container that is:
- made of a heavy-duty plastic,
- can be closed with a tight-fitting, puncture-resistant lid, without sharps being able to come out,
- upright and stable during use,
- leak-resistant, and
- properly labeled to warn of hazardous waste inside the container.
- When your sharps disposal container is almost full, you will need to follow your community guidelines for the right way to dispose of your sharps disposal container. There may be state or local laws about how you should throw away used needles and cartridges. For more information about safe sharps disposal, and for specific information about sharps disposal in the state that you live in, go to the FDA’s website at: http://www.fda.gov/safesharpsdisposal.
- Do not dispose of your used sharps disposal container in your household trash unless your community guidelines permit this. Do not recycle your used sharps disposal container.
How should I store Omnitrope Pen 5?
- Store Omnitrope cartridges in the refrigerator between 36°F and 46°F (2°C and 8°C).
- When the Omnitrope Pen 5 contains a cartridge, do not remove the cartridge from the Pen in between injections. Store the Pen containing the cartridge in the storage case provided and place in the refrigerator.
- When the Pen does not contain a cartridge, you may store the Pen at room temperature.
- Do not freeze Omnitrope cartridges.
- Protect the Omnitrope Pen 5 and cartridge from light by storing in their cartons or the storage case.
- The Omnitrope cartridge must be thrown away 28 days after the first injection. The Omnitrope Pen 5 can be reloaded with a new cartridge and can be used multiple times.
Important information about possible problems you may have with the Omnitrope Pen 5
| Problem | Possible cause | How to fix |
|---|---|---|
| Dial unit does not turn easily. | Dust or dirt | Turn the dial beyond the highest setting on the scale. Wipe all exposed surfaces with a clean, damp cloth. |
| The injection button cannot be pushed or stops during injection. The dose knob does not return to “0”. | Cartridge is empty and full dose has not been given. | Remove the needle as described in Step 6. Replace the empty cartridge with a new cartridge as described in Step 1. Prime the new cartridge as described in Step 3. |
| Clogged needle. | Remove the needle as described in Step 6. Replace with a new needle as described in Step 2. | |
| No clicking is heard during the injection and dose knob moves freely. | Pen is in dose correction mode. | Remove the needle from skin. Press injection button all the way in so the dial returns to zero and repeat Step 2, Step 4 and Step 5 to give the injection. |
| Medicine continues to drip from the needle before injection. | Cartridge holder is not properly attached to the Pen body. | Line up blue arrow on cartridge holder with yellow mark on Pen body. |
| Medicine continues to drip from the needle after injection. | Needle was removed from the skin too early. | Hold the needle in the skin for 5 seconds to complete the injection, before you carefully remove the needle from the skin. For the next injection, make sure that you hold the needle in the skin for 5 seconds. |
| Cartridge holder is not properly attached to the Pen body. | Line up blue arrow on cartridge holder with yellow mark on Pen body. | |
| The needle is left on the Pen after injection. | Carefully remove the needle from the Pen right after the injection. |
If the Omnitrope Pen 5 is damaged or does not work, call the pharmacy where you got the Omnitrope Pen 5. If you got your Omnitrope Pen 5 from OmniSource, call 1-877-456-6794.
For other questions or additional information, call OmniSource at 1-877-456-6794. Do not try to repair the Pen yourself.
Your Omnitrope Pen 5 is covered by a 2 year guarantee. Contact your Omnitrope Pen 5 provider after you have used the pen for 2 years to have it replaced by a new one.
This guarantee is invalid if your Omnitrope Pen 5 has not been used in accordance with the manufacturer’s instruction leaflet or if the defect has been caused by neglect, misuse or accident.
BD and the BD Logo are trademarks of Becton, Dickinson and Company © 2019 BD. All rights reserved.
Manufactured by:
Sandoz Inc.
Princeton, NJ 08540
US License No. 2003
This Instructions for Use has been approved by the U.S. Food and Drug Administration.
February 2026
INSTRUCTIONS FOR USE
OMNITROPE® PEN 10
OMNITROPE (om-KNEE-trope)
(somatropin) injection, for subcutaneous use
10 mg/1.5 mL Single-Patient-Use cartridges for use with
Omnitrope Pen 10
Read this Instructions for Use before you start using Omnitrope Pen 10 and each time you get a refill. There may be new information. This information does not take the place of talking to the healthcare provider about the medical condition or the treatment.
Note:
- Omnitrope is for use under the skin only (subcutaneous).
- Do not share your Omnitrope Pen or needles with anyone else. You may give an infection to them or get an infection from them.
- The “Start use by no later than” date, printed in year, month, and day on the outer carton, shows the date after which treatment should not be started with this pen.
Omnitrope Pen 10, Single-Patient-Use cartridge containing Omnitrope, needle, alcohol swab and storage case:
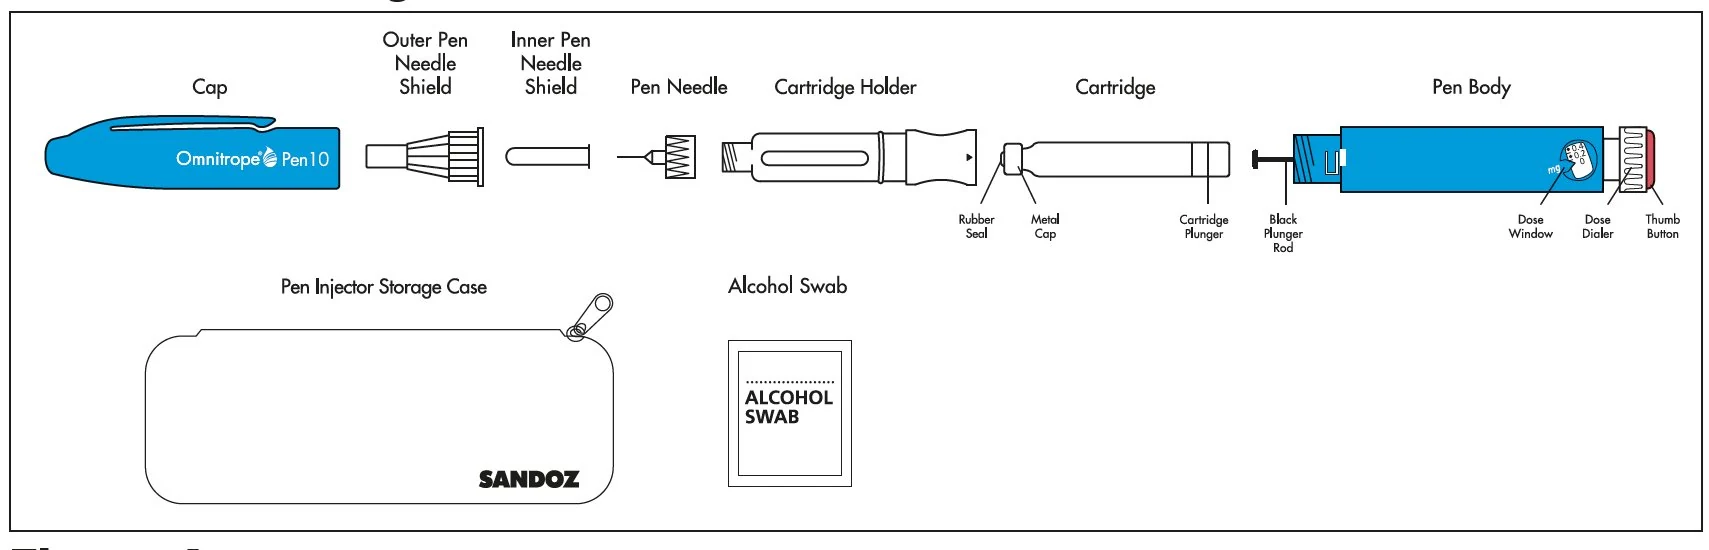
Figure A
Supplies you will need to give an Omnitrope injection. See Figure A.
- Omnitrope Pen 10
- 10 mg/1.5 mL cartridge containing Omnitrope
- 1 new BD™ Pen needle (29G x 12.7 mm or 31G x 8 mm or 31G x 5 mm). Needles are not included with the Pen.
- 1 alcohol swab
- flat surface like a table
- a sharps disposal container. See Step 6 for information on how to throw away (dispose of) used needles and cartridges.
Steps you should follow to give an Omnitrope injection:
Step 1. Placing the cartridge in the Omnitrope Pen 10
Step 2. Attaching the needle to the Omnitrope Pen 10
Step 3. Priming a new cartridge
Step 4. Selecting the correct dose of Omnitrope
Step 5. Selecting the injection site and injecting the dose of Omnitrope
Step 6. Removing and throwing away the needle and empty cartridge
Step 1. Placing the cartridge in the Omnitrope Pen 10
- Take an Omnitrope cartridge out of the refrigerator and leave at room temperature for about 30 minutes. Wash and dry your hands while you wait.
- Assemble all of the supplies needed on a flat surface. Remove the Pen and cartridge from their cartons if you are preparing the injection for the first time.
- Hold the body of the Pen with 1 hand and pull off the Pen cap with the other hand. See Figure B.
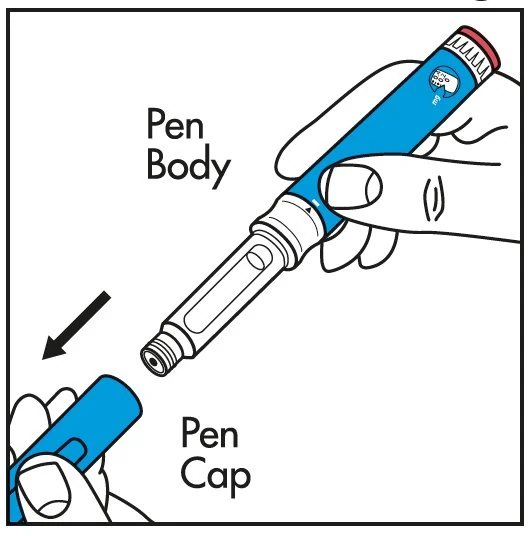
Figure B
- Hold the body of the Pen with 1 hand and unscrew the cartridge holder in a clockwise direction until the Pen and cartridge holder are completely separated. See Figure C.
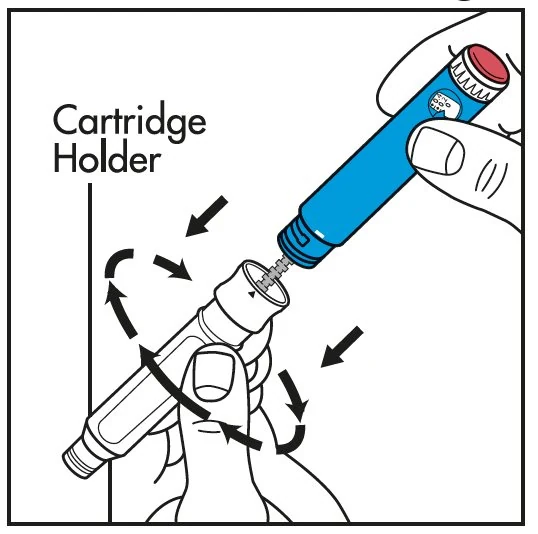
Figure C
- Hold the cartridge in 1 hand with the metal cap end pointing down. Insert the cartridge into the cartridge holder. See Figure D.
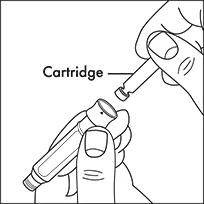
Figure D
- Lower the Pen body onto the cartridge holder so that the black rod presses against the cartridge plunger. Screw the cartridge holder onto the Pen body in a counterclockwise direction until the cartridge holder will not turn anymore. One of the blue arrows on the cartridge holder must line up with the white line mark on the Pen body. Do not over tighten the cartridge holder. See Figure E.
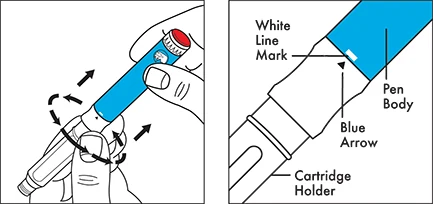
Figure E
Step 2. Attaching the needle to the Omnitrope Pen 10
- Take a new disposable needle and tear off the paper tab. Do not touch the needle or lay it on a surface. See Figure F.
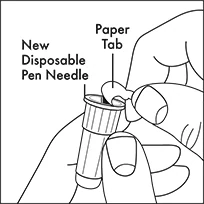
Figure F
- Holding the cartridge holder with 1 hand, firmly press the needle onto the cartridge holder end of the Pen. See Figure G. Screw the threaded part of the needle onto the cartridge holder in a counterclockwise direction until the needle will not turn anymore. See Figure H.
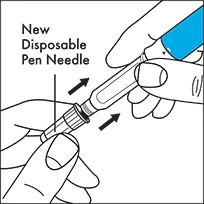
Figure G 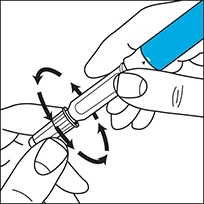
Figure H
- Gently pull off the outer needle shield and put it on a flat surface. You will use the outer needle shield later to remove the needle from the Pen after the injection is finished. See Figure I.
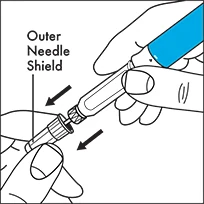
Figure I
Note: Check that the cartridge holder is attached to the Pen body before each injection. One of the blue arrows on the cartridge holder should be lined up with the white mark on the Pen body. After you attach the needle, you may see a few drops of medicine at the tip of the needle.
Step 3. Priming a new cartridge
- Priming is not needed for a cartridge you have used before. If the cartridge has already been primed, go to Step 4.
- Before you use a new cartridge you must first prepare it for use. Hold the Pen with the needle pointing upwards. Gently tap the cartridge holder with your finger to help air bubbles rise to the top of the cartridge. See Figure J.
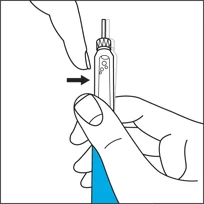
Figure J
- Hold the pen with the needle pointing up and the dose window facing you and you will see the numbers in the dose window at the bottom of the Pen body. Using the dose knob on the bottom of the Pen, slowly turn the dose knob in a clockwise direction as shown in Figure K until you hear 1 “click”. The arrow on the Pen body will then be lined up with the small line between “0” and “0.2” (0.1 mg). See Figure K.
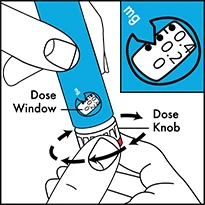
Figure K
- Remove the inner needle shield. See Figure L.
- With the needle pointing up, firmly turn the dose knob in a counterclockwise direction and back to the “0” position.
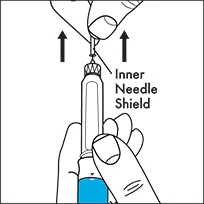
Figure L
At least 2 drops of medicine must flow out of the needle for the Pen to be properly primed. See Figure M.
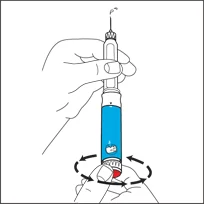
Figure M
- If at least 2 drops of medicine do not flow out, set the dose to 0.1 mg and repeat this step until at least 2 drops of medicine appear at the tip of the needle.
- When you see 2 drops of medicine flow out of the needle, the Pen is correctly primed and ready to use.
Step 4. Selecting the correct dose of Omnitrope
- Hold the pen with the needle pointing up and the dose window facing you and turn (dial) the dose knob in a clockwise direction until you see the number of mg for the prescribed dose in the middle of the dose window. The dose should be lined up with the arrow on the Pen body. You will hear 1 click for every single unit you dial. See Figure N.
Do not count the clicks to measure the correct dose of medicine.
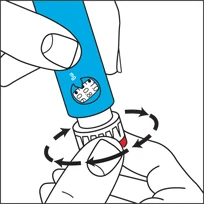
Figure N
- If you turn the dose knob past the correct dose, do not dial counterclockwise.
Instead, hold the Pen body with the needle pointing up and turn the dose knob in a clockwise direction until you see a bent arrow () in the dose dialing window. See Figure O. Now continue to turn the dose knob in a clockwise direction until you hear a click and the entire Pen body is fully extended.
The injection button can now be fully pressed, resetting the dial to “0” without giving medicine. The correct dose can now be redialed.
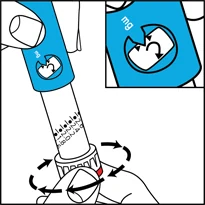
Figure O
- Check that the cartridge holder is still attached to the Pen body, with the blue arrow lined up with the white mark on the Pen body.
Step 5. Selecting the injection site and injecting the dose of Omnitrope
The best sites for injection are tissues with a layer of fat between skin and muscle such as the upper leg (thigh), buttocks, or stomach area (abdomen) as in the picture shown below. Do not inject near your belly button (navel) or waistline.
Change the injection site every day. See Figure P.
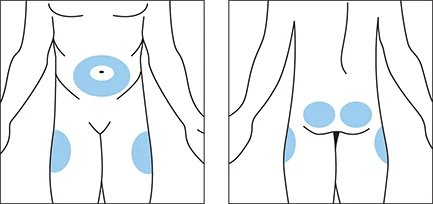
Figure P
- Select the injection site and wipe the skin with an alcohol swab as your healthcare provider showed you.
- With 1 hand, pinch a fold of loose skin at the injection site.
- With your other hand, insert the needle under the skin (at an angle of 45° to 90°) as your healthcare provider showed you. See Figure Q.
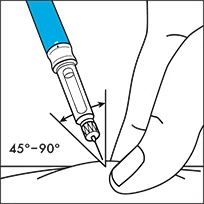
Figure Q
- After inserting the needle into the skin, push the injection button as far in as it will go and press the button firmly. A clicking sound will be heard while the dose is being injected. Continue to press firmly on the injection button for 5 seconds before you remove the needle from the skin. See Figure R.
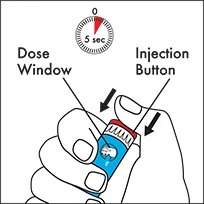
Figure R
- Stop pressing the injection button before you carefully remove the needle from the skin.
- If the injection button cannot be pushed in completely or stops during the injection, and the cartridge is empty, then the full dose has not been given. The dose indicator window will show the amount of medicine still needed. Reset the dose knob to “0” as described in Step 4. Remove the needle as described in Step 6. Replace the empty cartridge with a new cartridge as described in Step 1. Prime the new cartridge as described in Step 3. Set the dose, which you noted, and inject. This completes your dose.
Step 6. Removing and throwing away the needle and empty cartridge
- Carefully replace the outer needle shield. See Figure S.
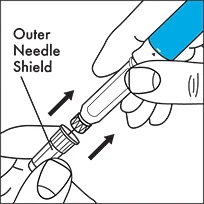
Figure S
- Hold the Pen by the cartridge holder and carefully remove the needle from the Pen by turning the needle in a clockwise direction. See Figure T. Recap the pen.
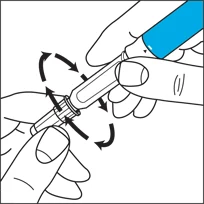
Figure T
- Put your used needles and cartridges in a FDA-cleared sharps disposal container right away after use. Do not throw away (dispose of) loose needles and cartridges in your household trash.
If you do not have a FDA-cleared sharps disposal container, you may use a household container that is:
- made of a heavy-duty plastic,
- can be closed with a tight-fitting, puncture-resistant lid, without sharps being able to come out,
- upright and stable during use,
- leak-resistant, and
- properly labeled to warn of hazardous waste inside the container.
- When your sharps disposal container is almost full, you will need to follow your community guidelines for the right way to dispose of your sharps disposal container. There may be state or local laws about how you should throw away used needles and cartridges. For more information about safe sharps disposal, and for specific information about sharps disposal in the state that you live in, go to the FDA’s website at: http://www.fda.gov/safesharpsdisposal.
- Do not dispose of your used sharps disposal container in your household trash unless your community guidelines permit this. Do not recycle your used sharps disposal container.
How should I store Omnitrope Pen 10?
- Store Omnitrope cartridges in the refrigerator between 36°F and 46°F (2°C and 8°C).
- When the Omnitrope Pen 10 contains a cartridge, do not remove the cartridge from the Pen in between injections. Store the Pen containing the cartridge in the storage case provided and place in the refrigerator.
- When the Pen does not contain a cartridge, you may store the Pen at room temperature.
- Do not freeze Omnitrope cartridges.
- Protect the Omnitrope Pen 10 and cartridge from light by storing in their cartons or the storage case.
- The Omnitrope cartridge must be thrown away 28 days after the first injection. The Omnitrope Pen 10 can be reloaded with a new cartridge and can be used multiple times.
Important information about possible problems you may have with the Omnitrope Pen 10
| Problem | Possible cause | How to fix |
|---|---|---|
| Dial unit does not turn easily. | Dust or dirt | Turn the dial beyond the highest setting on the scale. Wipe all exposed surfaces with a clean, damp cloth. |
| The injection button cannot be pushed or stops during injection. The dose knob does not return to “0”. | Cartridge is empty and full dose has not been given. | Remove the needle as described in Step 6. Replace the empty cartridge with a new cartridge as described in Step 1. Prime the new cartridge as described in Step 3. |
| Clogged needle. | Remove the needle as described in Step 6. Replace with a new needle as described in Step 2. | |
| No clicking is heard during the injection and dose knob moves freely. | Pen is in dose correction mode. | Remove the needle from skin. Press injection button all the way in so the dial returns to zero and repeat Step 2, Step 4 and Step 5 to give the injection. |
| Medicine continues to drip from the needle before injection. | Cartridge holder is not properly attached to the Pen body. | Line up blue arrow on cartridge holder with white mark on Pen body. |
| Medicine continues to drip from the needle after injection. | Needle was removed from the skin too early. | Hold the needle in the skin for 5 seconds to complete the injection, before you carefully remove the needle from the skin. For the next injection, make sure that you hold the needle in the skin for 5 seconds. |
| Cartridge holder is not properly attached to the Pen body. | Line up blue arrow on cartridge holder with white mark on Pen body. | |
| The needle is left on the Pen after injection. | Carefully remove the needle from the Pen right after the injection. |
If the Omnitrope Pen 10 is damaged or does not work, call the pharmacy where you got the Omnitrope Pen 10. If you got your Omnitrope Pen 10 from OmniSource, call 1-877-456-6794.
For other questions or additional information, call OmniSource at 1-877-456-6794. Do not try to repair the Pen yourself.
Your Omnitrope Pen 10 is covered by a 2 year guarantee. Contact your Omnitrope Pen 10 provider after you have used the pen for 2 years to have it replaced by a new one.
This guarantee is invalid if your Omnitrope Pen 10 has not been used in accordance with the manufacturer’s instruction leaflet or if the defect has been caused by neglect, misuse or accident.
BD and the BD Logo are trademarks of Becton, Dickinson and Company © 2019 BD. All rights reserved.
Manufactured by:
Sandoz Inc.
Princeton, NJ 08540
US License No. 2003
This Instructions for Use has been approved by the U.S. Food and Drug Administration.
February 2026
INSTRUCTIONS FOR USE
OMNITROPE (om-KNEE-trope)
(somatropin) for injection, for subcutaneous use
OMNITROPE® 5.8 mg/vial
The following instructions explain how to inject OMNITROPE 5.8 mg. Do not inject OMNITROPE yourself until your healthcare provider has taught you and you understand the instructions. Ask your healthcare provider or pharmacist if you have any questions about injecting OMNITROPE.
- OMNITROPE 5.8 mg is for Single-Patient-Use.
- The concentration of OMNITROPE after mixing is 5 mg/mL.
- After mixing, OMNITROPE 5.8 mg contains a preservative and should not be used in newborns.
Preparation
Collect the needed items before you begin:
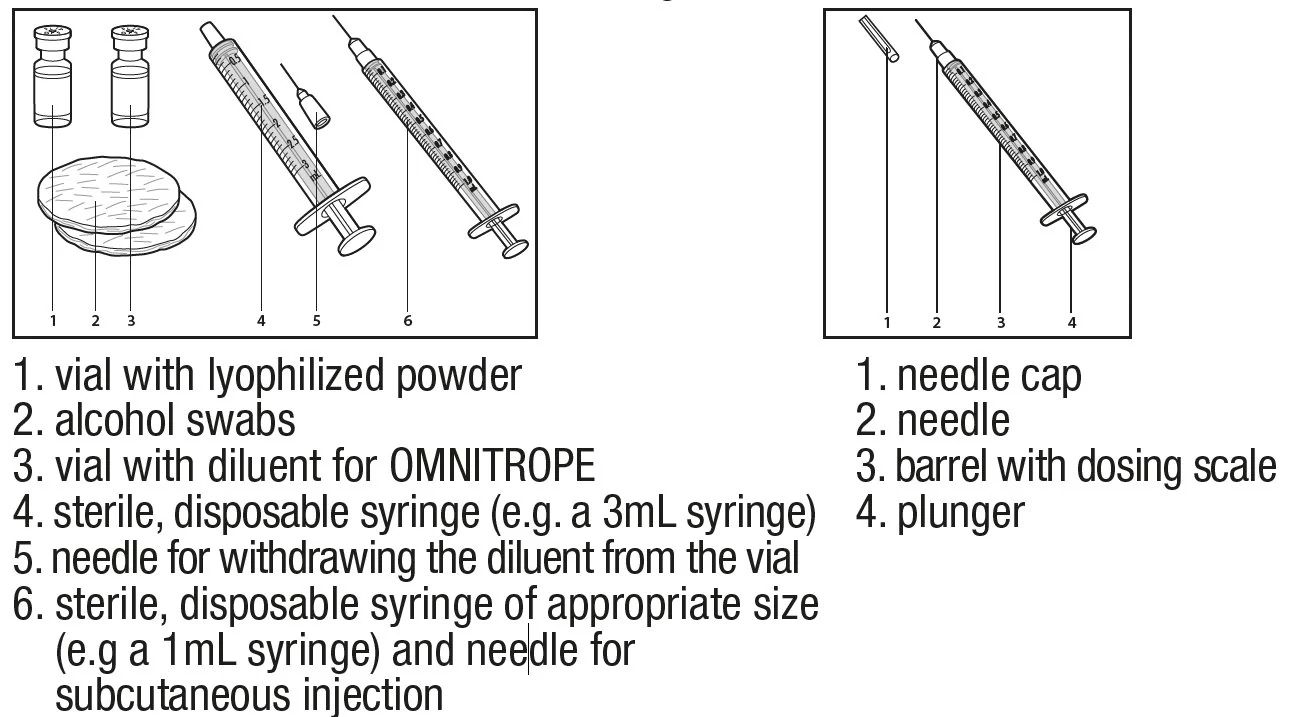
- a vial with OMNITROPE 5.8 mg
- a vial with diluent (mixing liquid - Bacteriostatic Water for Injection containing benzyl alcohol as preservative) for OMNITROPE 5.8 mg
- a sterile, disposable 3 mL syringe and needle for withdrawing the diluent from the vial (not supplied in the pack)
- sterile disposable 1 mL syringes and needles for under the skin (subcutaneous) injection (not supplied in the pack)
- 2 alcohol swabs (not supplied in the pack)
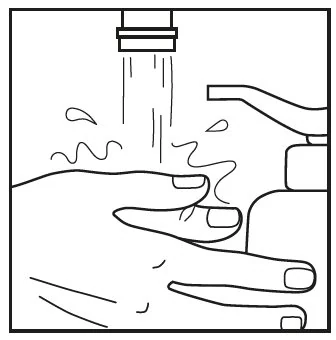
Wash your hands before you start with the next steps.
Mixing OMNITROPE 5.8 mg
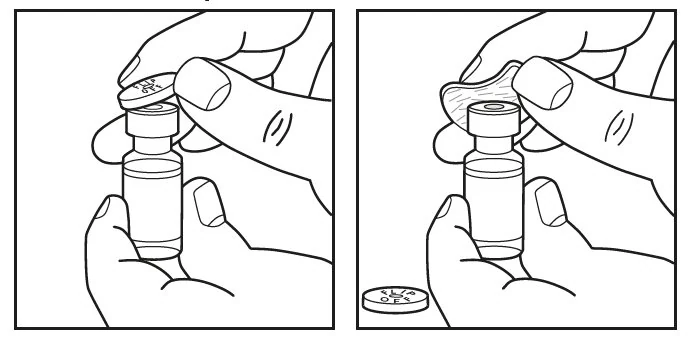
- Remove the protective caps from the two vials. With one alcohol swab, clean both the rubber top of the vial that contains the powder and the rubber top of the vial that contains diluent.
- Next use the sterile diluent vial, the disposal 3 mL syringe and a needle.
- Attach the needle to the syringe (if not attached already). Pull back the syringe plunger and fill the syringe with air. Push the needle fitted to the syringe through the rubber top of the diluent vial, push all the air from the syringe into the vial, turn the vial upside down, and withdraw all the diluent from the vial into the syringe. Remove the syringe and needle.
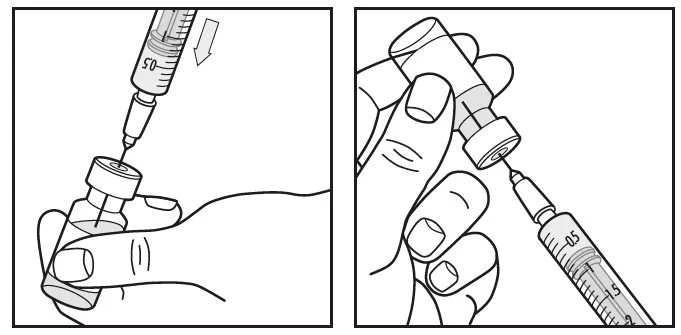
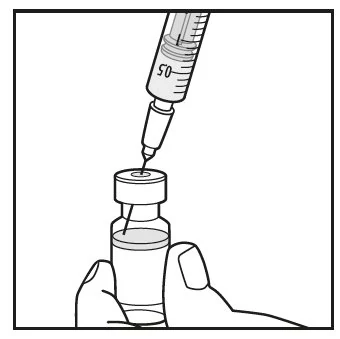
- Next take the syringe with the diluent in it and push the needle through the rubber stopper of the vial that contains the white powder. Inject the diluent slowly. Aim the stream of liquid against the glass wall in order to avoid foam. Remove the syringe and needle and throw them away.
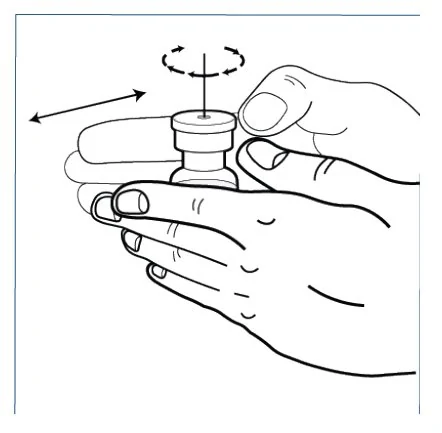
- Gently swirl the vial until the content is completely dissolved. Do not shake.
- If the medicine is cloudy or contains particles, it should not be used. The medicine must be clear and colorless after mixing.
- After mixing the medicine, the medicine in the vial must be used within 3 weeks. Store the vial in a refrigerator between 36°F to 46°F (2°C to 8°C) after mixing and using it each time.
Measuring the Dose of OMNITROPE 5.8 mg to Be Injected
- Next use the sterile, disposable 1 mL (or similar) syringe and needle for subcutaneous injection. Push the needle through the rubber top of the vial that contains the medicine that you have just mixed.
- Turn the vial and the syringe upside down.
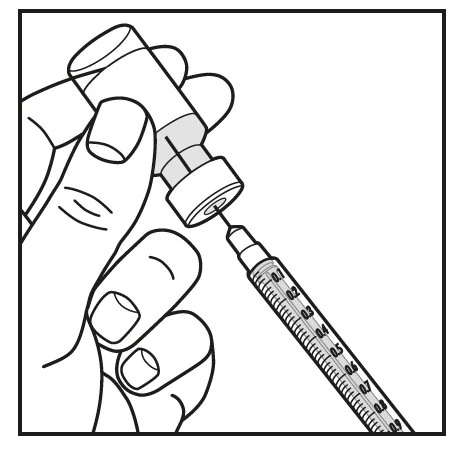
- Be sure the tip of the syringe is in the OMNITROPE mixed medicine.
- Pull back on the plunger slowly and withdraw the dose prescribed by your healthcare provider into the syringe.
- Hold the syringe with the needle in the vial pointing up and remove the syringe from the vial.
- Check for air bubbles in the syringe. If you see any bubbles, pull the plunger slightly back; tap the syringe gently, with the needle pointing upwards, until the bubble disappears. Push the plunger slowly back up to the correct dose. If there is not enough medicine in the syringe after removing the air bubbles, draw more medicine into the syringe from the mixed medicine vial and repeat checking for bubbles.
- Look at the mixed medicine in the syringe before using. Do not use if discolored or particles are present. You are now ready to inject the dose.
Injecting OMNITROPE 5.8 mg
- Choose the site of injection on your body. The best sites for injection are tissues with a layer of fat between skin and muscle such as the upper leg (thigh), buttocks, or stomach area (abdomen) as in the picture shown below. Do not inject near your belly button (navel) or waistline.
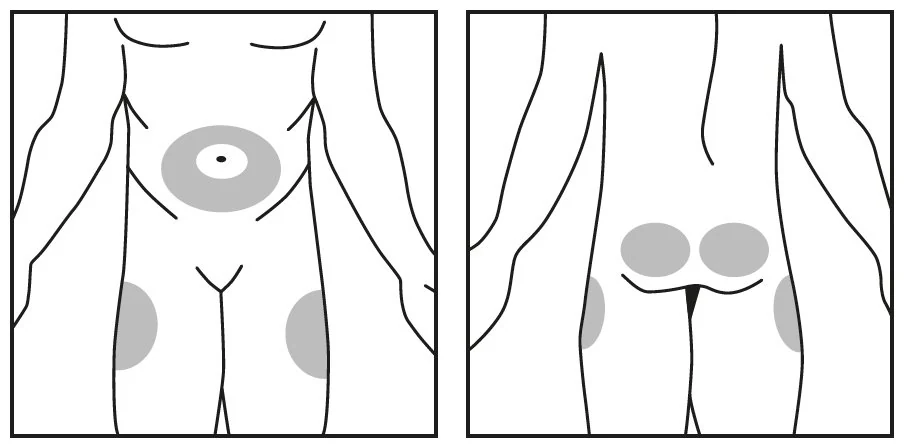
- Make sure you rotate the injection sites on your body. Inject at least 1/2 inch from the last injection. Change the places on your body where you inject, as instructed by your healthcare provider.
- Before you make an injection, clean your skin well with an alcohol swab. Wait for the area to air dry.
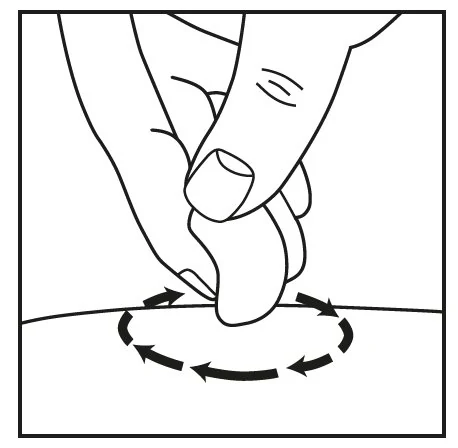
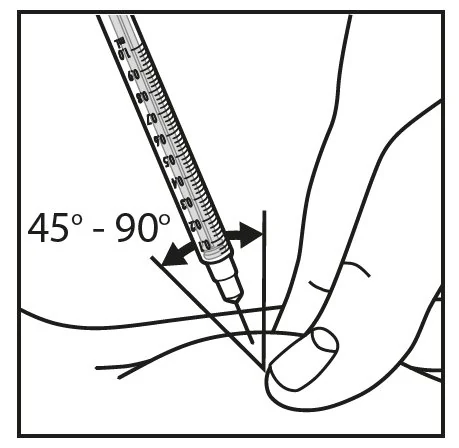
- With one hand, pinch a fold of loose skin at the injection site. With your other hand, hold the syringe as you would hold a pencil. Insert the needle into the pinched skin straight in or at a slight angle (an angle of 45° to 90°). After the needle is in, remove the hand used to pinch the skin and use it to hold the syringe barrel. Pull back the plunger very slightly with one hand. If blood comes into the syringe, the needle has entered a blood vessel. Do not inject into this site; withdraw the needle and repeat the procedure at a different site. If no blood comes into the syringe, inject the solution by pushing the plunger all the way down gently.
- Pull the needle straight out of the skin. After injection, press the injection site with a small bandage or sterile gauze if needed for bleeding, for several seconds. Do not massage or rub the injection site.
After Injecting OMNITROPE 5.8 mg
- Put your used needles and syringes in a FDA-cleared sharps disposal container right away after use. Do not throw away (dispose of) loose needles and syringes in your household trash.
If you do not have a FDA-cleared sharps disposal container, you may use a household container that is:
- made of a heavy-duty plastic,
- can be closed with a tight-fitting, puncture-resistant lid, without sharps being able to come out,
- upright and stable during use,
- leak-resistant, and
- properly labeled to warn of hazardous waste inside the container.
- When your sharps disposal container is almost full, you will need to follow your community guidelines for the right way to dispose of your sharps disposal container. There may be state or local laws about how you should throw away used needles and cartridges. For more information about safe sharps disposal, and for specific information about sharps disposal in the state that you live in, go to the FDA’s website at: http://www.fda.gov/safesharpsdisposal.
- Do not dispose of your used sharps disposal container in your household trash unless your community guidelines permit this. Do not recycle your used sharps disposal container.
How should I store OMNITROPE 5.8 mg?
- Before Use: store the vials in the refrigerator between 36°F to 46°F (2°C to 8°C) until the expiration date. Do not use if the expiration date has passed.
- After Mixing: store the vial of mixed medicine in the refrigerator between 36°F to 46°F (2°C to 8°C) and use within 3 weeks. Throw away any unused medicine after 3 weeks.
- Protect the vials from light by storing in their cartons.
- Do not freeze.
- The liquid should be clear after removal from the refrigerator. If the liquid is cloudy or contains particles, throw away the vial. Do not inject the medicine from this vial. Start over with a new vial of OMNITROPE 5.8 mg. Call your pharmacist if you need a replacement.
- Before each use clean the rubber top of the mixed medicine vial with an alcohol swab. You must use a new disposable 1 mL syringe and needle for each injection.
Manufactured by:
Sandoz Inc.
Princeton, NJ 08540
US License No. 2003
This Instructions for Use has been approved by the U.S. Food and Drug Administration.
November 2024