


Patient information: uses, side effects, how to take - RisperDAL CONSTA
INSTRUCTIONS FOR USE
RISPERDAL CONSTA ®
(risperidone)
Long-Acting Injection
12.5 mg, 25 mg, 37.5 mg, 50 mg
For deltoid or gluteal intramuscular injection only
Each injection should be administered by a healthcare professional.
IMPORTANT RESOURCES
For additional information, visit www.risperdalconsta.com or call Janssen Pharmaceuticals, Inc. at 1-800-526-7736.
Manufactured for:
Janssen Pharmaceuticals, Inc.
Titusville, NJ 08560, USA
For patent information: www.janssenpatents.com
© Johnson & Johnson and its affiliates 2007
Revised: 4/2025
Instructions for use
RISPERDAL CONSTA ® requires close attention to these step-by-step Instructions for Use to help ensure successful administration.
SINGLE-USE DEVICE
Do not reuse.Medical devices require specific material characteristics to perform as intended. These characteristics have been verified for single use only. Any attempt to re-process the device for subsequent re-use may adversely affect the integrity of the device or lead to deterioration in performance.
Important Information
Use components provided
The components in this dose pack are specifically designed for use with RISPERDAL CONSTA ®. RISPERDAL CONSTA ® must be reconstituted only in the diluent supplied in the dose pack.
Do not substitute ANY components of the dose pack.
Do not store suspension after reconstitution
Administer dose as soon as possible after reconstitution to avoid settling.
Proper dosing
The entire contents of the vial must be administered to ensure intended dose of RISPERDAL CONSTA ®is delivered.
Dose pack contents
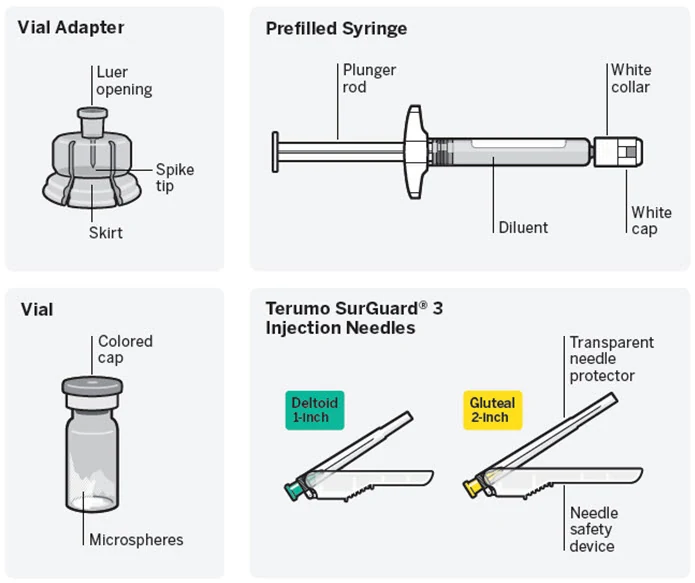
| Step 1 Assemble components | |||
|---|---|---|---|
| Take out dose pack | Connect vial adapter to vial | ||
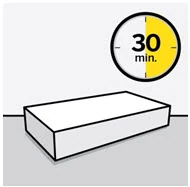 | 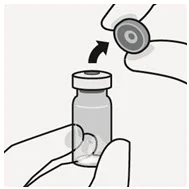 | 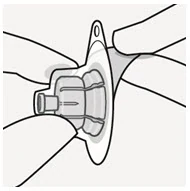 | 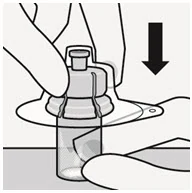 |
Wait 30 minutes Remove dose pack from the refrigerator and allow to sit at room temperature for at least 30 minutes before reconstituting. Do not warm any other way. | Remove cap from vial Flip off colored cap from vial. Wipe top of the grey stopper with an alcohol swab. Allow to air dry. Do not remove grey rubber stopper. | Prepare vial adapter Hold sterile blister as shown. Peel back and remove paper backing. Do not remove vial adapter from blister. Do not touch spike tip at any time. This will result in contamination. | Connect vial adapter to vial Place vial on a hard surface and hold by the base. Center vial adapter over the grey rubber stopper. Push vial adapter straight down onto vial top until it snaps securely into place. Do not place vial adapter on at an angle or diluent may leak upon transfer to the vial. 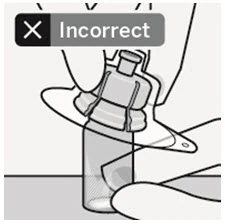 |
| Connect prefilled syringe to vial adapter | |||
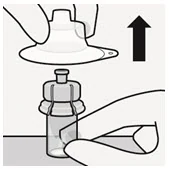 | 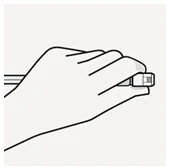 | 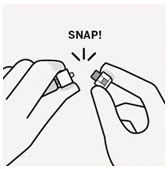 | 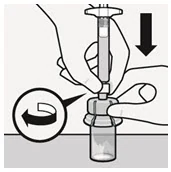 |
Remove sterile blister 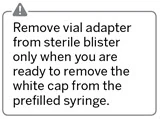 Keep vial vertical to prevent leakage. Hold base of vial and pull up on the sterile blister to remove. Do not shake. Do not touch exposed luer opening on vial adapter. This will result in contamination. | Use proper grip Hold by white collar at the tip of the syringe. Do not hold syringe by the glass barrel during assembly. 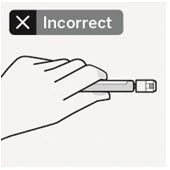 | Remove cap Holding the white collar, snap off the white cap. Do not twist or cut off the white cap. Do not touch syringe tip. This will result in contamination. 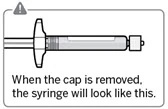 The broken-off cap can be discarded. | Connect syringe to vial adapter Hold vial adapter by skirt to keep stationary. Hold syringe by white collarthen insert tip into the luer opening of the vial adapter. Do not hold the glass syringe barrel. This may cause the white collar to loosen or detach. Attach the syringe to the vial adapter with a firm clockwise twisting motion until it feels snug. Do not over-tighten. Over-tightening may cause the syringe tip to break. |
| Step 2 Reconstitute microspheres | |||
|---|---|---|---|
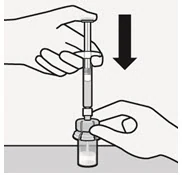 | 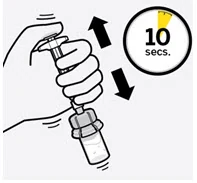 | 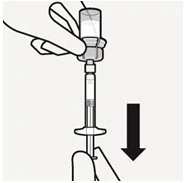 | 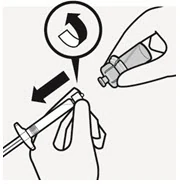 |
Inject diluent Inject entire amount of diluent from syringe into the vial. 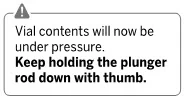 | Suspend microspheres in diluent Continuing to hold down the plunger rod, shake vigorously for at least 10 seconds, as shown. Check the suspension. When properly mixed, the suspension appears uniform, thick and milky in color. Microspheres will be visible in the liquid. Immediately proceed to the next step so suspension does not settle. | Transfer suspension to syringe Invert vial completely. Slowly pull plunger rod down to withdraw entire contents from the vial into the syringe. | Remove vial adapter Hold white collar on the syringe and unscrew from vial adapter. Tear section of the vial label at the perforation. Apply detached label to the syringe for identification purposes. Discard both vial and vial adapter appropriately. |
| Step 3 Attach needle | ||
|---|---|---|
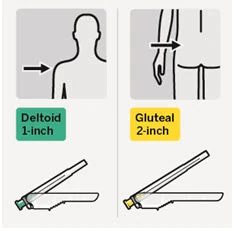 | 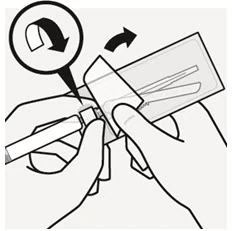 | 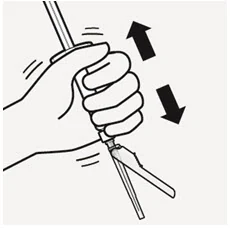 |
Select appropriate needle Choose needle based on injection location (gluteal or deltoid). | Attach needle Peel blister pouch open part way and use to grasp the base of the needle, as shown. Holding the white collar on the syringe, attach syringe to needle luer connection with a firm clockwise twisting motion until snug. Do not touch needle luer opening. This will result in contamination. | Resuspend microspheres Fully remove the blister pouch. Just before injection, shake syringe vigorously again, as some settling will have occurred. |
| Step 4 Inject dose | ||||
|---|---|---|---|---|
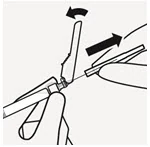 | 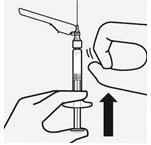 | 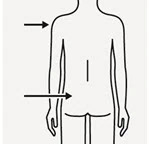 | 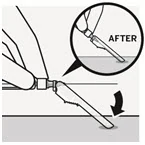 | 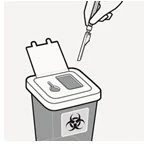 |
Remove transparent needle protector Move the needle safety device back towards the syringe, as shown. Then hold white collar on syringe and carefully pull the transparent needle protector straight off. Do not twist transparent needle protector, as the luer connection may loosen. | Remove air bubbles Hold needle upright and tap gently to make any air bubbles rise to the top. Slowly and carefully press plunger rod upward to remove air. | Inject Immediately inject entire contents of syringe intramuscularly (IM) into the gluteal or deltoid muscle of the patient. Gluteal injection should be made into the upper-outer quadrant of the gluteal area. Do not administer intravenously. | Secure needle in safety device Using one hand, place needle safety device at a 45-degree angle on a hard, flat surface. Press down with a firm, quick motion until needle is fully engaged in safety device. Avoid needle stick injury: Do not use two hands. Do not intentionally disengage or mishandle the needle safety device. Do not attempt to straighten the needle or engage the safety device if the needle is bent or damaged. | Properly dispose of needles Check to confirm needle safety device is fully engaged. Discard in an approved sharps container. Also discard the unused needle provided in the dose pack. |