


Patient information: uses, side effects, how to take - Varithena
INSTRUCTIONS FOR USE
VARITHENA Delivery System
Instructions for Use
Please read all prescribing information before using the product.
Rx Only
The Instructions for Use are for the entire VARITHENA system.
180 mg/18 mL Configuration:
Bi-Canister box and Administration Pack
180 mg/18 mL Configuration: Always write the activation date and time on the canister and verify the product has not expired prior to use. Once the VARITHENA canister has been activated, the shelf life for the product is thirty (30) days.
A canister of VARITHENA generates 90 mL of foam which, following purging instructions contained in this IFU, is sufficient to yield 45 mL of usable foam for injection. The gas mix of the foam is 65:35 O2: CO2.
WARNINGS:
As the foam fills the syringe and before injecting, inspect the syringe full of foam for any visible bubbles. If there are any present, the foam should be emptied into the VARITHENA transfer unit waste chamber and the syringe refilled.
Do not shake VARITHENA canisters.
Always use a fresh pair of sterile gloves when handling the Bi-Canister and VARITHENA transfer unit.
Notes: Use a new sterile syringe after each injection. Never fill a syringe until just before the foam is required.
Use foam within 75 seconds of generation or discard and generate new foam.
The activated VARITHENA canister should always be stored with a VARITHENA transfer unit in place in the upright position at or below 86°F (30°C), in an appropriately controlled clean area to limit contamination. A new VARITHENA transfer unit must be used for each treatment session.
Unpacking VARITHENA:
180 mg/18 mL: Bi-Canister Box and Administration Pack
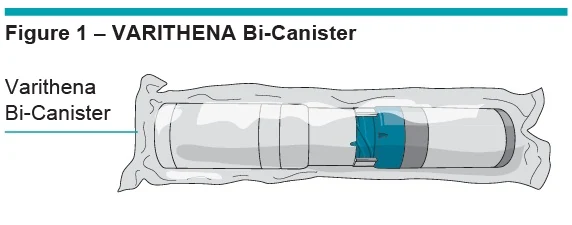
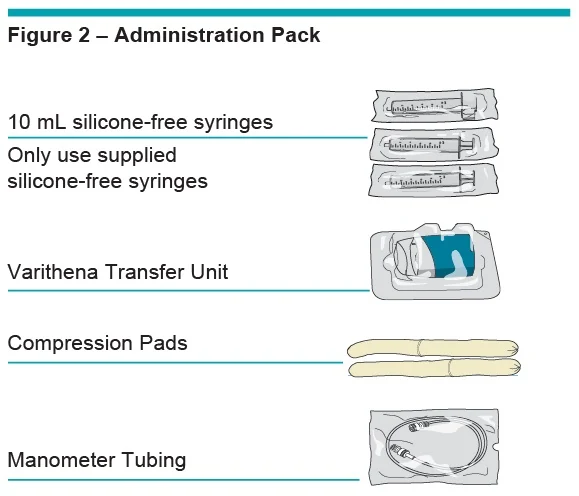
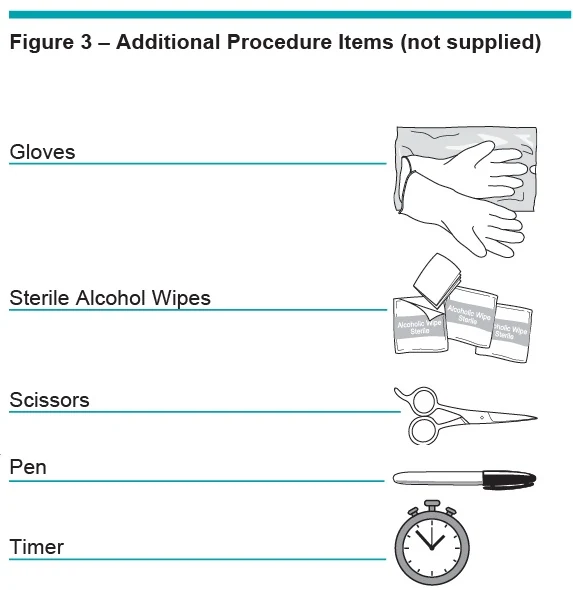
Gather all the items needed for the generation of foam: the VARITHENA Bi-Canister box (Figure 1), Administration Pack (including: VARITHENA transfer unit, manometer tube, compression pad and silicone-free syringes) (Figure 2), and the following items that are not supplied: scissors, pen, sterile alcoholic wipes, timer and gloves (Figure 3).
Open the VARITHENA Bi-Canister box and remove the VARITHENA Bi-Canister pouch. Open the Administration Pack and remove the components. Inspect the pouch and components for damage (do not use product if there are any visible signs of damage to pouch or components).
Preparing the Patient
Preparations for treating the patient with VARITHENA should include the following steps:
- Position the patient comfortably on the treatment table in a supine position with their hip externally rotated to facilitate access to the GSV.
- Use ultrasound to find the best site for venous access.
- Using an aseptic technique, infiltrate the skin over the venous access point with local anesthetic.
- Obtain venous access under ultrasound guidance.
- IV catheters that are 16 to 22 gauge and 40 - to 50 - mm long or micropuncture sets are recommended for venous access.
- Prefill the manometer tube with sterile heparinized normal saline solution and connect to the IV catheter.
- Confirm venous access by aspirating with a syringe, blood should be dark and under low pressure.
- Flush the IV catheter and manometer tube with heparinized normal saline and secure it to the skin with adhesive tape, leave the saline syringe connected.
- With the IV catheter in place and secure, place the patient supine and elevate the leg to approximately 45 degrees.
Complete all preparation of the patient and preparations for VARITHENA injectable foam injection before generation of the foam.
VARITHENA Preparation
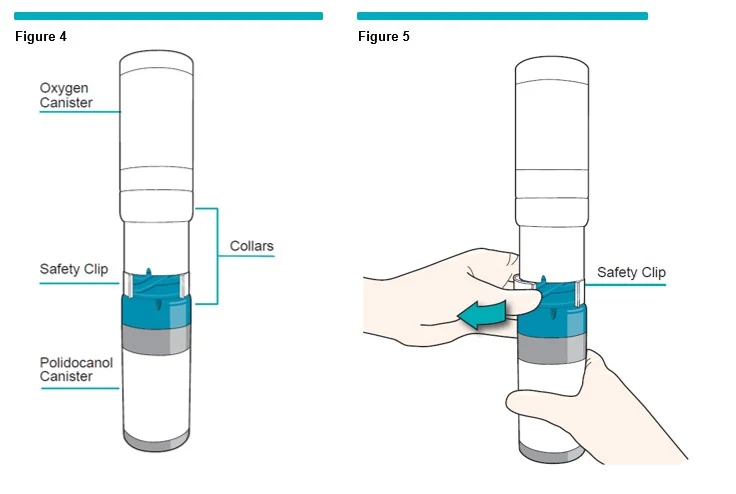
1 Wearing appropriate sterile gloves, open Bi-Canister pouch using a pair of scissors. Place canisters upright on a cleaned (sterile wipes) stable surface with the white oxygen canister on top (Figure 4). Discard empty pouch.
2 Remove the safety clip by lifting one corner of the clip out (Figure 5). Discard the safety clip.
Gas Activation of the VARITHENA Canistern
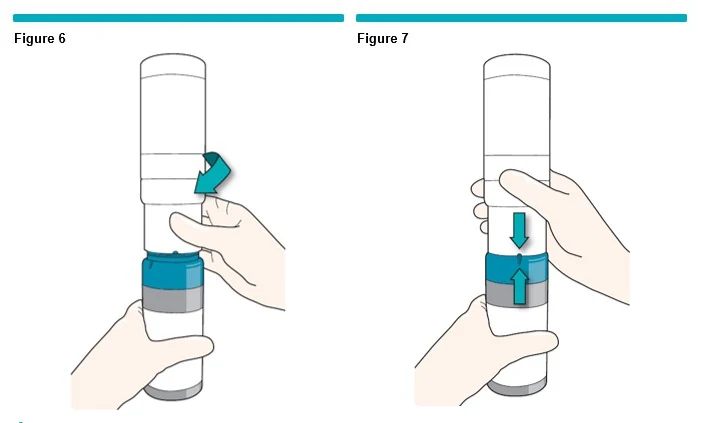
3 To begin the gas transfer, twist the canisters together clockwise (Figure 6) until they come to a stop and the small indicators/marks on the collars are aligned (Figure 7). You may hear a bubbling sound.
While the canisters are activating, keep them upright on the clean flat surface for 1 minute. Use a timing device to keep track of the 1 minute time. Extended gassing periods (more than 10 minutes) are undesirable.
4 Note: In order to maintain sterility of the VARITHENA transfer unit, the following steps must be followed. While waiting 1 minute for the gas transfer, open a new VARITHENA transfer unit, blister pack, but leave the VARITHENA transfer unit in the package (Figure 8).
The manometer tubing (20 inch) should have been previously filled with sterile heparinized normal saline solution.

5 After 1 minute,
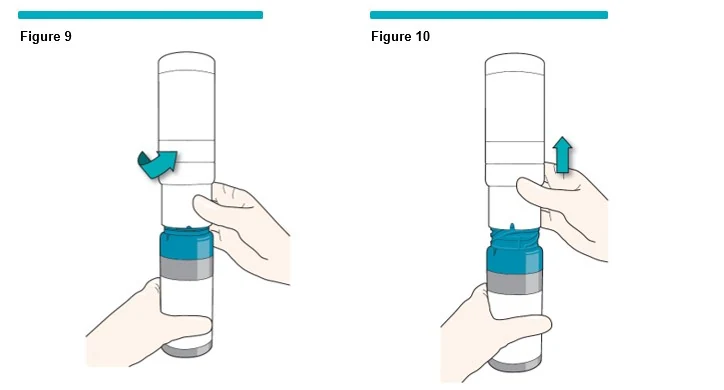
- Twist the two canisters by turning them in the opposite direction (counterclockwise) as before (Figure 9).
- Pull straight up to separate the oxygen canister from the VARITHENA canister, as shown (Figure 10). Do not separate canisters until you have a VARITHENA transfer unit ready to place onto the VARITHENA canister (See step 6).
- Put the oxygen canister (with white collar) aside.
- The VARITHENA canister (with blue collar) should remain on a clean flat surface, in the upright position.
Write today’s date and time in the “Date and Time of Activation” box on the VARITHENA canister (Figure 11)

Connecting a new VARITHENA transfer unit and syringe
6 Remove the VARITHENA transfer unit from the blister pack, wearing a fresh pair of sterile gloves. Make sure not to touch the sterile underside of the VARITHENA transfer unit, (discard VARITHENA transfer unit if contaminated).
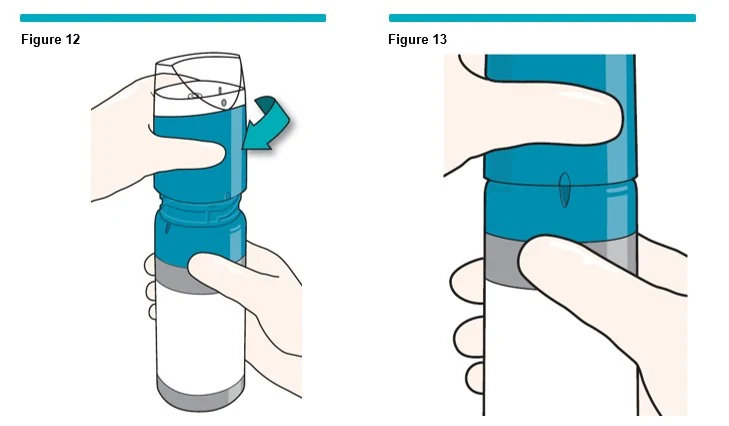
Immediately place the VARITHENA transfer unit on top of the blue VARITHENA canister. Gently rotate the VARITHENA transfer unit clockwise as indicated (Figure 12) until it drops into the collar threads then twist the VARITHENA transfer unit (clockwise) until it reaches a stop (Figure 13).
The system is now activated and ready for use.
7 Once all preparations for injection are complete, i.e., cannula in situ, patient’s leg elevated and a good ultrasound view of the saphenofemoral junction (SFJ) obtained, foam may be generated for immediate use.
Open a sterile 10 mL silicone-free syringe blister pack and keep it in the package until needed.
Remove the syringe from the package, and connect it to the VARITHENA transfer unit as shown (Figure 14).

Priming a New Syringe
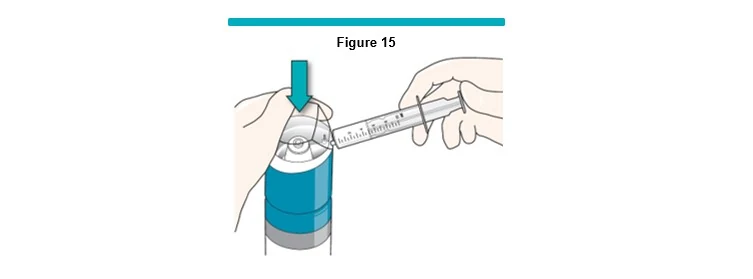
8 Gently press down the VARITHENA transfer unit to begin producing foam (Figure 15).
Using continuous pressure, allow the silicone-free syringe to fill between 3 mL and 5 mL.
Release the pressure on the VARITHENA transfer unit and leave the syringe connected.
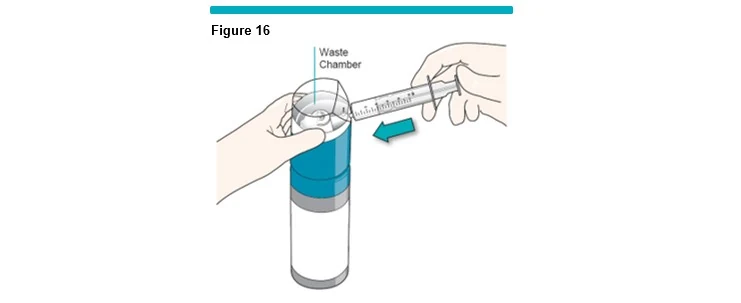
9 Push the silicone-free syringe plunger in fully to discard its contents (Figure 16). Do not disconnect the syringe.
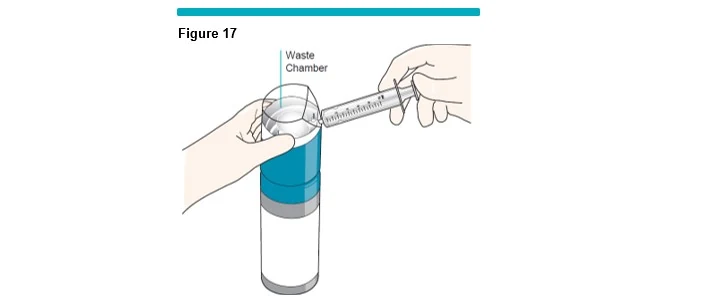
Note: The foam will automatically be diverted into the waste chamber within the VARITHENA transfer unit (Figure 17). This process eliminates the small quantity of air in the syringe and VARITHENA transfer unit.
Generation of Foam
10 Foam Generation: The technique to produce usable foam requires a single purge cycle before filling the syringe, a process that takes less than 1 second.
| Important Note: Foam must be generated by pushing down on the VARITHENA transfer unit continuously without pulling back on the plunger of the syringe (aspirating). |
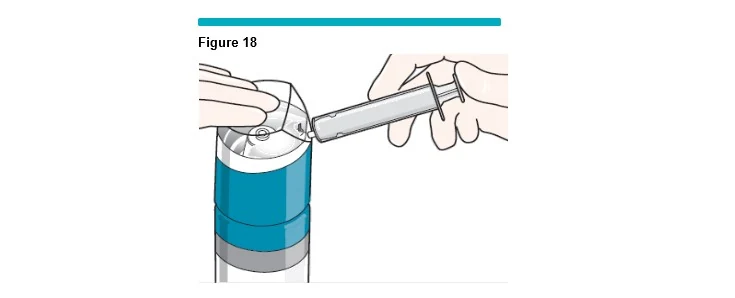
While holding the silicone-free syringe plunger in place, gently press down on the VARITHENA transfer unit to begin the purge cycle (Figure 18).
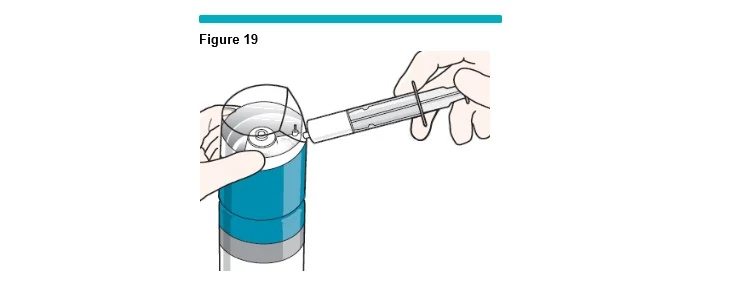
Visually inspect the flowing foam inside the VARITHENA transfer unit to make sure the visible air bubbles have been expelled (less than 1 second) before releasing the syringe plunger and allowing it to fill to the desired volume (Figure 19).
Draw up to 5 mL of foam into the syringe.
Inspecting and Injecting Foam
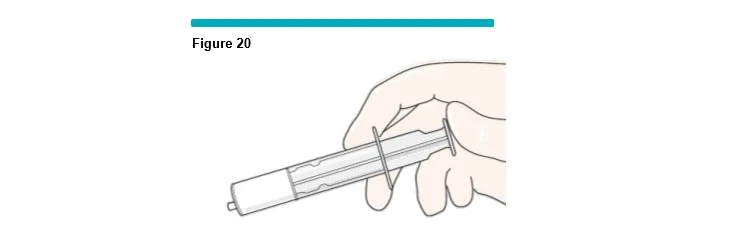
11 After the silicone-free syringe has filled to the desired volume, wait 10 seconds to allow the pressure to equalize before removing the syringe from the VARITHENA transfer unit (Figure 20).
WARNING: As the foam fills the syringe and before injecting, inspect the syringe full of foam for any visible bubbles (easily seen with the unaided eye at arm’s length). If there are any present, empty the foam into the VARITHENA transfer unit waste chamber and refill the syringe.
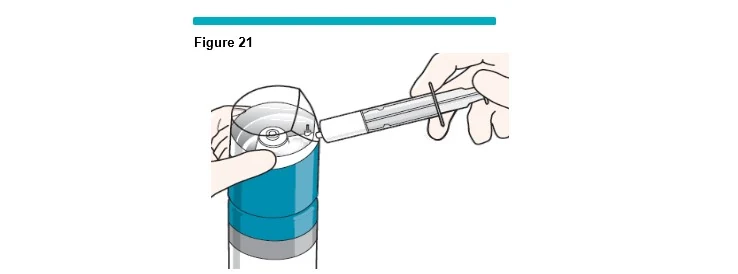
12 Remove the syringe from the VARITHENA transfer unit and inspect it for visible bubbles (Figure 21).
If no visible bubbles are present then the foam is ready for use.
Use the foam within 75 seconds of generation or discard and generate new foam.
WARNING: The total amount of foam injected in any one treatment session must not exceed 15 mL, comprised of individual injections of up to 5 mL each.
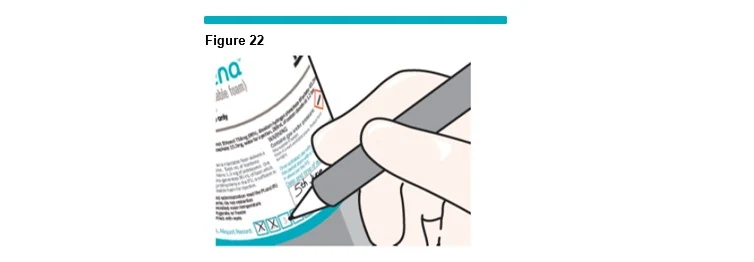
After each treatment session, mark-off on the canister label the number of aliquots of up to 5 mL of usable foam drawn from the canister per step 11 (Figure 22).
13 Connect a syringe of freshly generated foam to the manometer tubing, which is already connected to the cannula, in preparation for the initial injection. The manometer tubing (20) inch should have been previously filled with sterile heparinized normal saline solution.
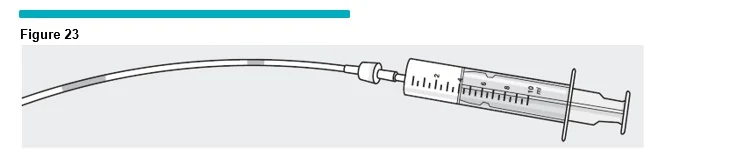
14 Inject the foam at approximately 0.5 mL to 1.0 mL per second through the manometer tubing. Five (5) mLs of foam should be injected in approximately 10 seconds. Always inspect the foam as it passes through the manometer tubing for visible bubbles (Figure 23). If any visible bubbles are seen (easily seen with the unaided eye at arm's length) they should be aspirated back into the silicone-free syringe and the syringe contents discarded back into the VARITHENA transfer unit waste chamber, and a fresh syringe of foam generated.
Notes: Use a new sterile syringe after each injection.
WARNING: The total amount of foam injected in any one treatment session must not exceed 15 mL, comprised of individual injections of up to 5 mL each
Do not remove VARITHENA transfer unit if the VARITHENA canister is to be stored (see Storage)
Change sterile gloves appropriately, to limit any contamination of the VARITHENA transfer unit and Bi-Canister.
Compression Pads
15 Once treatment is complete, the Compression Pads should be used:
The objective of the pads is to focus the compression forces on the treated vein to keep them as free from blood as possible, thus minimizing retained thrombus.
The compression pads supplied should be placed along the course of the treated trunk vein in the thigh, and over raised treated varicose veins above and below the knee. The pads may be shaped to follow the course of the veins. The pads should be placed outside the first layer of limited stretch bandage and held in place by a second layer of bandage.
The appropriate length compression stocking is then applied.
Replacing the VARITHENA Transfer Unit
Important Note: Do not replace the VARITHENA transfer unit if the canister is to be stored for future use. The activated VARITHENA canister should always be stored in an appropriately cleaned area with a VARITHENA transfer unit in place in the upright position at or below 86°F (30°C). Replace the VARITHENA transfer unit just prior to the next treatment session.
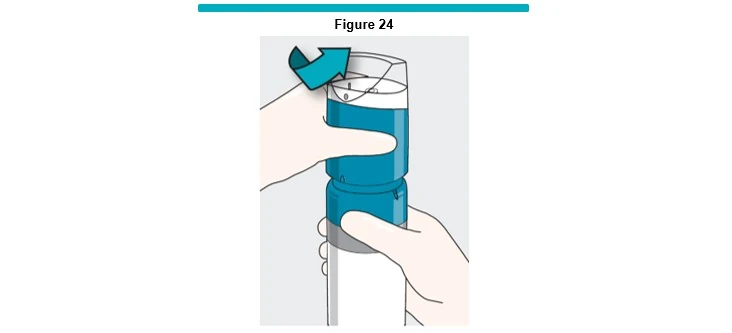
16 Wearing appropriate new sterile gloves, hold the VARITHENA canister, twist the VARITHENA transfer unit counterclockwise and then pull up to separate from the canister (Figure 24).
17 Discard the old VARITHENA transfer unit and open a new VARITHENA transfer unit.
Make sure not to touch the sterile underside of the VARITHENA transfer unit.
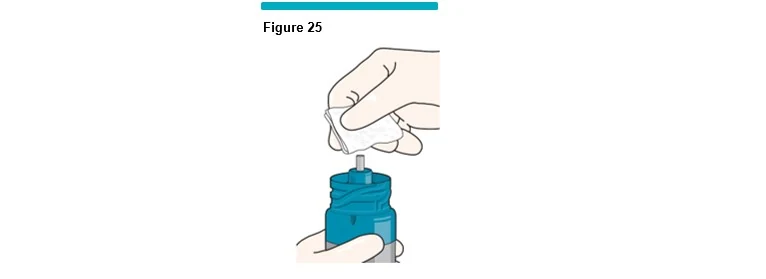
18 Swab the uncovered shuttle with a fresh sterile alcohol wipe (Figure 25) and immediately place the VARITHENA transfer unit on top of the VARITHENA canister.
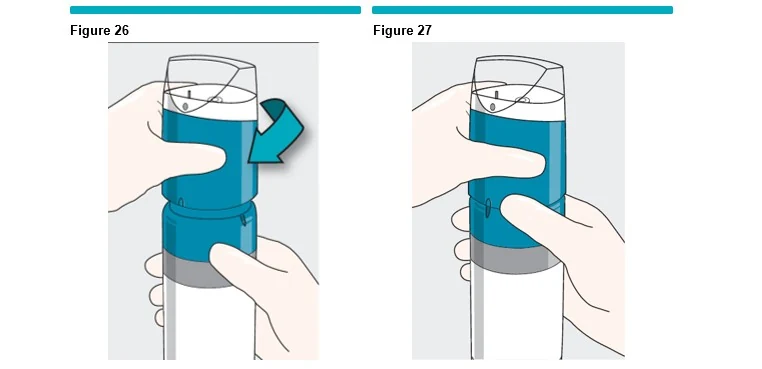
Gently rotate the VARITHENA transfer unit clockwise until it drops into the collar threads (Figure 26), then twist the VARITHENA transfer unit (clockwise) until it reaches a stop (Figure 27).
The VARITHENA device now ready for use for a new treatment session, following the instructions in Steps 7 to 15.
Storage and Disposal
Note: The activated VARITHENA canister should always be stored with a VARITHENA transfer unit in place in the upright position at or below 86°F (30°C), in an appropriately controlled clean area to limit contamination.
Dispose of VARITHENA and oxygen canisters following local and state regulations for aerosol disposal.
The VARITHENA transfer unit can be disposed of as non-toxic non-clinical waste.
| 180 mg/18 mL Configuration: |
Once the VARITHENA canister has been activated, the shelf life for the product is thirty (30) calendar days. Always write the activation date and time on the canister and verify the product has not expired prior to use. Net Contents: 18 mL One canister of VARITHENA in the 180 mg/18 mL Configuration contains: 180 mg Polidocanol, 756 mg alcohol (96% v/v), 43.2 mg disodium hydrogen phosphate dihydrate, 15.3 mg potassium dihydrogen phosphate, water for injection. One canister of VARITHENA generates 90 mL of foam which, following purging instructions contained in this IFU, is sufficient to yield 45 mL of usable foam for injection. The gas mix of the foam is 65:35 O2:CO2. NDC 60635-118-01 VARITHENA 180 mg/18 mL Bi- Canister NDC 60635-018-01 180 mg/18 mL PD Canister Administration Pack |
This product may be protected by one or more patents.
Patent information can be obtained at http://www.bostonscientific.com/patents.
Manufactured by:
Biocompatibles UK Ltd
Chapman House, Weydon Lane
Farnham, UK, GU9 8QL
Boston Scientific Limited
Business and Technology Park
Model Farm Road
Cork
Ireland
Distributed by:
Boston Scientific Corporation, USA, and its subsidiaries
VARITHENA is a registered trademark of a subsidiary of Boston Scientific Corporation, USA.
Varithena®
(polidocanol injectable foam)

CN01355.02