


Patient information: uses, side effects, how to take - Furoscix
INSTRUCTIONS FOR USE
Model/REF # FUR-80W5
Instructions For Use
On-Body Infusor for
FUROSCIX® [fue roe’ six]
(furosemide injection) for subcutaneous use
Single-Use On-Body Infusor and
80 mg/10 mL (8 mg/mL) Prefilled Cartridge
This Instructions for Use contains information about how to prepare and use FUROSCIX On-Body Infusor.
Before Starting
- Read this Instructions for Use before using the FUROSCIX On-Body Infusor for the first time.
- You or a caregiver should receive training before using the Furoscix On-Body Infusor.
- Always wash your hands before starting.
- The FUROSCIX On-Body Infusor will deliver a fixed dose of 80 mg of furosemide over about 5 hours.
- The FUROSCIX On-Body Infusor delivers the medicine just under the skin (subcutaneously).
- When the FUROSCIX On-Body Infusor is started, a small needle sticks into the skin to deliver the medicine. The on-body Infusor signals when all the medicine has been delivered. When the on-body Infusor is removed from the skin, a needle cover will extend over the needle to protect from an accidental needle stick.
Parts of the FUROSCIX On-Body Infusor and Prefilled Cartridge
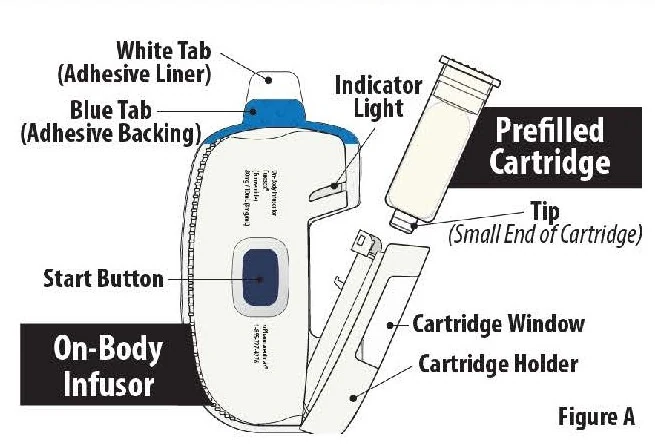
Important Information
- The on-body Infusor and prefilled cartridge are not made with natural rubber latex.
- The infusion will last about 5 hours. During this time, you should limit your activity so that your bending movements are limited. Wearing the Infusor while riding in a car or flying in an airplane is not recommended.
- You should notice an increase in urine production in about an hour after the infusion is started and may need to make frequent bathroom visits. Be sure you have access to a bathroom for up to 8 hours after starting the infusion. If you do not notice the need to go to the bathroom, call your healthcare provider.
- The on-body Infusor can only be used with the prefilled FUROSCIX cartridge supplied in the kit.
- Do not use any other cartridges or medicines inside the on-body Infusor.
- Do not apply lotions, oils, or ointments to the adhesion area of the abdomen prior to applying the on-body Infusor to the abdomen.
- Do not use the on-body Infusor if the packaging appears to be opened, or if the on-body Infusor has been dropped or appears to be broken or damaged.
- Do not use the on-body Infusor within 12 inches of mobile phones, tablets, computers or wireless accessories (for example: TV remote control, Bluetooth computer keyboard or mouse).
- Do not use the on-body Infusor or prefilled cartridge after the expiration date on the carton.
- Do not use the prefilled cartridge if the liquid is discolored or cloudy. The liquid in the prefilled cartridge should be clear to slightly yellow in color.
- Do not use the on-body Infusor in or around an MRI machine.
- Do not take the on-body Infusor off your skin while it is infusing, unless there is an emergency or a device error. Removing the on-body Infusor before the infusion is done will result in a partial dose. The on-body Infusor will stop infusing and it cannot be restarted. Do not apply a new on-body Infusor unless instructed to do so by your healthcare provider.
- Do not reuse the on-body Infusor. The on-body Infusor is for single use only.
- Do not let the on-body Infusor get wet from water or any other liquids. Do not shower, bathe, swim or do activities that may make you sweat while wearing the on-body Infusor. It contains parts that should not get wet.
Call your healthcare provider or scPharmaceuticals at 1-855-SCPHARMA (1-855-727-4276) if you have any questions.
Storage Information
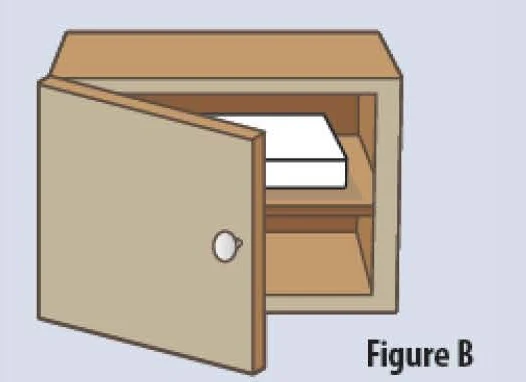
- The FUROSCIX On-Body Infusor and prefilled cartridge should be stored at controlled room temperature between 68°F to 77°F (20°C to 25°C) (see Figure B). Do not refrigerate or freeze.
- Keep the FUROSCIX prefilled cartridge in the original carton to protect from light or physical damage until you are ready to use.
- Keep the FUROSCIX On-Body Infusor and prefilled cartridge out of the reach of children.
Prepare for the Infusion
STEP 1 Wash Hands, Check Expiration Date and Remove Supplies from Carton
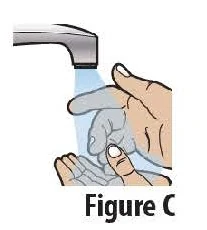
1.1 Wash your hands before using the on-body Infusor (Figure C).
1.2 Check the expiration date on the FUROSCIX On-Body Infusor carton (see Figure D). Do not use if the expiration date has passed.

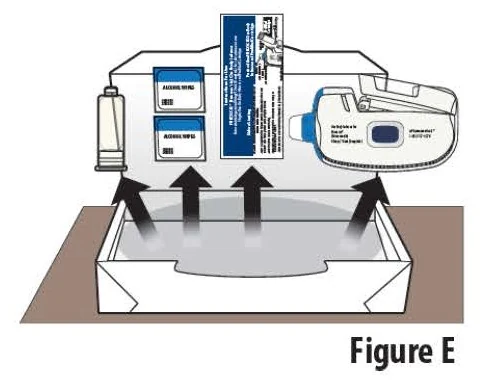
1.3 Open the carton and peel away the white paper cover. Remove the plastic cover from the clear tray. Remove supplies from the carton and packaging (see Figure E). Do not use the on-body Infusor or prefilled cartridge if packaging appears to have been previously opened or damaged.
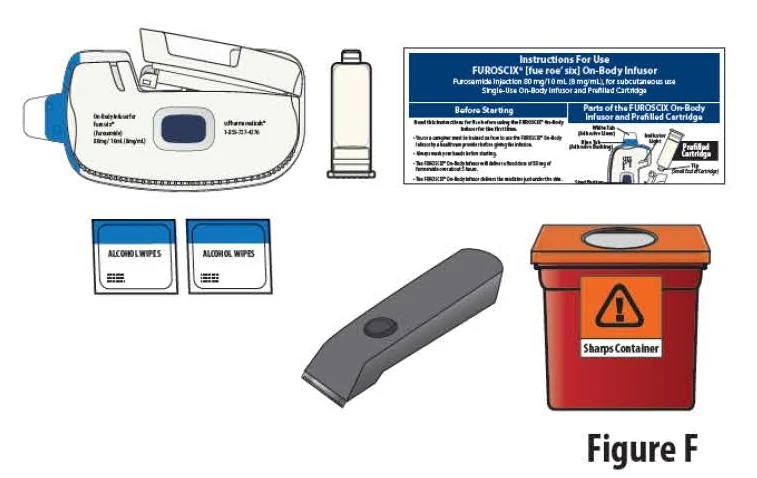
1.4 Gather all materials needed for your injection, on a clean, well-lit work surface (Figure F):
- On-body Infusor and prefilled cartridge (Included)
- Instructions For Use (Included)
- Alcohol wipes (Included)
- Clippers (if needed) (Not included)
- Sharps disposal container (Not included)
STEP 2 Check On-Body Infusor and Prefilled Cartridge
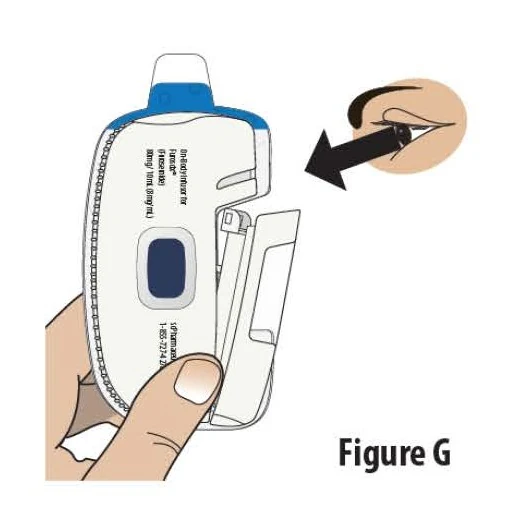
2.1 Check the on-body Infusor and prefilled cartridge for any damage (see Figure G).
Do not use the on-body Infusor or prefilled cartridge if either item appears to be damaged.
Do not touch the blue start button until the on-body Infusor is on the skin and you are ready to begin the infusion.
Do not touch or fully open the cartridge holder until you are ready to load the cartridge.
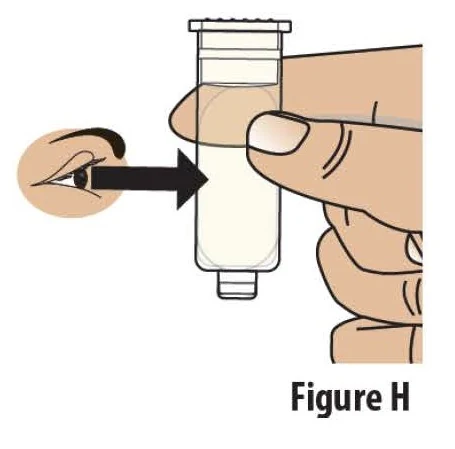
2.2 Check the liquid medicine in the prefilled cartridge (see Figure H). The liquid in the prefilled cartridge should be clear to slightly yellow.
Do not use the prefilled cartridge if the liquid is discolored or cloudy.
Call scPharmaceuticals at: 1-855-SCPHARMA (1-855-727-4276) or call your healthcare provider.
STEP 3 Load Prefilled Cartridge into the On-Body Infusor
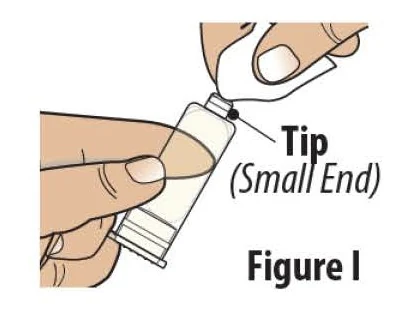
3.1 Clean the tip (small end) of the prefilled cartridge with an alcohol wipe (see Figure I).
Do not continue with the process of opening the cartridge holder all the way or loading the prefilled cartridge until you are ready to begin the infusion.
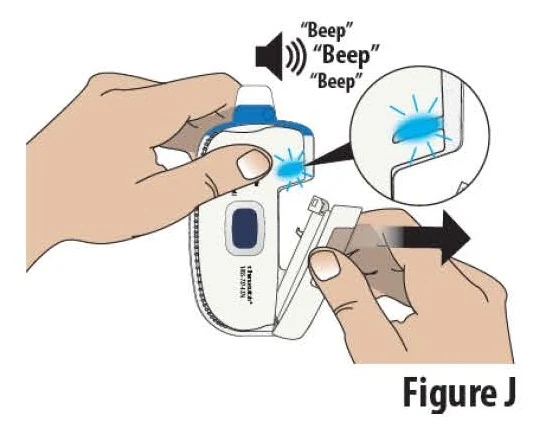
3.2 Open the cartridge holder all the way to turn on the on-body Infusor. The on-body Infusor “beeps” and the indicator light will begin blinking blue (see Figure J).
Note: Complete steps 3.3 through 6.1 within 30 minutes of fully opening the cartridge holder or the Infusor will alarm and cannot restart.
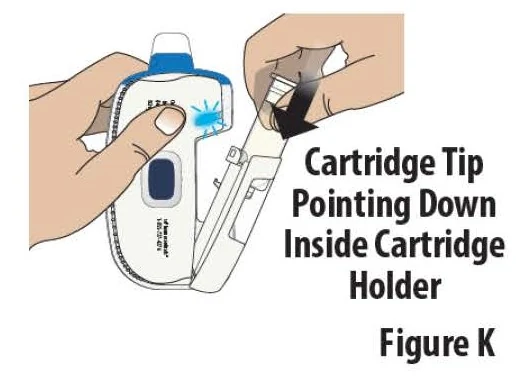
3.3 Insert the prefilled cartridge into the cartridge holder with the tip pointed down (see Figure K).
Note: The prefilled cartridge should slide into the cartridge holder easily. If it does not slide in easily, check the prefilled cartridge to make sure the tip is pointed down and try again.
Do not press the blue start button until on-body Infusor is applied to skin and you are ready to begin the infusion.
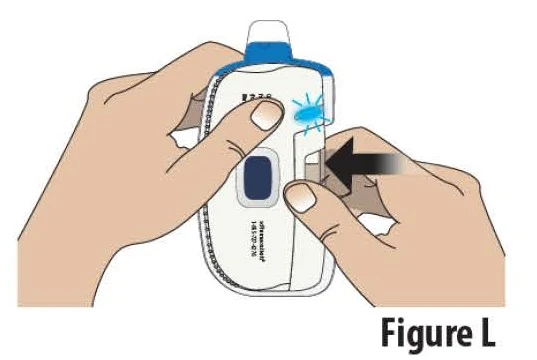
3.4 Close the cartridge holder all the way until it is even with the rest of the on-body Infusor (see Figure L). You may hear a “click” sound when it is closed.
Note: If the indicator light blinks red and the on-body Infusor "beeps", the on-body Infusor has experienced an internal error. Do not use the on-body Infusor (see On-Body Infusor Alarm section).
Apply the On-Body Infusor
STEP 4 Select and Prepare Application Site
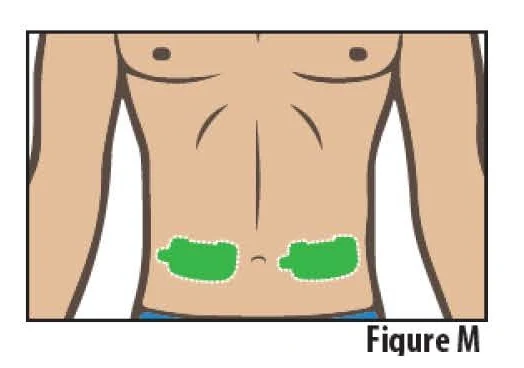
4.1 Select one site on the stomach on either side of the belly button (navel). The site should be a flat area below the rib cage and above the belt line (see Figure M).
Do not select a site where the skin is irritated or broken.
Do not apply lotions, oils or ointments to the adhesion area of the abdomen.
Do not select a site where belts, waistbands or other types of clothing may rub against, disturb, or dislodge the on-body Infusor.
Note: Rotate application site (side of the stomach) each time if told by your healthcare provider to repeat dose.
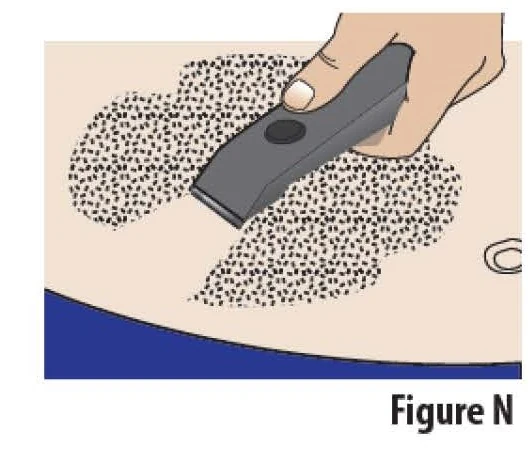
4.2 The site should be hairless or nearly hairless. If needed, remove excess hair by clipping or shaving the hair before applying the on-body Infusor (see Figure N).
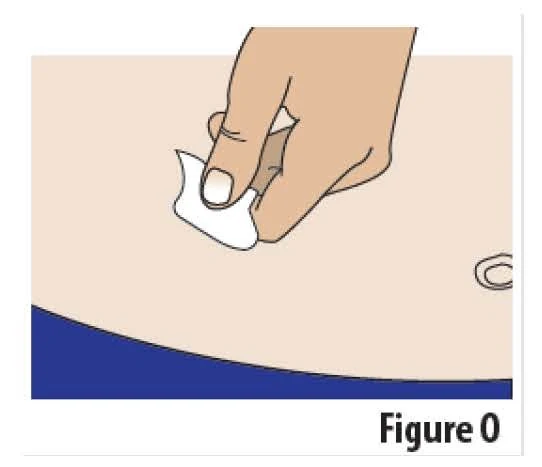
4.3 Wipe the skin where the on-body Infusor will be applied with an alcohol wipe and allow area to dry (see Figure O).
STEP 5 Apply the On-Body Infusor
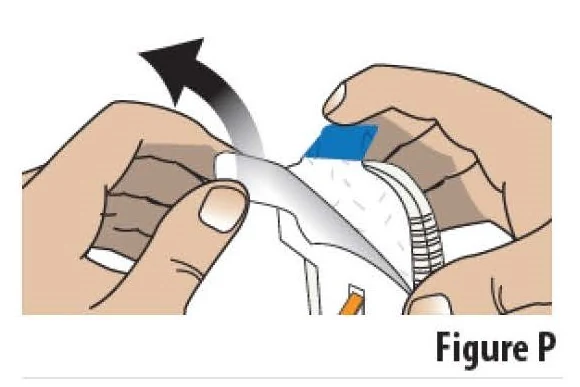
5.1 Pick up the on-body Infusor. Peel away the adhesive liner by grasping the white tab and pulling it away from the blue tab/adhesive backing (see Figure P).
Do not touch the sticky (adhesive) part of the on-body Infusor with your fingers or let it touch any objects or surfaces before the Infusor is placed on the skin.
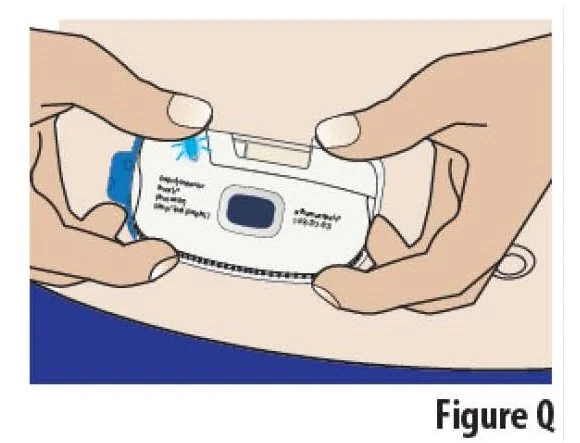
5.2 Apply the on-body Infusor to the chosen skin site while standing or sitting up straight.
Position the on-body Infusor so that the cartridge window and the indicator light can be seen during the infusion (see Figure Q).
Do not bend over when applying the on-body Infusor.
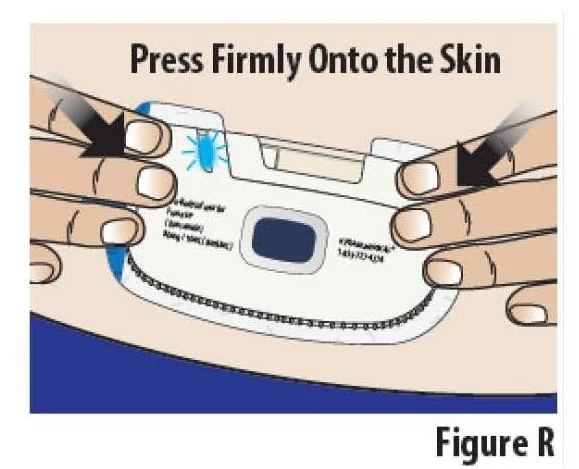
5.3 Press the on-body Infusor firmly onto the skin and hold it for several seconds (see Figure R). Then rub your finger over the edges of the adhesive to get it to stick well.
Do not touch the blue start button until you are ready to start the infusion (see Step 6).
Do not remove and reapply on-body Infusor. The on-body Infusor adhesive might not work as well.
Start the Infusion
STEP 6 Start the Infusion
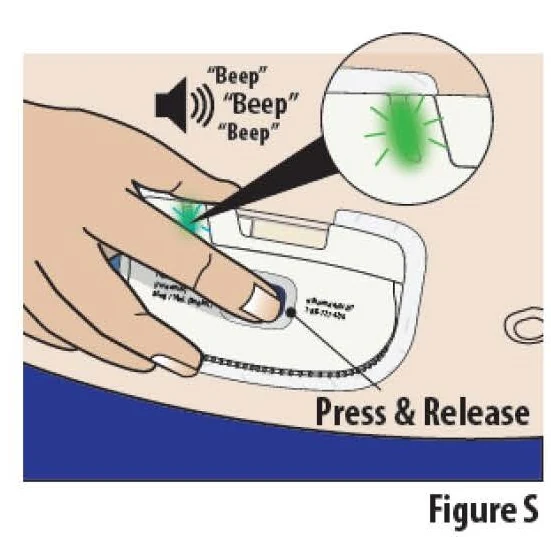
6.1 Firmly press and release the blue start button to begin the infusion (see Figure S).
The on-body Infusor will stick a very small needle just under the skin and begin delivering the medicine. The indicator light will start blinking green and the on-body Infusor "beeps", signifying that the infusion has begun.
Note: At the start of the infusion, you may also hear the on-body Infusor motor running for several seconds.
STEP 7 Allow Medicine to Deliver for 5 Hours
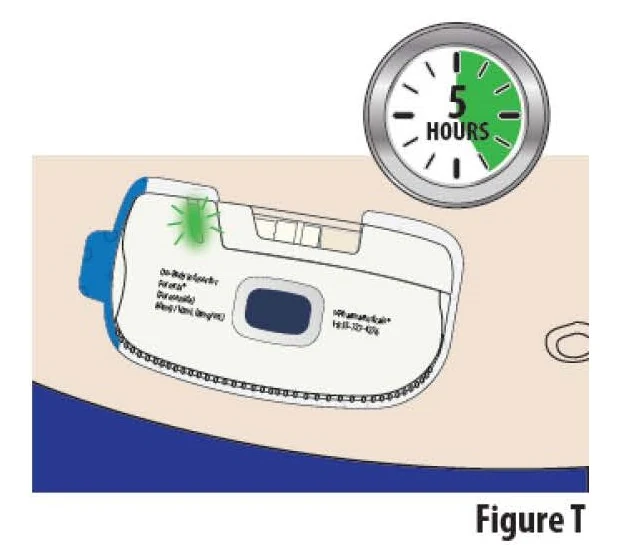
7.1 Relax during the delivery period. The on-body Infusor should remain on the skin until the delivery is complete.
Do not exercise or take part in activities that might result in the on-body Infusor falling off. Take care not to bump the on-body Infusor while wearing it. It takes about 5 hours for the on-body Infusor to deliver all of the medicine. During the infusion, the indicator light will continue to blink green periodically, signifying that the infusion is running (see Figure T).
Note: If the on-body Infusor falls off or if the indicator light begins blinking red, call your healthcare provider right away (see On-Body Infusor Alarm section). Do not reapply or reuse the on-body Infusor. Do not apply a new on-body Infusor unless instructed to do so by your healthcare provider.
If You Have to Stop the Infusion Due to An Emergency, Do the Following:
- Remove the on-body Infusor from the skin (see Step 8). It will immediately stop infusing and the on-body Infusor will deactivate. Do not reuse the on-body Infusor. After the on-body Infusor is removed, it can no longer be used.
- Call your healthcare provider for further instructions.
Remove and Dispose of the On-Body Infusor
STEP 8 When Infusion is Complete, Remove the On-Body Infusor from the Skin
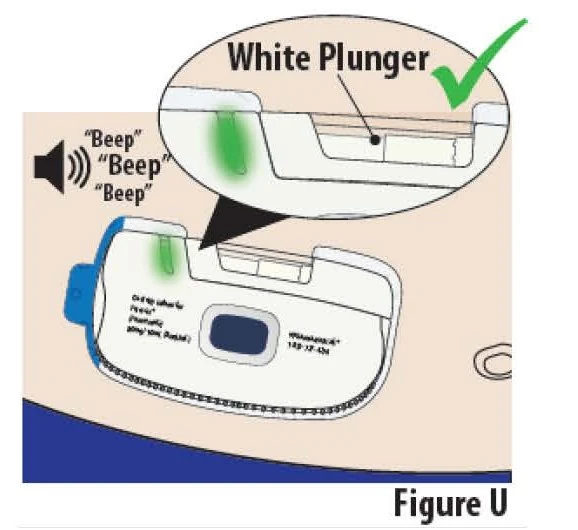
8.1 The infusion is complete and the on-body Infusor is ready to be removed when (see Figure U):
- The indicator light turns solid green.
- The on-body Infusor "beeps".
- The white plunger rod fills the cartridge window all the way.
Note: If indicator light begins blinking red instead of green and the on-body Infusor “beeps”, call your healthcare provider (see On-Body Infusor Alarm section).
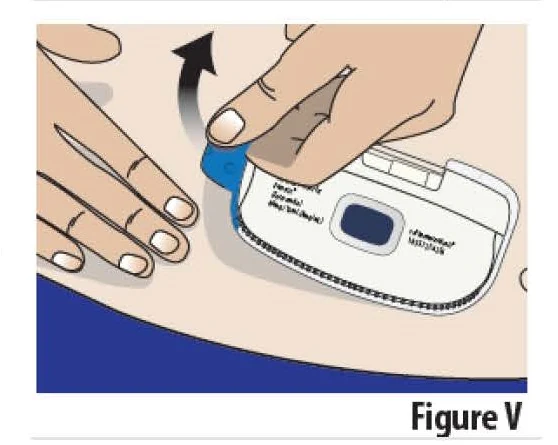
8.2 Peel the on-body Infusor off the skin by holding the skin down and pulling on the blue tab (see Figure V). When the on-body Infusor is removed, the indicator light will turn off, the needle cover will extend over the needle to protect against accidental needle sticks, and the on-body Infusor will turn off.
Note: You might have some discomfort after you remove the adhesive. This discomfort should quickly go away. However, some redness of the skin may remain.
8.3 Check the infusion site. If there is any bleeding use a cotton ball or apply a small adhesive bandage.
STEP 9 Throw Away (Dispose) of Used On-Body Infusor
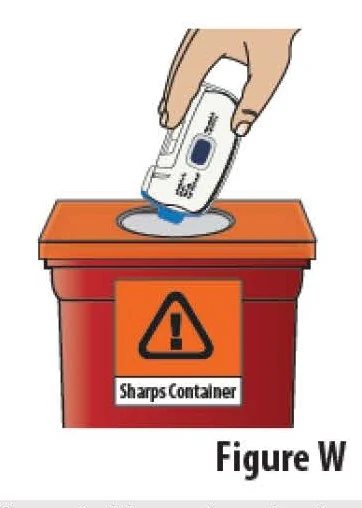
9.1 Dispose of the used FUROSCIX On-Body Infusor and prefilled cartridge together into an FDA-cleared sharps container (see Figure W).
Do not attempt to remove the cartridge from the on-body Infusor; it cannot be removed.
Do not throw away the used on-body Infusor into household trash.
If you do not have a FDA-cleared sharps disposal container, you may use a household container that is:
- made of a heavy-duty plastic,
- can be closed with a tight-fitting, puncture-resistant lid, without sharps being able to come out,
- upright and stable during use,
- leak-resistant, and
- properly labeled to warn of hazardous waste inside the container.
When your sharps disposal container is almost full, you will need to follow your community guidelines for the right way to dispose of your sharps disposal container. There may be state or local laws about how you should throw away used Needles and syringes. For more information about safe sharps disposal, and for specific information about sharps disposal in the state that you live in, go to the FDA’s website at: http://www.fda.gov/safesharpsdisposal.
Do not dispose of your used sharps disposal container in your household trash unless your community guidelines permit this.
Do not recycle the on-body Infusor or sharps disposal container or throw them into household trash.
Important: Always keep the sharps disposal container out of the reach of children.
For more information refer to: http://www.safeneedledisposal.org
Infusor Alarm
What happened?
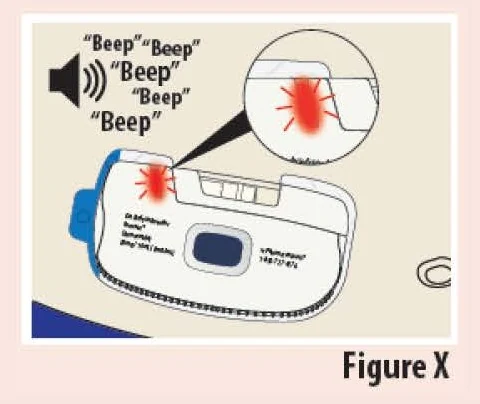
The Indicator light blinks red and the on-body Infusor "beeps" (see Figure X).
What does it mean?
There has been an internal error or the on-body Infusor came off the skin during the infusion.
What to do?
Stop using the on-body Infusor. If the on-body Infusor is on the skin, carefully remove it. Call your healthcare provider for further instructions.
Do not reapply or reuse the on-body Infusor. It can no longer be used.
Do not apply a new on-body Infusor unless instructed to do so by your healthcare provider.
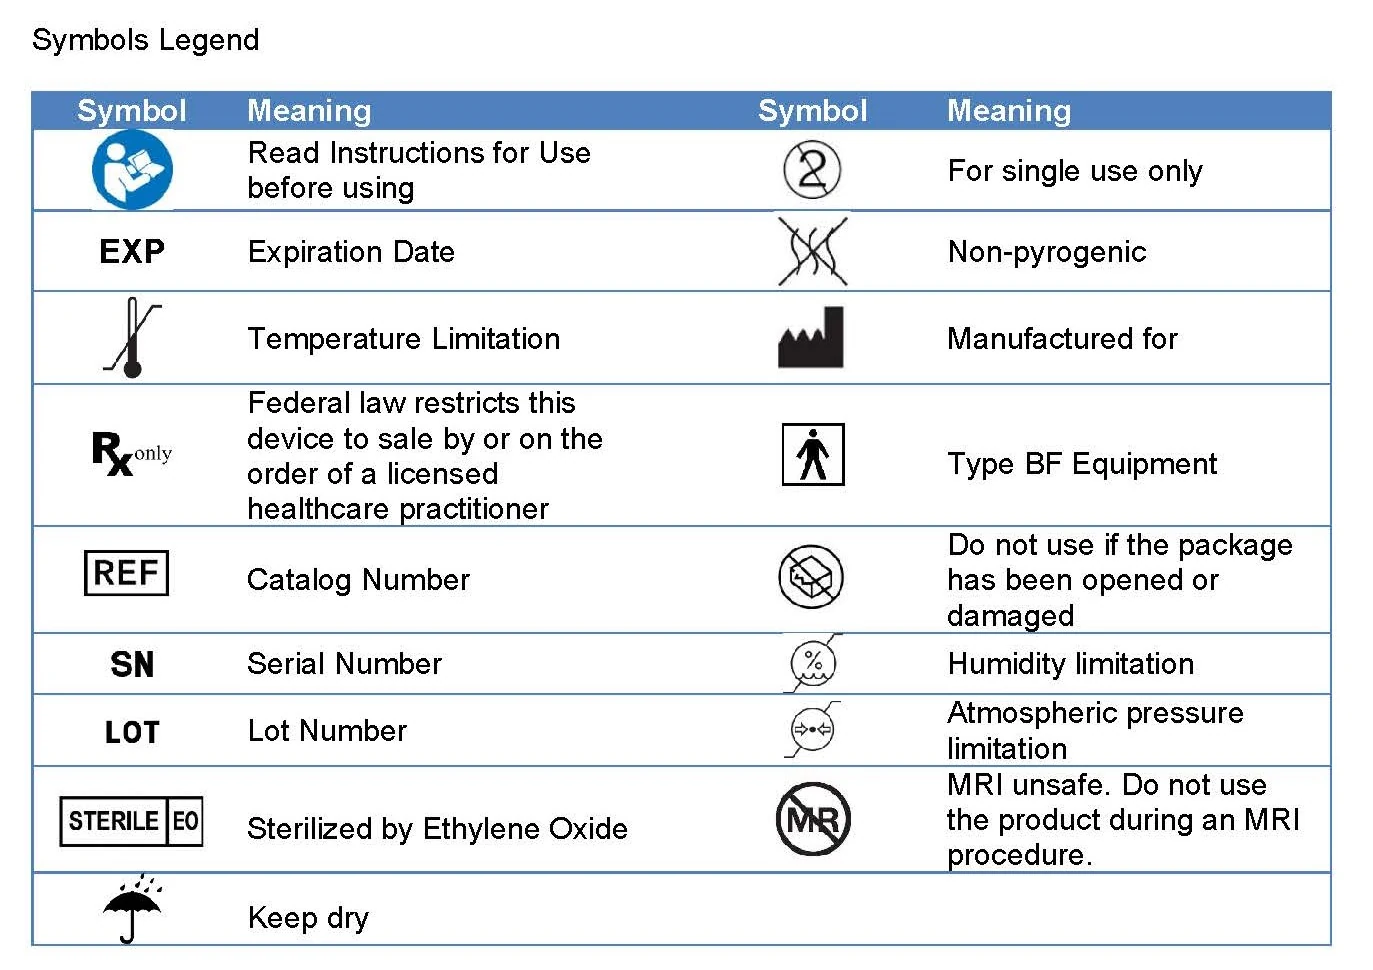
Symbols Legend
scPharmaceuticals, Inc.
25 Mall Road, Suite 203, Burlington, MA 01803
1-855-SCPHARMA (1-855-727-4276)
This Instructions for Use has been approved by the U.S. Food and Drug Administration.
Issued: 10/2023
Reg-0017 Rev 01
INSTRUCTIONS FOR USE
FUROSCIX ReadyFlow™ [fue roe’ six]
(furosemide injection) for subcutaneous use
Single-dose autoinjector
80 mg/mL
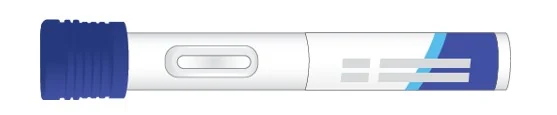
This Instructions for Use contains information on how to use the FUROSCIX ReadyFlow autoinjector to inject an 80 mg dose of furosemide under the skin (subcutaneous). Read this Instructions for Use before using the FUROSCIX ReadyFlow autoinjector.
Before using the FUROSCIX ReadyFlow autoinjector, your healthcare provider should show you how to use it the right way. If you have any questions, ask your healthcare provider.
INSTRUCTIONS FOR USE
Important Information You Need to Know Before Using the FUROSCIX ReadyFlow autoinjector
- The autoinjector is for single use only.
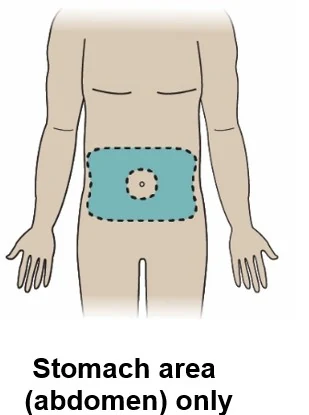
- The autoinjector is for subcutaneous (under the skin) injection into the stomach area (abdomen) only.
Before injection
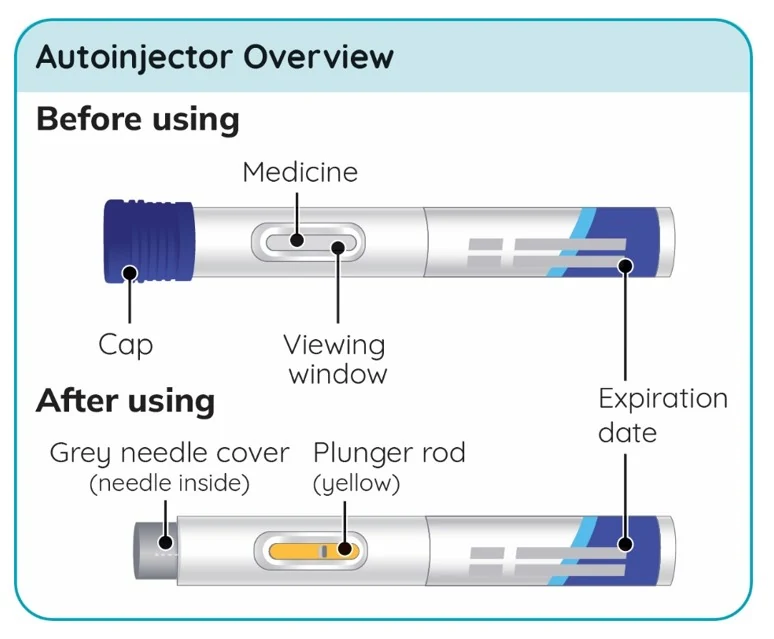
- Do not remove the blue Cap until you are ready to inject (see Step 6).
- Do not touch or push on the Needle cover. The needle is covered by the grey Needle cover and will not be seen.
- Do not use in extreme heat or cold.
During injection
- Only inject into the stomach area (abdomen). Do not inject into any other area of the body.
- Do not lift the autoinjector from your skin before the yellow Plunger rod has stopped moving and fills the Viewing window.
- If the yellow Plunger rod does not move or does not fill the Viewing window, contact your healthcare provider.
- If you lift the autoinjector too early or do not press the autoinjector firmly against the skin for the entire injection, the Medicine may appear on the skin or squirt from the needle, and you may not get your full dose of FUROSCIX. If you believe you have not received a full dose, contact your healthcare provider.
After injection
- You should notice an increase in urine production about an hour after the injection and may need to make frequent bathroom visits. Be sure you have access to a bathroom for up to 6 hours after the injection. If you do not notice the need to use the bathroom, contact your healthcare provider.
Storing FUROSCIX ReadyFlow autoinjector
- The autoinjector should be stored at room temperature between 68°F and 77°F (20°C and 25°C).
- Do not refrigerate or freeze.
- Keep the autoinjector in the original carton until ready to use to protect from light.
- Keep the autoinjector and all medicines out of the reach of children.
Preparing to Inject
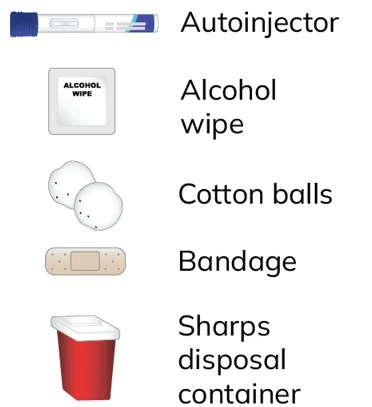
Gather all supplies needed for your injection on a clean, well-lit work surface:
|  |
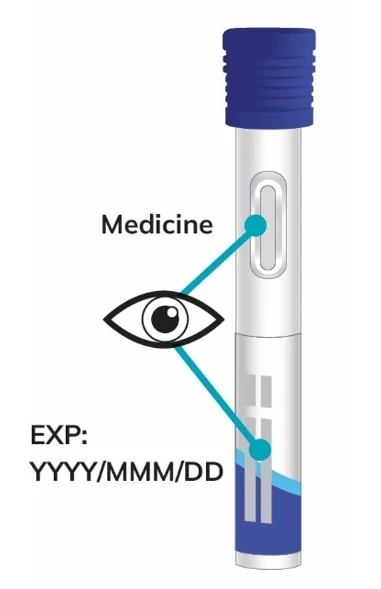
Inspect the autoinjector and make sure:
|  |
Wash your hands with soap and water before using the autoinjector. | 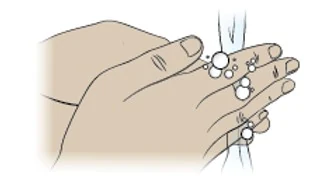 |
Select an injection site on the stomach area only, at least two inches away from the belly button (navel).
|  |
Wipe the injection site with an alcohol wipe and allow the area to dry. Do not blow on or touch the cleaned area again before injecting. | 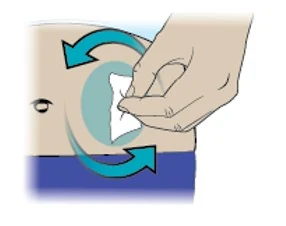 |
Injecting FUROSCIX
| 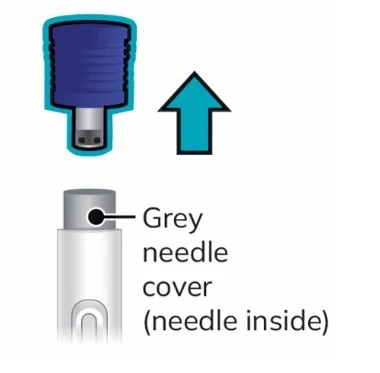 |
Hold the autoinjector at 90 degrees with the grey Needle cover flat against the clean stomach area injection site. Make sure you can see the Viewing window. | 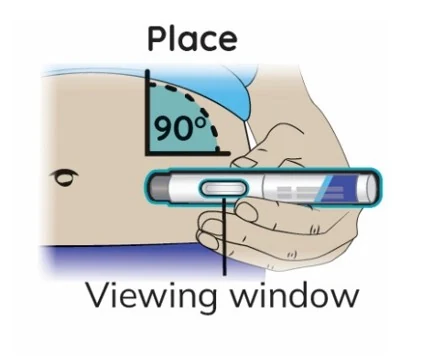 |
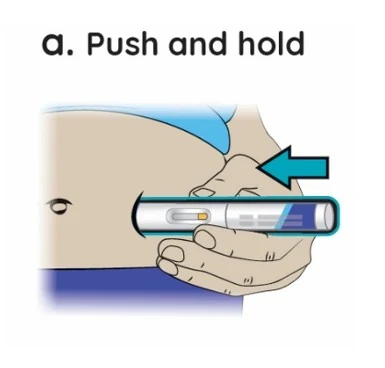
a. Firmly push and hold the autoinjector against stomach area until the yellow Plunger rod stops moving. This may take about 10 seconds.
|  |
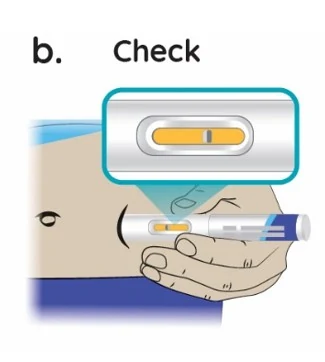
b. Check that the yellow Plunger rod has stopped moving and fills the Viewing window.
|  |
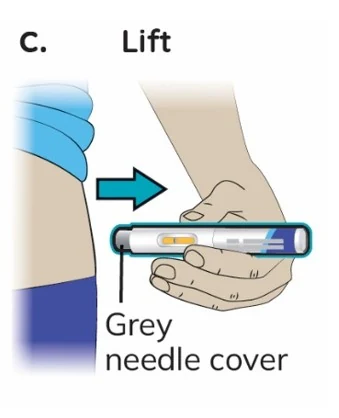
C. When the injection is complete, lift the autoinjector. The grey Needle cover will automatically extend and lock out over the needle.
|  |
After Injecting
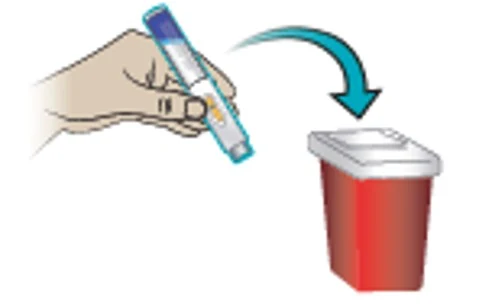
Put your used autoinjector into an FDA-cleared sharps disposal container right away after use. Do not throw away (dispose of) the autoinjector in your household trash. If you do not have a FDA-cleared sharps disposal container, you may use a household container that:
When your sharps disposal container is almost full, you will need to follow your community guidelines for the right way to dispose of your sharps disposal container. There may be state or local laws about how you should throw away used needles and syringes. For more information about safe sharps disposal and for specific information about sharps disposal in the state that you live in, go to the FDA’s website at: http://www.fda.gov/safesharpsdisposal
|  |
Urine production should increase about an hour after the injection for up to 6 hours. If you do not notice the need to use the bathroom, contact your healthcare provider |  |
For additional resources call 1-877-323-8505
© 2026 MannKind Corporation, 25 Mall Road, Burlington, MA 01803 USA
FUROSCIX READYFLOW is a trademark of MannKind Corporation
Patent: www.mannkindcorp.com/patent-notices
This Instructions for Use has been approved by the U.S. Food and Drug Administration.
Approved: 7/2026
REG-0021 R06