Medication-info.com Search Menu

Cabenuva: Uses, Side Effects and Dosage

Updated:
Facts
Status:
Prescription (Rx)
Strength:
200 mg/mL, 300 mg/mL
Active ingredients:

Patient information: uses, side effects, how to take - Cabenuva

What is CABENUVA?

CABENUVA is a prescription medicine that is used without other human immunodeficiency virus-1 (HIV-1) medicines to treat HIV-1 infection in people 12 years of age and older who weigh at least 77 pounds (35 kg) to replace their current HIV-1 medicines when their healthcare provider determines that they meet certain requirements.

HIV-1 is the virus that causes acquired immune deficiency syndrome (AIDS).

CABENUVA contains 2 different medicines:

  • cabotegravir
  • rilpivirine

It is not known if CABENUVA is safe and effective in children younger than 12 years of age or weighing less than 77 pounds (35 kg).

Do not receive CABENUVA if you:

  • have ever had an allergic reaction to cabotegravir or rilpivirine.
  • are taking any of the following medicines:
  • carbamazepine
  • oxcarbazepine
  • phenobarbital
  • phenytoin
  • rifabutin
  • rifampin
  • rifapentine
  • dexamethasone (more than a single-dose treatment)
  • St John’s wort (Hypericum perforatum)

Before you receive CABENUVA, tell your healthcare provider about all your medical conditions, including if you:

  • have ever had a skin rash or an allergic reaction to medicines that contain cabotegravir or rilpivirine.
  • have or have had liver problems, including hepatitis B or C infection.
  • have or ever had kidney problems.
  • have ever had mental health problems.
  • are pregnant or plan to become pregnant. It is not known if CABENUVA will harm your unborn baby. CABENUVA can remain in your body for up to 12 months or longer after the last injection. Tell your healthcare provider if you become pregnant during or after treatment with CABENUVA.

  • Pregnancy Registry. There is a pregnancy registry for those who take CABENUVA during pregnancy. The purpose of this registry is to collect information about the health of you and your baby. Talk to your healthcare provider about how you can take part in this registry.
  • are breastfeeding or plan to breastfeed. CABENUVA may pass into your breast milk. Talk to your healthcare provider about the following risks to your baby from breastfeeding during or after treatment with CABENUVA:

    • the HIV-1 virus may pass to your baby if your baby does not have HIV-1 infection.
    • the HIV-1 virus may become harder to treat if your baby has HIV-1 infection.
    • your baby may get side effects from CABENUVA.

Tell your healthcare provider about all the medicines you take, including prescription and over-the-counter medicines, vitamins, and herbal supplements.

Some medicines interact with CABENUVA. Keep a list of your medicines and show it to your healthcare provider and pharmacist when you get a new medicine.

You can ask your healthcare provider or pharmacist for a list of medicines that interact with CABENUVA.

Do not start taking a new medicine without telling your healthcare provider. Your healthcare provider can tell you if it is safe to take CABENUVA with other medicines.

How will I receive CABENUVA?

  • Your healthcare provider will inject CABENUVA into the muscle of each side of your buttocks or on the same side of your buttocks at least 2 cm apart.
  • You will receive CABENUVA as 2 injections (cabotegravir and rilpivirine), either one time every month or one time every 2 months.
  • Before receiving your first injection doses of CABENUVA, your healthcare provider may have you take 1 VOCABRIA (cabotegravir) tablet and 1 EDURANT (rilpivirine) tablet 1 time a day for 1 month (at least 28 days). This will allow your healthcare provider to assess how well you tolerate these medicines.
  • CABENUVA is a long-acting medicine and may stay in your system for 12 months or longer after your last injection.
  • Stay under the care of a healthcare provider during treatment with CABENUVA. It is important that you attend your planned appointments to receive your injection doses of CABENUVA.
  • If you miss or plan to miss a scheduled monthly or every-2-month injection of CABENUVA by more than 7 days, call your healthcare provider right away to discuss your treatment options.
  • If you stop treatment with CABENUVA you will need to take other medicines to treat your HIV-1 infection and reduce the risk of developing viral resistance. Call your healthcare provider right away to discuss your treatment options.

What are the possible side effects of CABENUVA?

CABENUVA may cause serious side effects including:

  • Allergic reactions. Call your healthcare provider right away if you develop a rash with CABENUVA. Stop receiving CABENUVA and get medical help right away if you develop a rash with any of the following signs or symptoms:
  • fever
  • generally ill feeling
  • tiredness
  • muscle or joint aches
  • trouble breathing
  • blisters or sores in mouth
  • blisters
  • redness or swelling of the eyes
  • swelling of the mouth, face, lips, or tongue
  • Post-injection reactions. Post-injection reaction symptoms have happened within minutes in some people after receiving their rilpivirine injection. Most symptoms resolved within minutes after the injection. Symptoms of post-injection reactions may include:
  • trouble breathing
  • narrowing of airways
  • stomach cramps
  • sweating
  • numbness of your mouth
  • pain (e.g., back and chest)
  • feeling anxious
  • feeling warm
  • rash
  • feeling lightheaded or feeling like you are going to pass out (faint)
  • blood pressure changes
  • Liver problems. Liver problems have happened in people with or without history of liver problems or other risk factors. Your healthcare provider may do blood tests to check your liver function. People with a history of liver problems or people who have certain liver function test changes may have an increased risk of developing new or worsening changes in certain liver tests during treatment with CABENUVA.
  • Call your healthcare provider right away if you develop any of the following signs or symptoms of liver problems:
  • your skin or the white part of your eyes turns yellow (jaundice)
  • dark or “tea-colored” urine
  • light-colored stools (bowel movements)
  • nausea or vomiting
  • loss of appetite
  • pain, aching, or tenderness on the right side of your stomach area
  • itching
  • Depression or mood changes. Call your healthcare provider or get emergency medical help right away if you develop any of the following symptoms:

    • feeling sad or hopeless
    • feeling anxious or restless
    • have thoughts of hurting yourself (suicide) or have tried to hurt yourself

The most common side effects of CABENUVA include:

  • pain, tenderness, hardened mass or lump, swelling, redness, itching, bruising, and warmth at the injection site
  • fever
  • tiredness
  • headache
  • muscle or bone pain
  • nausea
  • sleep problems
  • dizziness
  • rash

These are not all the possible side effects of CABENUVA. Call your doctor for medical advice about side effects. You may report side effects to FDA at 1‑800‑FDA‑1088.

General information about the safe and effective use of CABENUVA.

Medicines are sometimes prescribed for purposes other than those listed in a Patient Information leaflet. You can ask your pharmacist or healthcare provider for information about CABENUVA that is written for health professionals.

What are the ingredients in CABENUVA?

Cabotegravir extended-release injectable suspension:

Active ingredient: cabotegravir

Inactive ingredients: mannitol, polyethylene glycol (PEG) 3350, polysorbate 20, and Water for Injection.

Rilpivirine extended-release injectable suspension:

Active ingredient: rilpivirine

Inactive ingredients: citric acid monohydrate, dextrose to ensure isotonicity, monobasic sodium phosphate, poloxamer 338, sodium hydroxide to adjust pH, and Water for Injection.

Manufactured for:

ViiV Healthcare

Durham, NC 27701

CABENUVA and VOCABRIA are trademarks owned by or licensed to the ViiV Healthcare group of companies.

The other brand listed is a trademark owned by or licensed to its respective owner and is not a trademark owned by or licensed to the ViiV Healthcare group of companies. The maker of this brand is not affiliated with and does not endorse the ViiV Healthcare group of companies or its products.

©2025 ViiV Healthcare group of companies or its licensor.

CBN:8PIL

For more information, go to www.cabenuva.com or call 1-877-844-8872.

  • This Patient Information has been approved by the U.S. Food and Drug Administration. Revised: 11/2025
Overview:

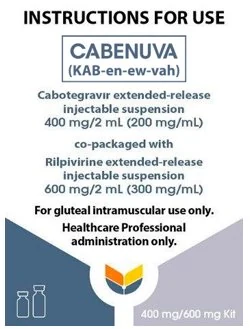
A complete dose of CABENUVA requires two injections: 400 mg (2 mL) of cabotegravir and 600 mg (2 mL) of rilpivirine.

Cabotegravir and rilpivirine are suspensions that do not need further dilution or reconstitution.

The preparation steps for both medicines are the same. Carefully follow these instructions when preparing the suspension for injection to avoid leakage.

Cabotegravir and rilpivirine are for gluteal intramuscular use only. Each injection must be administered to separate gluteal intramuscular sites (on opposite sides or at least 2 cm apart).

Note: The ventrogluteal site is recommended. The administration order is not important.

Storage information

Store in refrigerator at 2°C to 8°C (36°F to 46°F).

Do not freeze.

Prior to administration:
  • Before preparing the injections, the vials may sit in the carton at room temperature (maximum temperature of 25°C [77°F]) for up to 6 hours; do not put back into the refrigerator. If not used within 6 hours, the medicines must be discarded.
  • Once the medicines have been drawn into the syringes, they can remain in the syringes for up to 2 hours before injection. The filled syringes should not be placed in the refrigerator. If the medicines remain in the syringes for more than 2 hours, the filled syringes and needles must be discarded.
  • It is recommended to label each syringe with the time that the medicine has been drawn into the syringe if the medicine is not administered immediately.
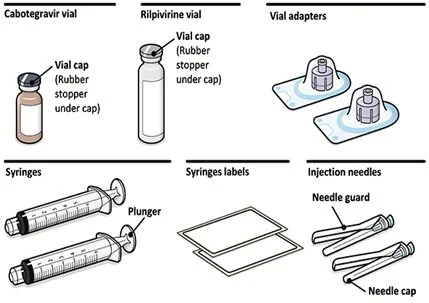
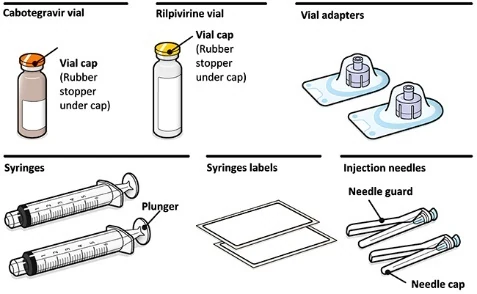
Your pack contains:
  • 1 vial of Cabotegravir
  • 1 vial of Rilpivirine
  • 2 vial adapters
  • 2 syringes
  • 2 syringe labels
  • 2 injection needles (23 gauge, 1½ inch)

Consider the patient’s build and use medical judgment to select an appropriate injection needle length.

You will also need:
  • Non-sterile gloves
  • 4 alcohol wipes
  • 4 gauze pads
  • A suitable sharps container
Preparation:
    1. 1. Inspect both vials.
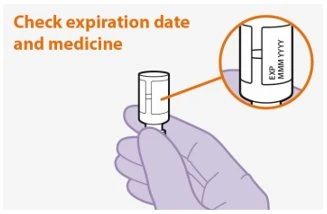
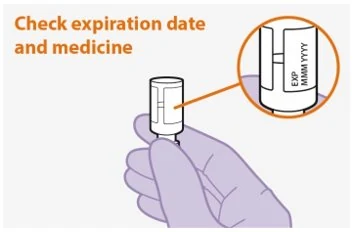
  • Figure A
  • Check that the expiration date has not passed. See Figure A.
  • Inspect the vials immediately. If you can see foreign matter, do not use the product.
  • Note: The Cabotegravir vial has a brown tint to the glass.
  • Do not use if the expiration date has passed.
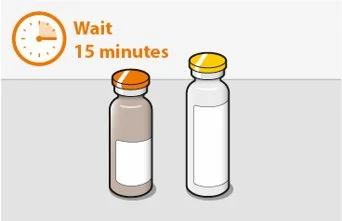
    1. 2. Wait 15 minutes.
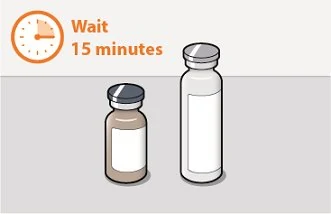
  • Figure B
  • Wait at least 15 minutes before you are ready to give the injection to allow the medicine to come to room temperature. See Figure B.
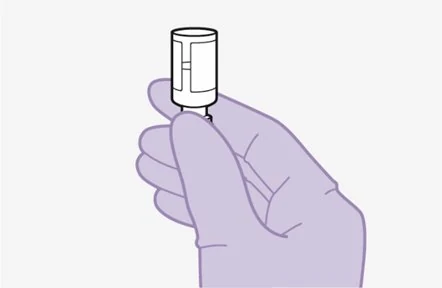
    1. 3. Shake the vial vigorously.
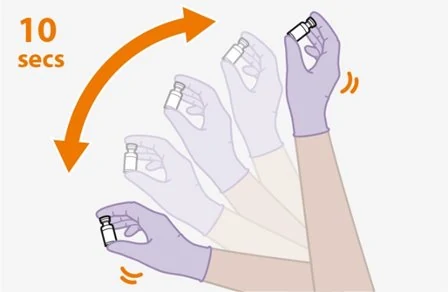
  • Figure C
  • Hold the vial firmly, and vigorously shake for a full 10 seconds. See Figure C.

    Note: Vial preparation order is not important.

  1. 4. Inspect suspension.

Figure D

  • Invert the vial and confirm the suspension is uniform. It should look uniform. See Figure D.
  • If the suspension is not uniform, shake the vial again.
  • It is also normal to see small air bubbles.
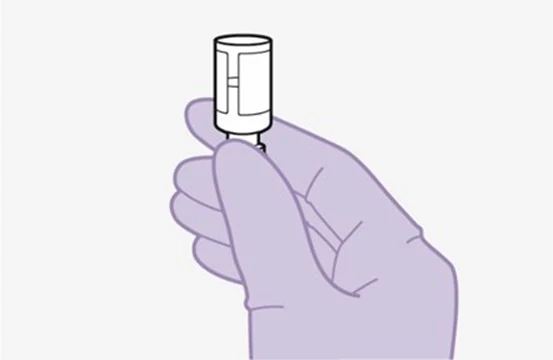
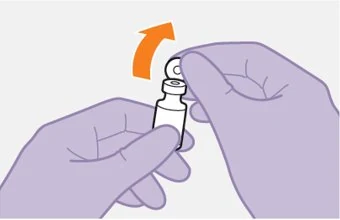
    1. 5. Remove the vial cap.
  • Figure E
  • Remove the cap from the vial. See Figure E.
  • Wipe the rubber stopper with an alcohol wipe.
  • Do not allow anything to touch the rubber stopper after wiping it.
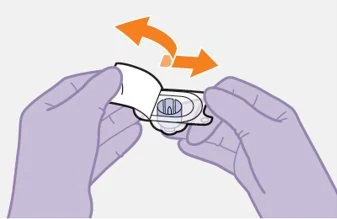
    1. 6. Peel open the vial adapter.
  • Figure F
  • Peel off the paper backing from the vial adapter packaging. See Figure F.
  • Note: Do not remove the adapter from its packaging for the next step. The adapter will not fall out when its packaging is turned upside down.
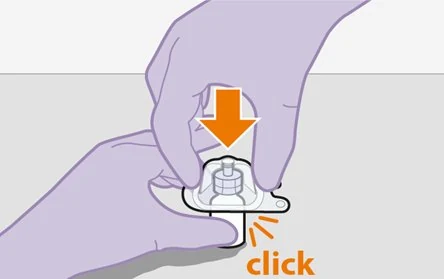
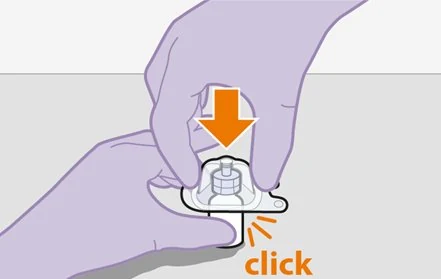
    1. 7. Place vial on flat surface and attach the vial adapter.
  • Figure G
  • Ensure the vial is upright and on a flat surface.
  • Press the vial adapter straight down onto the vial, as shown.
  • The vial adapter should click securely into place. See Figure G.
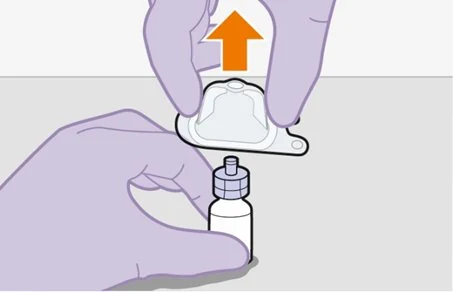
  1. 8. Lift off the packaging.

Figure H

  • Lift off the vial adapter packaging, as shown. See Figure H.
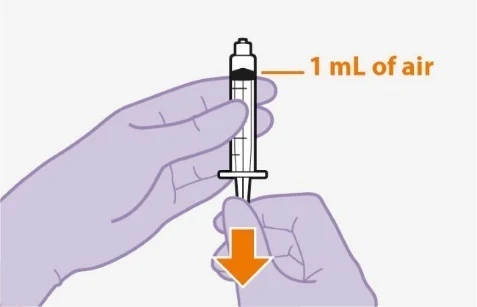
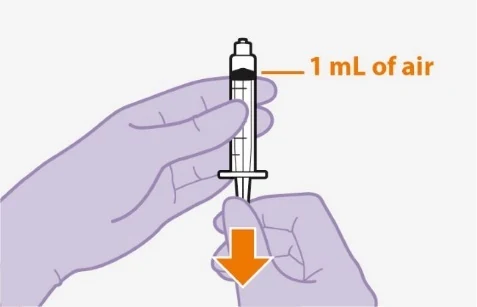
    1. 9. Prepare the syringe.

Figure I

  • Remove the syringe from its packaging.
  • Draw 1 mL of air into the syringe. This will make it easier to draw up the medicine later. See Figure I.
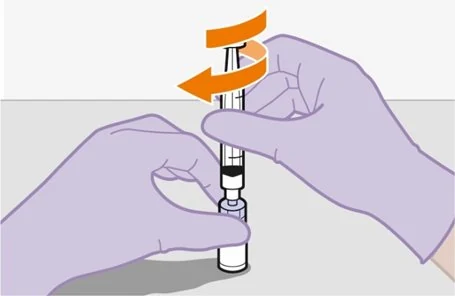
    1. 10. Attach the syringe.
  • Figure J
  • Hold the vial adapter and vial firmly, as shown.
  • Screw the syringe firmly onto the vial adapter. See Figure J.
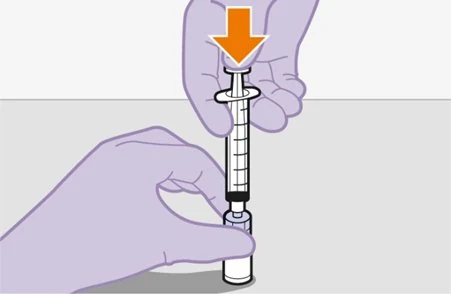
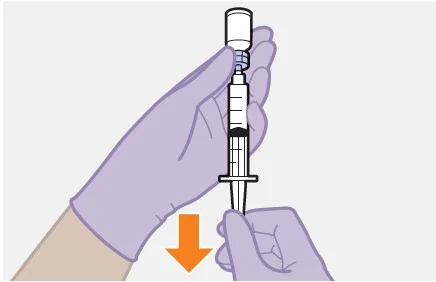
  1. 11. Press the plunger.

Figure K

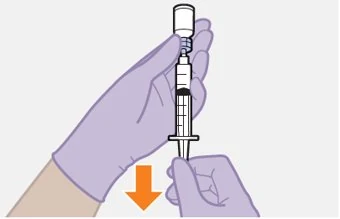
  • Press the plunger all the way down to push the air into the vial. See Figure K.
    1. 12. Slowly draw up the dose.
  • Figure L
  • Invert the syringe and vial and slowly withdraw as much of the medicine as possible into the syringe. There may be more medicine than the dose amount. See Figure L.
  • Note: Keep the syringe upright to avoid leakage.
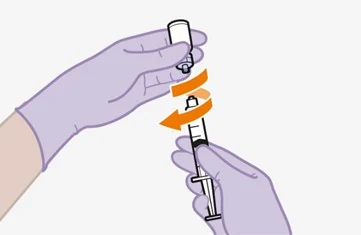
    1. 13. Unscrew the syringe.
  • Figure M
  • Hold the syringe plunger firmly in place as shown to prevent leakage. It is normal to feel some back pressure.
  • Unscrew the syringe from the vial adapter, holding the vial adapter as shown. See Figure M.
  • Note: Check that the suspension looks uniform and milky white.
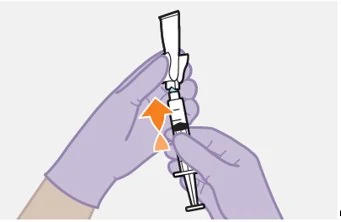
    1. 14. Attach the needle and affix syringe label.
  • Figure N
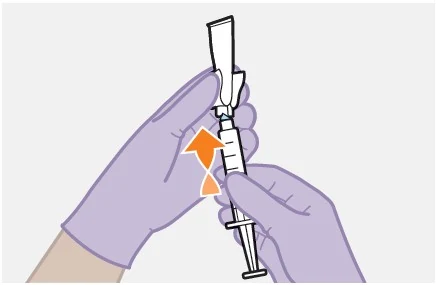
  • Peel open the needle packaging part way to expose the needle base.
  • Keeping the syringe upright, firmly twist the syringe onto the needle.
  • Remove the needle packaging from the needle. See Figure N.
  • Write the name of the medicine on the syringe label. Affix the label to the syringe making sure the gradations remain visible.
Injection:
    1. 15. Prepare the injection site.
  • Figure O

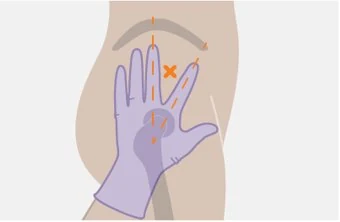
Injections must be administered to a gluteal site. See Figure O.

Select from the following areas for the injection:

  • Ventrogluteal, as shown (recommended)
  • Dorsogluteal, not shown (upper outer quadrant)
  • Note: For gluteal intramuscular use only.

    Do not inject intravenously.

    1. 16. Remove the cap.
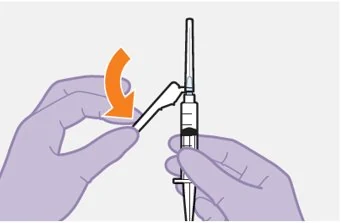
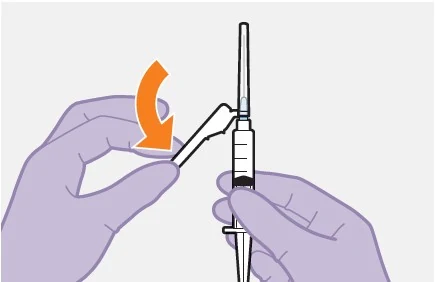
  • Figure P
  • Fold the needle guard away from the needle. See Figure P.
  • Pull off the injection needle cap.
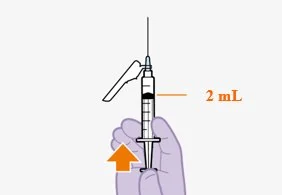
    1. 17. Remove extra liquid from the syringe.
  • Figure Q
  • Hold the syringe with the needle pointing up. Press the plunger to the 2-mL dosing mark to remove extra liquid and any air bubbles. See Figure Q.
  • Note: Clean the injection site with an alcohol wipe. Allow the skin to air dry before continuing.
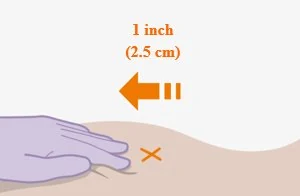
    1. 18. Stretch the skin.
  • Figure R

Use the z-track injection technique to minimize medicine leakage from the injection site.

  • Firmly drag the skin covering the injection site, displacing it by about an inch (2.5 cm). See Figure R.
  • Keep it held in this position for the injection.
    1. 19. Insert the needle.
  • Figure S
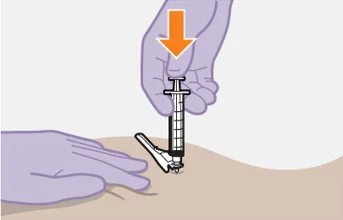
  • Insert the needle to its full depth, or deep enough to reach the muscle. See Figure S.
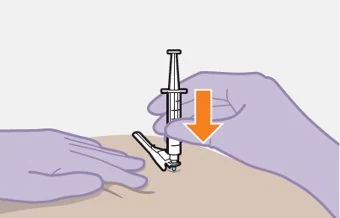
    1. 20. Inject the dose of medicine.
  • Figure T
  • Still holding the skin stretched – slowly press the plunger all the way down. See Figure T.
  • Ensure the syringe is empty.
  • Withdraw the needle and release the stretched skin immediately.
    1. 21. Assess the injection site.
  • Figure U
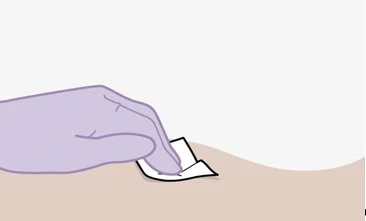
  • Apply pressure to the injection site using a gauze pad. See Figure U.
  • A small bandage may be used if bleeding occurs.
  • Do not massage the area.
    1. 22. Make the needle safe.
  • Figure V
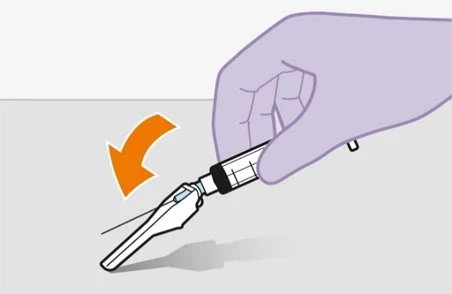
  • Fold the needle guard over the needle. See Figure V.

Figure W

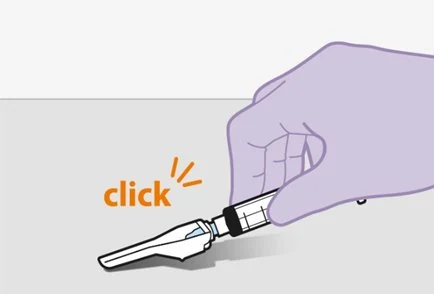
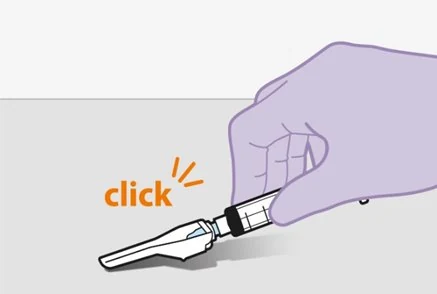
  • Gently apply pressure using a hard surface to lock the needle guard in place.
  • The needle guard will make a click when it locks. See Figure W.
After injection:
    1. 23. Dispose safely.
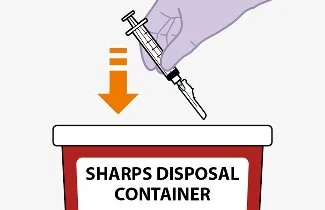
  • Figure X
  • Dispose of used needles, syringes, vials, and vial adapters according to local health and safety laws. See Figure X.
Repeat for 2nd medicine.
  • If you have not yet injected both medicines, use the same steps for preparation and injection of the other medicine.
  • The second medicine must be injected into a separate gluteal intramuscular site (on opposite sides or at least 2 cm apart).
Questions and Answers
    1. 1. How long can the medicines be left out of the refrigerator?
  1. It is best to inject the medicines as soon as they reach room temperature. However, the vials may sit in the carton at room temperature (maximum temperature of 25°C [77°F]) for up to 6 hours; do not put back into the refrigerator. If not used within 6 hours, the medicines must be discarded.
    1. 2. How long can the medicines be left in the syringes?
  2. It is best to inject the (room temperature) medicines as soon as possible after drawing them up. However, the medicines can remain in the syringes for up to 2 hours before injection. The filled syringes should not be placed in the refrigerator.
  3. If the medicines remain in the syringes for more than 2 hours, the filled syringes and needles must be discarded.
    1. 3. Why do I need to inject air into the vials?
  4. Injecting 1 mL of air into the vials makes it easier to draw up the medicines into the syringes. Without the air, some liquid may flow back into the vials unintentionally, leaving less medicine than intended in the syringes.
    1. 4. Does the order in which I give the medicines matter?
  5. No, the order is unimportant.
    1. 5. Is it safe to warm the vials up to room temperature more quickly?
  6. It is best to let the vials come to room temperature naturally. However, you can use the warmth of your hands to speed up the warm-up time, but make sure the vials do not get above 25°C (77°F).
  7. Do not use any other heating methods.

Manufactured for:

ViiV Healthcare

Durham, NC 27701

Trademarks are owned by or licensed to the ViiV Healthcare group of companies.

©2024 ViiV Healthcare group of companies or its licensor.

CBN:6IFU2

This Instructions for Use has been approved by the U.S. Food and Drug Administration. Revised: 9/2024
Overview:

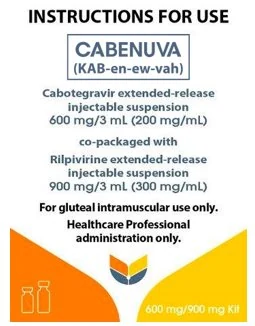
A complete dose of CABENUVA requires two injections: 600 mg (3 mL) of cabotegravir and 900 mg (3 mL) of rilpivirine.

Cabotegravir and rilpivirine are suspensions that do not need further dilution or reconstitution.

The preparation steps for both medicines are the same. Carefully follow these instructions when preparing the suspension for injection to avoid leakage.

Cabotegravir and rilpivirine are for gluteal intramuscular use only. Each injection must be administered to separate gluteal intramuscular sites (on opposite sides or at least 2 cm apart).

Note: The ventrogluteal site is recommended. The administration order is not important.

Storage information

Store in refrigerator at 2°C to 8°C (36°F to 46°F).

Do not freeze.

Prior to administration:
  • Before preparing the injections, the vials may sit in the carton at room temperature (maximum temperature of 25°C [77°F]) for up to 6 hours; do not put back into the refrigerator. If not used within 6 hours, the medicines must be discarded.
  • Once the medicines have been drawn into the syringes, they can remain in the syringes for up to 2 hours before injection. The filled syringes should not be placed in the refrigerator. If the medicines remain in the syringes for more than 2 hours, the filled syringes and needles must be discarded.
  • It is recommended to label the syringe with each time that the medicine has been drawn into the syringe if the medicine is not administered immediately.
Your pack contains:
  • 1 vial of Cabotegravir
  • 1 vial of Rilpivirine
  • 2 vial adapters
  • 2 syringes
  • 2 syringe labels
  • 2 injection needles (23 gauge, 1½ inch)

Consider the patient’s build and use medical judgment to select an appropriate injection needle length.

You will also need:
  • Non-sterile gloves
  • 4 alcohol wipes
  • 4 gauze pads
  • A suitable sharps container
Preparation:
    1. 1. Inspect both vials.
  • Figure A
  • Check that the expiration date has not passed. See Figure A.
  • Inspect the vials immediately. If you can see foreign matter, do not use the product.
  • Note: The Cabotegravir vial has a brown tint to the glass.
  • Do not use if the expiration date has passed.
    1. 2. Wait 15 minutes.
  • Figure B
  • Wait at least 15 minutes before you are ready to give the injection to allow the medicine to come to room temperature. See Figure B.
    1. 3. Shake the vial vigorously.
  • Figure C
  • Hold the vial firmly, and vigorously shake for a full 10 seconds. See Figure C.

    Note: Vial preparation order is not important.

  1. 4. Inspect suspension.

Figure D

  • Invert the vial and confirm the suspension is uniform. It should look uniform. See Figure D.
  • If the suspension is not uniform, shake the vial again.
  • It is also normal to see small air bubbles.
    1. 5. Remove the vial cap.
  • Figure E
  • Remove the cap from the vial. See Figure E.
  • Wipe the rubber stopper with an alcohol wipe.
  • Do not allow anything to touch the rubber stopper after wiping it.
    1. 6. Peel open the vial adapter.
  • Figure F
  • Peel off the paper backing from the vial adapter packaging. See Figure F.
  • Note: Do not remove the adapter from its packaging for the next step. The adapter will not fall out when its packaging is turned upside down.
    1. 7. Place vial on flat surface and attach the vial adapter.
  • Figure G
  • Ensure the vial is upright and on a flat surface.
  • Press the vial adapter straight down onto the vial, as shown.
  • The vial adapter should click securely into place. See Figure G.
  1. 8. Lift off the packaging.

Figure H

  • Lift off the vial adapter packaging, as shown. See Figure H.
    1. 9. Prepare the syringe.
  • Figure I
  • Remove the syringe from its packaging.
  • Draw 1 mL of air into the syringe. This will make it easier to draw up the medicine later. See Figure I.
    1. 10. Attach the syringe.
  • Figure J
  • Hold the vial adapter and vial firmly, as shown.
  • Screw the syringe firmly onto the vial adapter. See Figure J.
  1. 11. Press the plunger.

Figure K

  • Press the plunger all the way down to push the air into the vial. See Figure K.
    1. 12. Slowly draw up the dose.

Figure L

  • Invert the syringe and vial and slowly withdraw as much of the medicine as possible into the syringe. There may be more medicine than the dose amount. See Figure L.
  • Note: Keep the syringe upright to avoid leakage.
    1. 13. Unscrew the syringe.
  • Figure M
  • Hold the syringe plunger firmly in place as shown to prevent leakage. It is normal to feel some back pressure.
  • Unscrew the syringe from the vial adapter, holding the vial adapter as shown. See Figure M.
  • Note: Check that the suspension looks uniform and milky white.
    1. 14. Attach the needle and affix syringe label.

Figure N

  • Peel open the needle packaging part way to expose the needle base.
  • Keeping the syringe upright, firmly twist the syringe onto the needle.
  • Remove the needle packaging from the needle. See Figure N.
  • Write the name of the medicine on the syringe label. Affix the label to the syringe making sure the gradations remain visible.
Injection:
    1. 15. Prepare the injection site.
  • Figure O

Injections must be administered to a gluteal site. See Figure O.

Select from the following areas for the injection:

  • Ventrogluteal, as shown (recommended)
  • Dorsogluteal, not shown (upper outer quadrant)
  • Note: For gluteal intramuscular use only.

    Do not inject intravenously.

    1. 16. Remove the cap.
  • Figure P
  • Fold the needle guard away from the needle. See Figure P.
  • Pull off the injection needle cap.
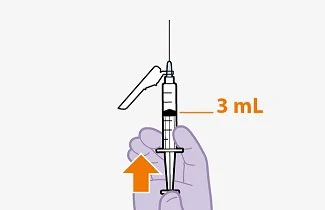
    1. 17. Remove extra liquid from the syringe.
  • Figure Q
  • Hold the syringe with the needle pointing up. Press the plunger to the 3-mL dosing mark to remove extra liquid and any air bubbles. See Figure Q.
  • Note: Clean the injection site with an alcohol wipe. Allow the skin to air dry before continuing.
    1. 18. Stretch the skin.
  • Figure R

Use the z-track injection technique to minimize medicine leakage from the injection site.

  • Firmly drag the skin covering the injection site, displacing it by about an inch (2.5 cm). See Figure R.
  • Keep it held in this position for the injection.
    1. 19. Insert the needle.
  • Figure S
  • Insert the needle to its full depth, or deep enough to reach the muscle. See Figure S.
    1. 20. Inject the dose of medicine.
  • Figure T
  • Still holding the skin stretched – slowly press the plunger all the way down. See Figure T.
  • Ensure the syringe is empty.
  • Withdraw the needle and release the stretched skin immediately.
    1. 21. Assess the injection site.
  • Figure U
  • Apply pressure to the injection site using a gauze pad. See Figure U.
  • A small bandage may be used if bleeding occurs.
  • Do not massage the area.
    1. 22. Make the needle safe.
  • Figure V
  • Fold the needle guard over the needle. See Figure V.

Figure W

  • Gently apply pressure using a hard surface to lock the needle guard in place.
  • The needle guard will make a click when it locks. See Figure W.
After injection:
    1. 23. Dispose safely.
  • Figure X
  • Dispose of used needles, syringes, vials, and vial adapters according to local health and safety laws. See Figure X.
Repeat for 2nd medicine.
  • If you have not yet injected both medicines, use the same steps for preparation and injection of the other medicine.
  • The second medicine must be injected into a separate gluteal intramuscular site (on opposite sides or at least 2 cm apart).
Questions and Answers
    1. 1. How long can the medicines be left out of the refrigerator?
  1. It is best to inject the medicines as soon as they reach room temperature. However, the vials may sit in the carton at room temperature (maximum temperature of 25°C [77°F]) for up to 6 hours; do not put back into the refrigerator. If not used within 6 hours, the medicines must be discarded.
    1. 2. How long can the medicines be left in the syringes?
  2. It is best to inject the (room temperature) medicines as soon as possible after drawing them up. However, the medicines can remain in the syringes for up to 2 hours before injection. The filled syringes should not be placed in the refrigerator.
  3. If the medicines remain in the syringes for more than 2 hours, the filled syringes and needles must be discarded.
    1. 3. Why do I need to inject air into the vials?
  4. Injecting 1 mL of air into the vials makes it easier to draw up the medicines into the syringes. Without the air, some liquid may flow back into the vials unintentionally, leaving less medicine than intended in the syringes.
    1. 4. Does the order in which I give the medicines matter?
  5. No, the order is unimportant.
    1. 5. Is it safe to warm the vials up to room temperature more quickly?
  6. It is best to let the vials come to room temperature naturally. However, you can use the warmth of your hands to speed up the warm-up time, but make sure the vials do not get above 25°C (77°F).
  7. Do not use any other heating methods.

Manufactured for:

ViiV Healthcare

Durham, NC 27701

Trademarks are owned by or licensed to the ViiV Healthcare group of companies.

©2024 ViiV Healthcare group of companies or its licensor.

CBN:7IFU3

This Instructions for Use has been approved by the U.S. Food and Drug Administration. Revised: 9/2024

About this document

Source: FDA drug labeling via NLM DailyMed · Application number: NDA 212888 · View the label on DailyMed

Revision date stated in the text: November 2025

Found a mistake? Write to us via the contact page.

The information on this site does not replace the advice of a doctor or pharmacist.

Drug information for Cabenuva

Rx or OTC
Prescription (Rx)?
  • This drug is available only with a prescription from a licensed healthcare provider.
  • Rx
Drug class Human Immunodeficiency Virus 1 Non-Nucleoside Analog Reverse Transcriptase Inhibitor, Human Immunodeficiency Virus Integrase Strand Transfer Inhibitor
Active ingredients Cabotegravir 200 mg/mL, Rilpivirine 300 mg/mL
Dosage form Kit
Marketing status listed in the FDA NDC Directory
Company (applicant) VIIV HLTHCARE
FDA approval NDA 212888New Drug Application (NDA) Approved January 21, 2021
Reference listed drug This is the reference listed drug (RLD) that generics are compared with.
Manufacturers 1 labelers list this drug on DailyMed
Packages (NDC)
Package
200 mg/mL, 300 mg/mL – 1 in 1 carton NDC 49702-253-15
200 mg/mL, 300 mg/mL – 1 in 1 carton NDC 49702-240-15
200 mg/mL, 300 mg/mL – 1 in 1 carton NDC 49702-266-63

Source: FDA drug labeling via NLM DailyMed, data as of October 31, 2026. FDA data (DailyMed, Orange Book, Drug Shortages, enforcement reports). Not a substitute for the advice of a doctor or pharmacist.